Deck the Halls with Inky Paws 2018 Blog Hop

Hello Everyone,

I am so excited to be part of  Deck the Halls with Inky Paws 2018 Blog Hop with Newton’s Nook Designs!  As a cat lover (I have two furry kitties) I cannot resist to any kitty images, so of course kitty images from them attracted my eyes.

I wanted to create something simple but cool at the mean time. The idea of creating a white border came up to my mind.  I masked four edges of a rectangle watercolor panel using wide washi tapes. Then I ink blended uncovered area using Tim Holtz Distress oxide ink in Worn lipstick and Tumbled Glass. I stamped snowflake and holly images from Newton’s Holiday Mischief Stamp set using Versamark ink and heat embossed with white embossing powder. Then I stamped the sentiment ” meowy christmas!” with Memento Tuxedo Black ink.

For the main character of this card, a kitty cat in Christmas mood. I stamped the image onto a piece of  Neenah Solar white 80lbs Card stock paper using Memento Tuxedo Black ink and colored with copic markers. I hand cut the image with my trusty scissors. If you want to save some time, you could purchase the Coordinating dies for it. I attached this kitty with a Christmas hat to the inked background with a piece of foam tape. To make this simple card not so boring. I purposely resized the panel a little smaller than A2 size. I adhered it onto an A2 sized card base with foam stripes to create 3D dimensions.


Deck the Halls with Inky Paws Exclusive! 
Newton’s Nook Designs is also releasing a NEW mini 2×3 stamp set today called Ginger Snap!! This fun new stamp set will only be available at Newton’s Nook Designs online shop and you can get it for FREE this week with a $30 purchase! Offer is valid until Friday, December 14, 2018 or while supplies last. This new stamp set is also available for purchase for $4.99.
Enter to Win! Deck the Halls with Inky Paws Hop Prizes! 
We will be choosing two lucky winners to win a $25 store credit for Newton’s Nook Designs online shop! To enter, just leave comments on the Design Team Member and Guest blogs (see list below)! Two winners will be chosen at random from the collective blogs in the blog hop. Make sure to check out each of their blogs and comment for your chance to win. You will not know which blog has been chosen so the more you comment on the better your chances are of winning! You have until Sunday, December 9th at 9 pm EST to comment — winners will be announced on the NND blog on Monday, December 10th.

Thank you so much for stopping by! Enjoy your hop and Good luck!

Fa-La-La-La Meow – Newton’s Nook

Good morning!

Welcome to Deck the Halls with Inky Paws Week! I am so honored to be one of  Featured Guests for Newton’s Nook Designs Today!

To create my dark blue background, I used watercolor paints over a piece of 100% cotton watercolor paper. You do get better watercolor blending results when you use higher quality papers. Then I spread Nuvo Glimmer paste over Newton’s Nook Evergreens Stencil using a craft spatula. Since it takes about 15 mins to dry, I rest it aside and started to color the image from Caroling Newton Stamp set with copic markers. I hand fussy cut the image, but you could get Coordinating die for it to save your time.

Once the paste dried, I splattered some white ink over the background to create the stars in the night sky. For bigger droplets, I used a paint brush to place them in selected areas. Oh…I guess I got controlling issue. I stamped the sentiment “fa-la-la-la meow” that comes with this Caroling Newton Stamp set with Versamark ink and heat embossed with white embossing powder. At last, I arranged all carolers in front of tress to create my scene.

Thanks for visiting and Have a wonderful day!

Happy Winter- Pretty Pink Posh

Happy Friday Crafty Birdies!

I haven’t update my blog for about 2 weeks because I was working hard to make tons of surprises for December. Be sure to “Stalk” my blog and Instagram because there are lots of cards and inspirations coming up to you!

After suffering the side effect of Butte county fire for 10 days, we finally had some rainy days. It’s so precious to have some water since California is becoming a desert year by year. The rain helped with cleaning out bad air pollution as well. Thank goodness!!!

Today I am sharing this card to welcome Winter.I started off Copic coloring all stamped images from Pretty Pink Posh Winter Wonderland Stamp set. Once they are colored, I cut them out with scissors. To save your time and energy, you could try to cut them with Coordinating dies. To create the background, I ink blended with Tim Holtz Distress oxide ink in Tumbled Glass onto a piece of Tim Holtz Distress watercolor paper.  Then I splattered whole bunch of white ink over the background to create snowy day effect.

I used Pretty Pink Posh Storybook 6 die to create the frame. I raised the frame with Foam tape to create some dimensions.  Then I arranged all images around the frame and stamped the sentiment “Happy Winter”. In order to make it more interesting, I added Pretty Pink Posh Jewels in Starry Sky Mix and Seed Beads in Sparkling Clear.

I hope you like this card and I will see you around very very soon!

PPP November Product Release Blog Hop + Giveaway

Welcome everyone to Day 1 of Pretty Pink Posh November 2018 release Blog Hop! It’s about Holiday Season. So let us bring you some holiday spirits with our products! I am showing you three cards that I made for this Blog Hop today.

<Card 1>

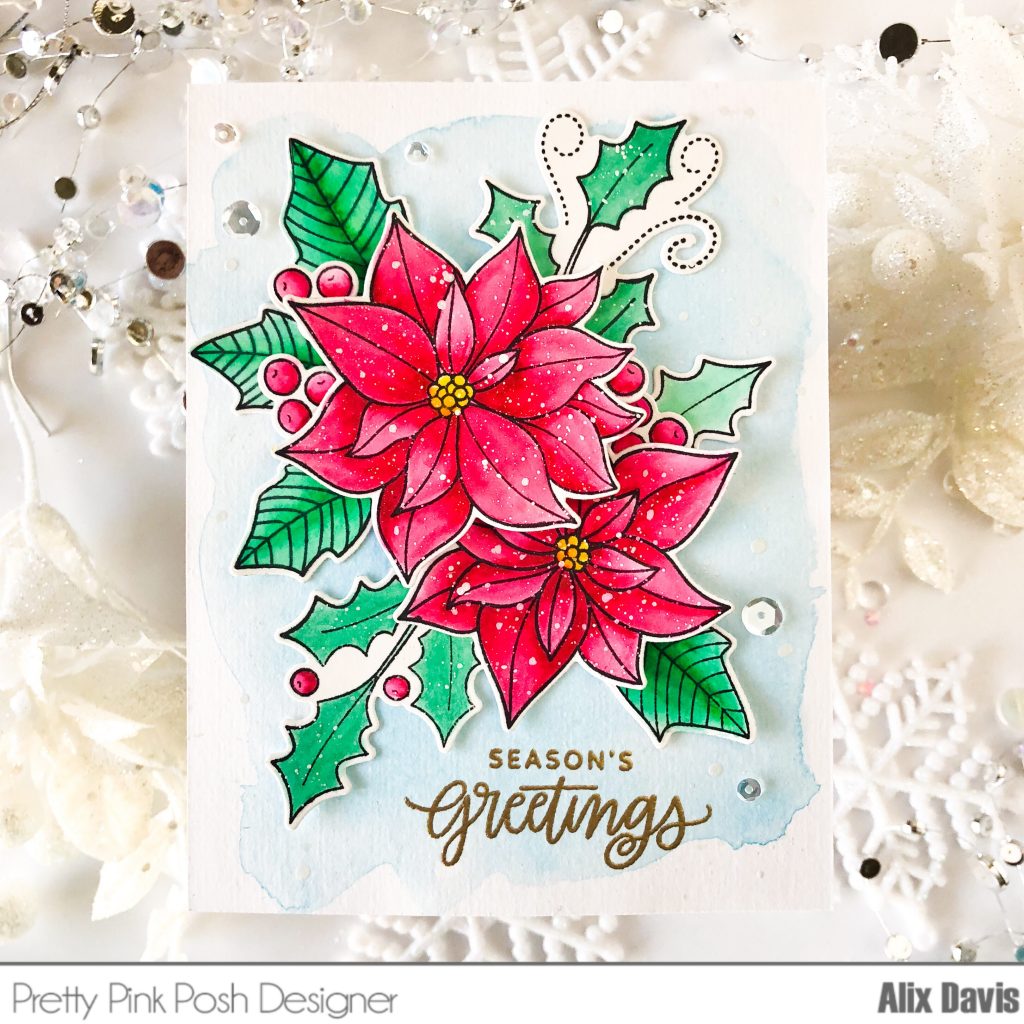
For my first card, I colored images with Kerutake Zig Clean Color Real Brush Markers from Pretty Pink Posh Poinsettias and Elegant Holly Stamp sets onto Bristol Smooth paper and die cut them with coordinating dies (For Poinsettias / For Elegant Holly)  I highly recommend you to use coordinating dies so you could boost up your productions for upcoming holiday card making.

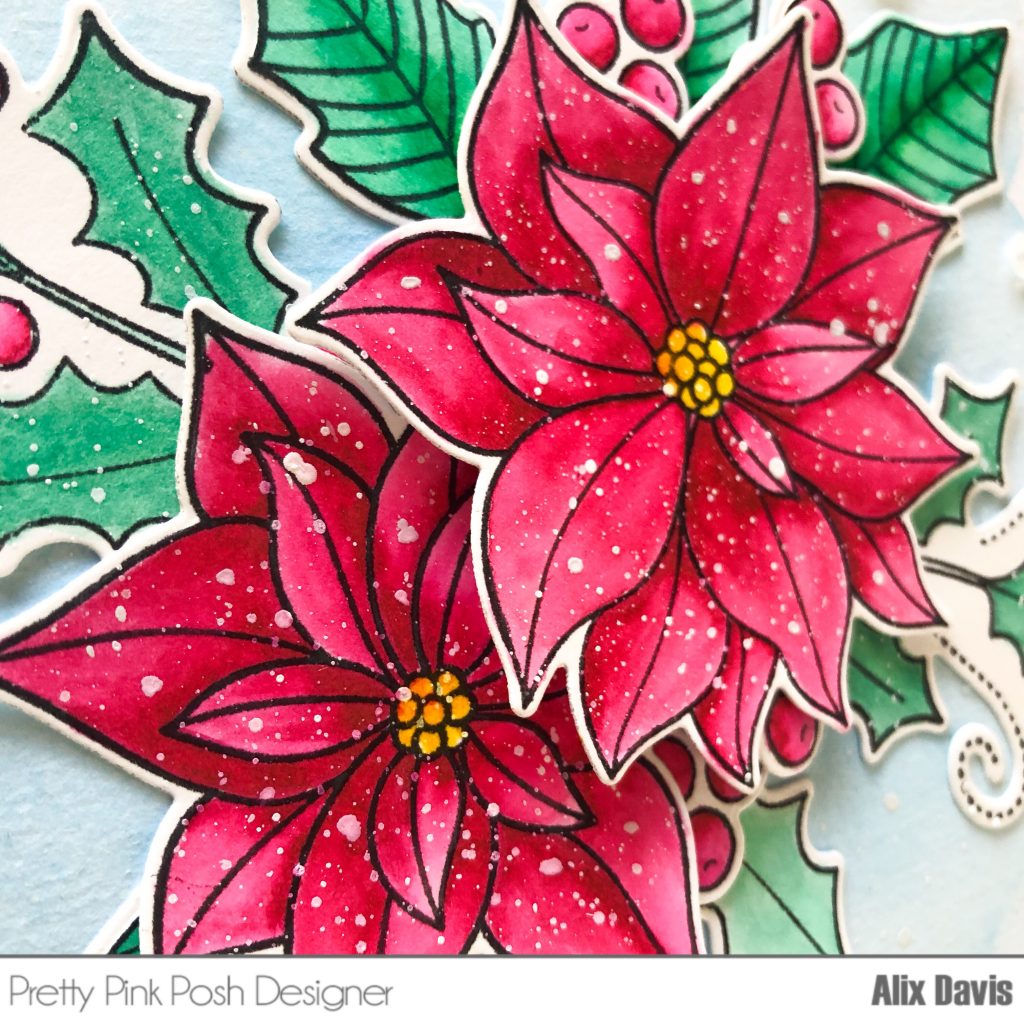
I grabbed a piece of Tim Holtz Distress watercolor paper and randomly added a thin layer of watercolor paint in light blue. Once it’s dried, I splattered the same paint along with some white paint over the background. I assembled my colored images onto the background using Multi Medium Matte and Foam tape. For floral arrangement, I searched google images to get inspirations. To create snow flakes laying on the Poinsettias and the leaves, I also flicked some white paint over them.

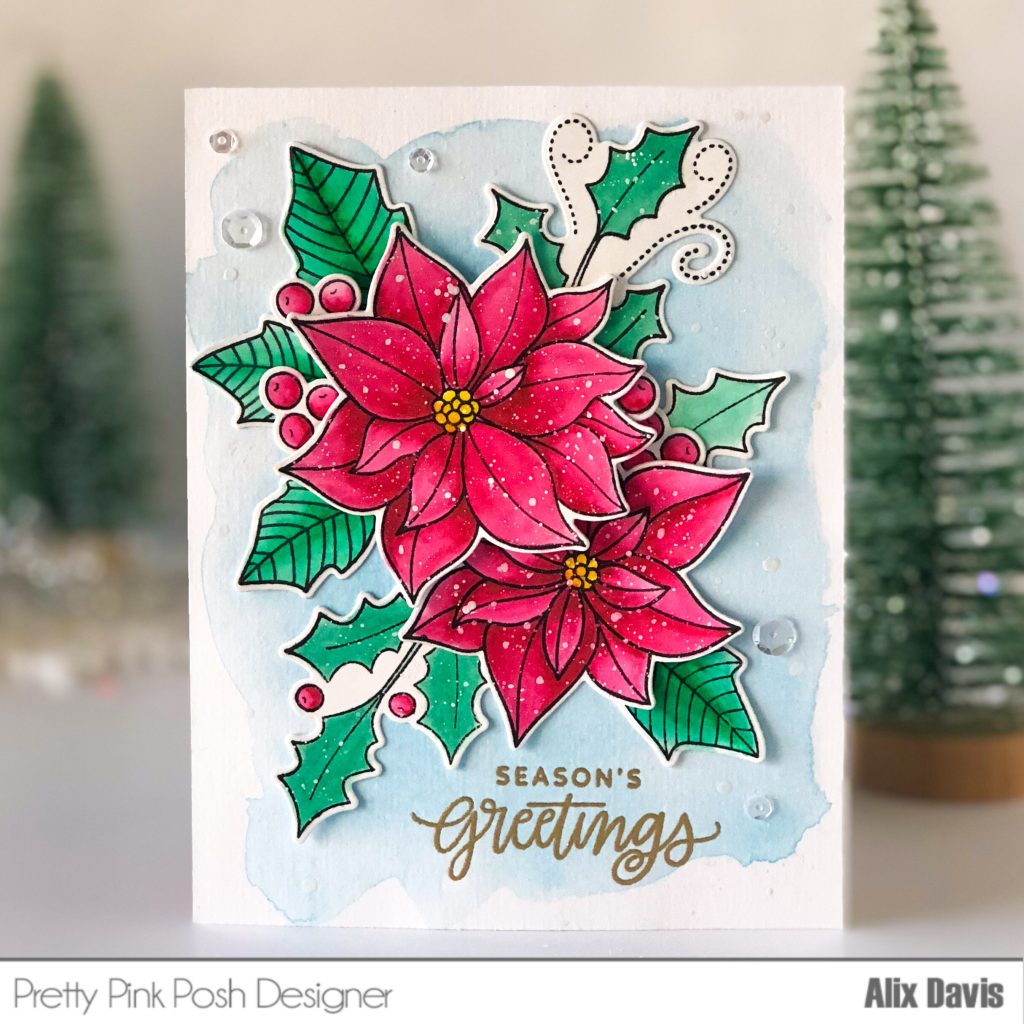
At last, I stamped the sentiment “Searson’s Greetings” to the lower corner of card using Vesamark embossing ink, then embossed them with Gold embossing powder and heated to set. I embellished the background using Pretty Pink Posh 4mm Sparkling Clear Sequins and 6mm Sparkling Clear Sequins to finish.
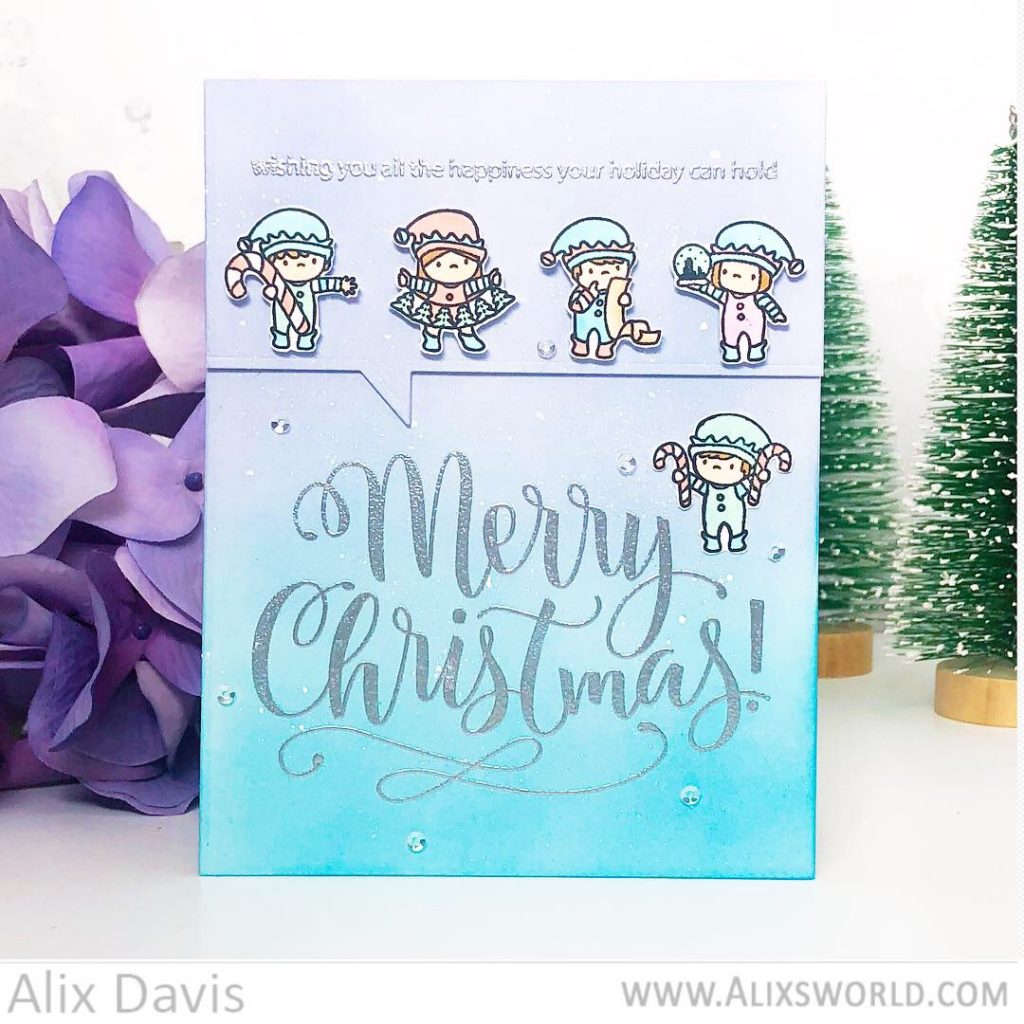
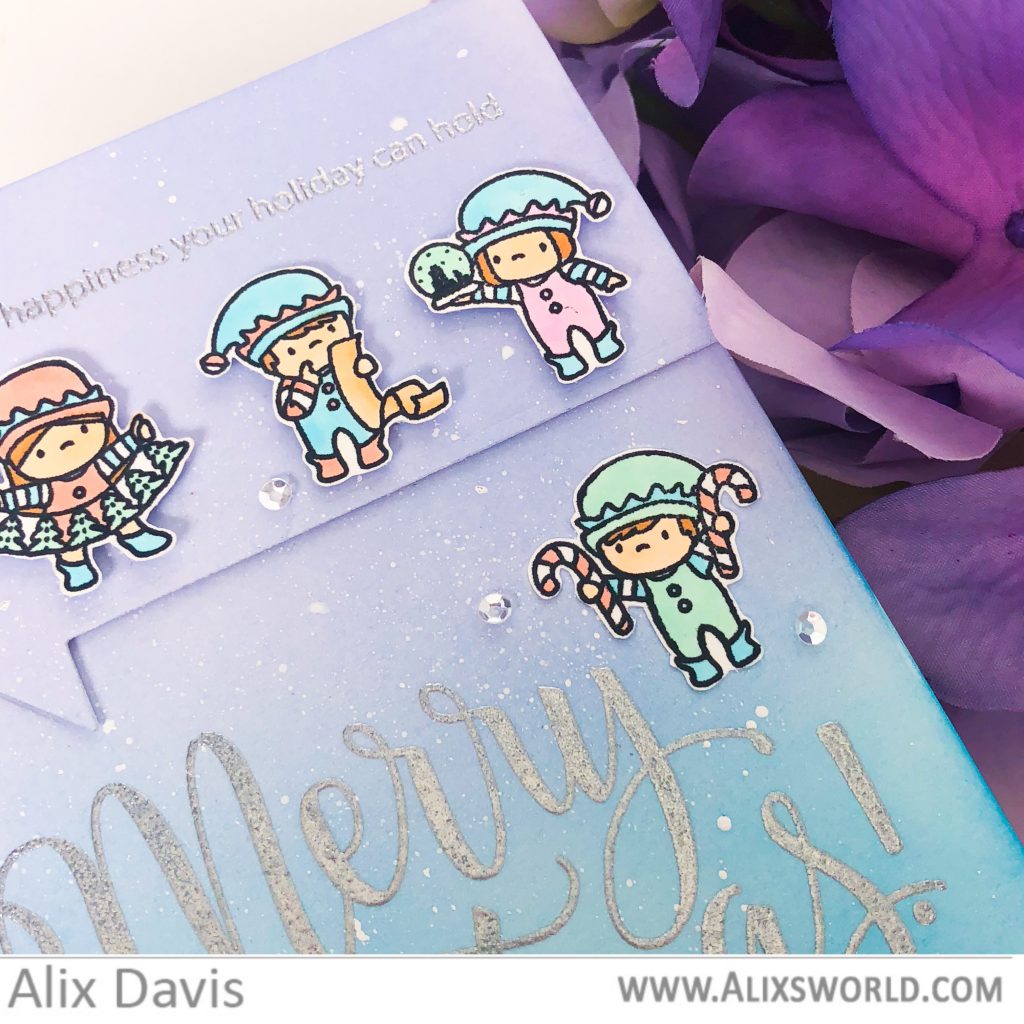
 

<Card 2>

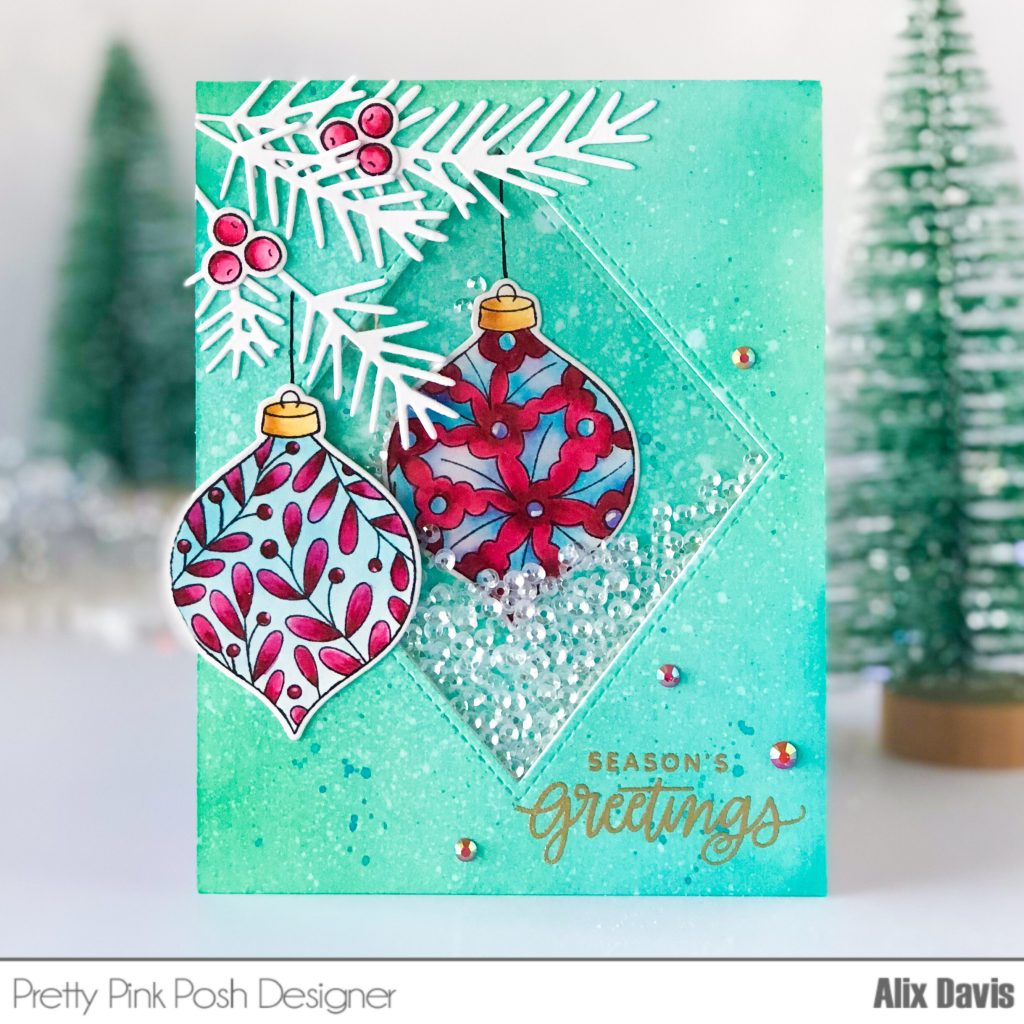
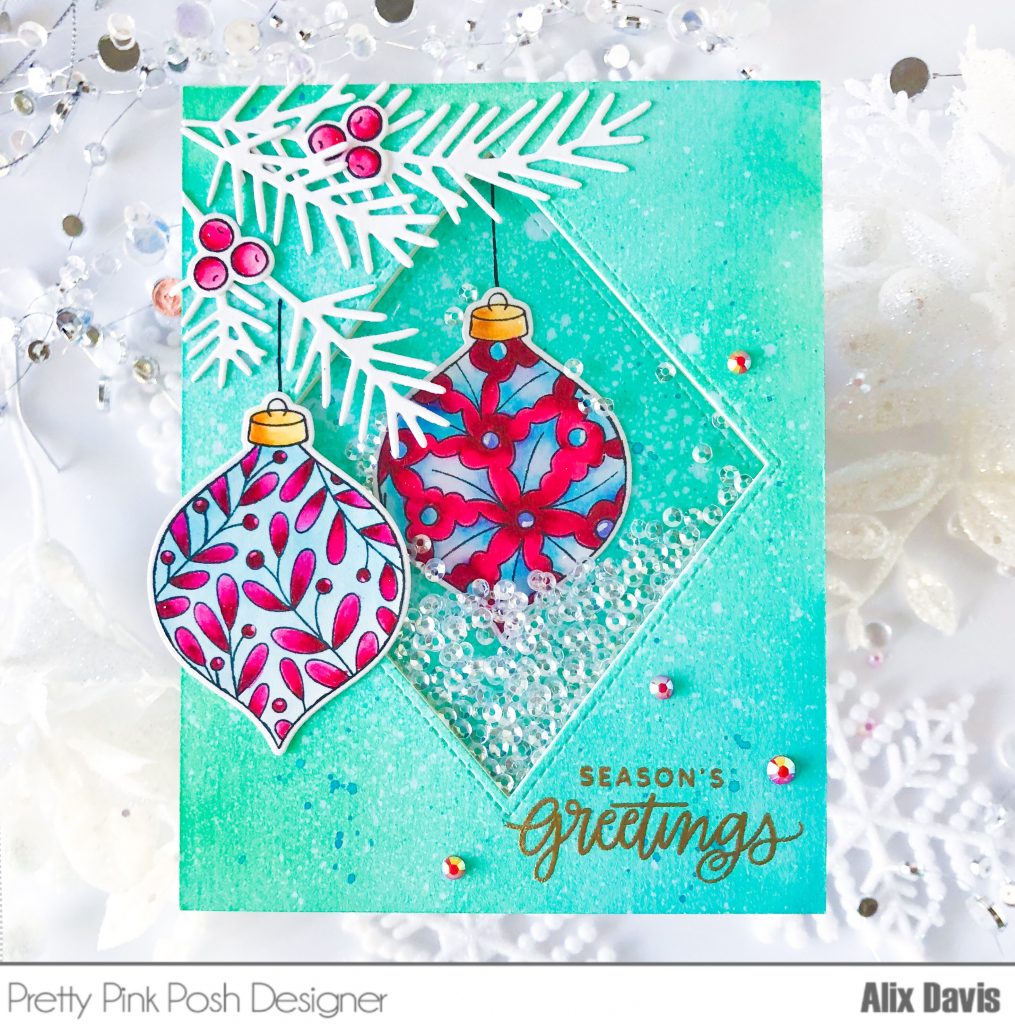
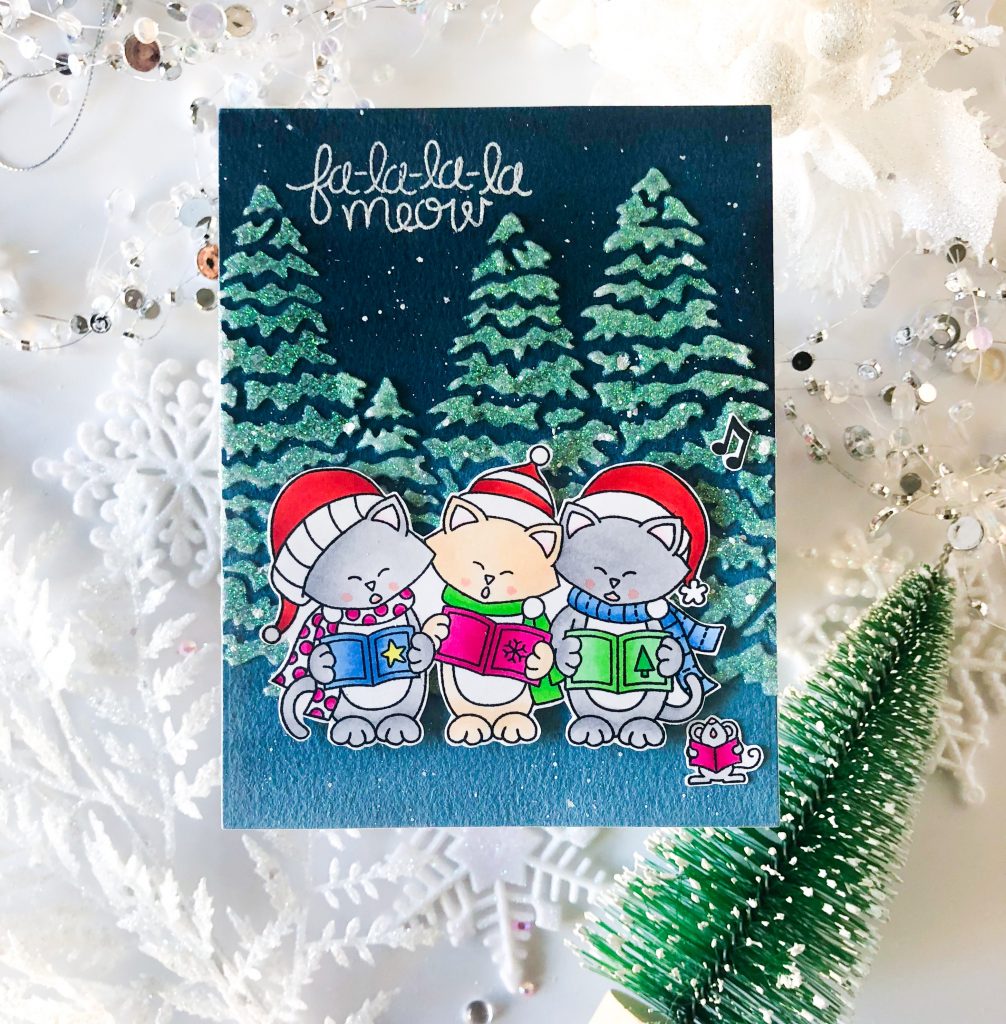
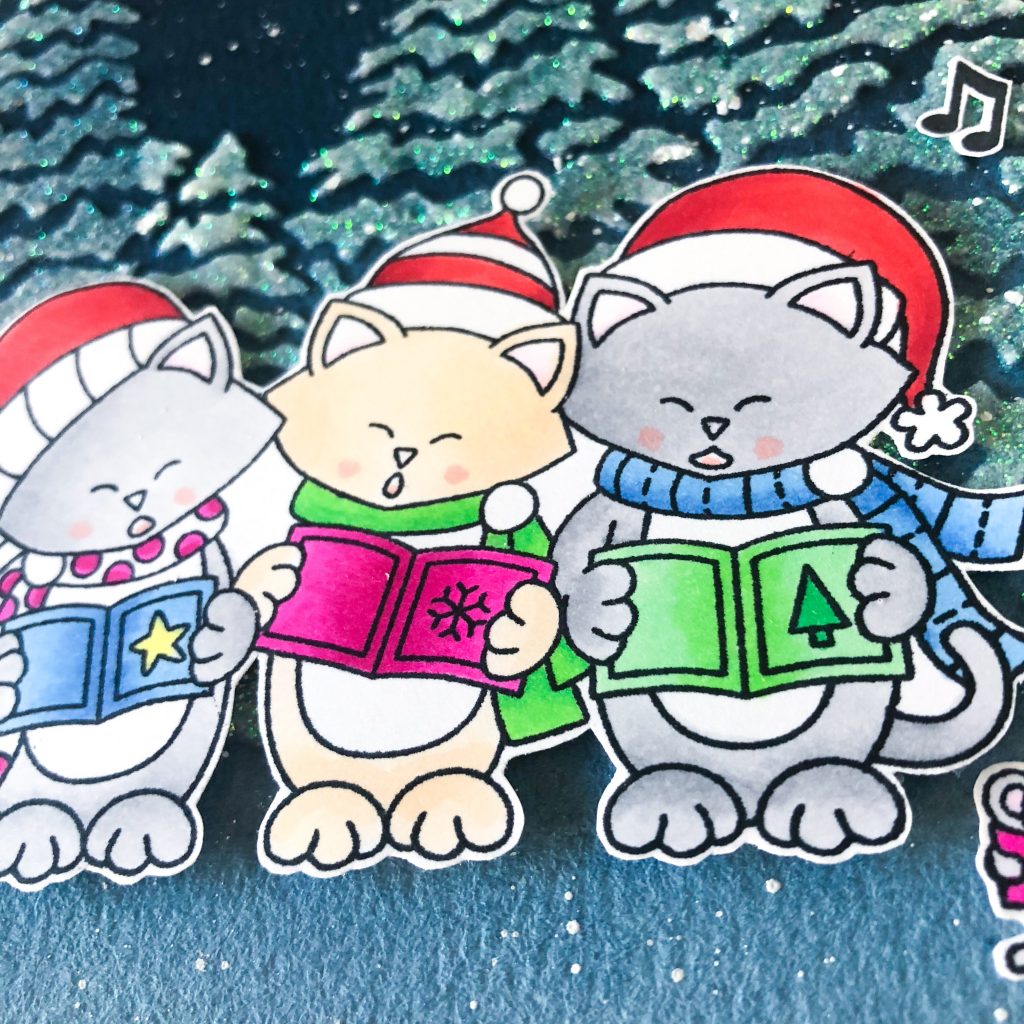
My second card is a shaker card. Of course! We are with Pretty Pink Posh, the shaker elements heaven! I colored images with Kerutake Zig Clean Color Real Brush Markers from Pretty Pink Posh Decorative Ornament Stamp set and die cut them using the Coordinating dies. I also die cut the pine branch from a piece of white card stock paper using Pretty Pink Posh Pine Sprigs Dies and set them aside for later use.

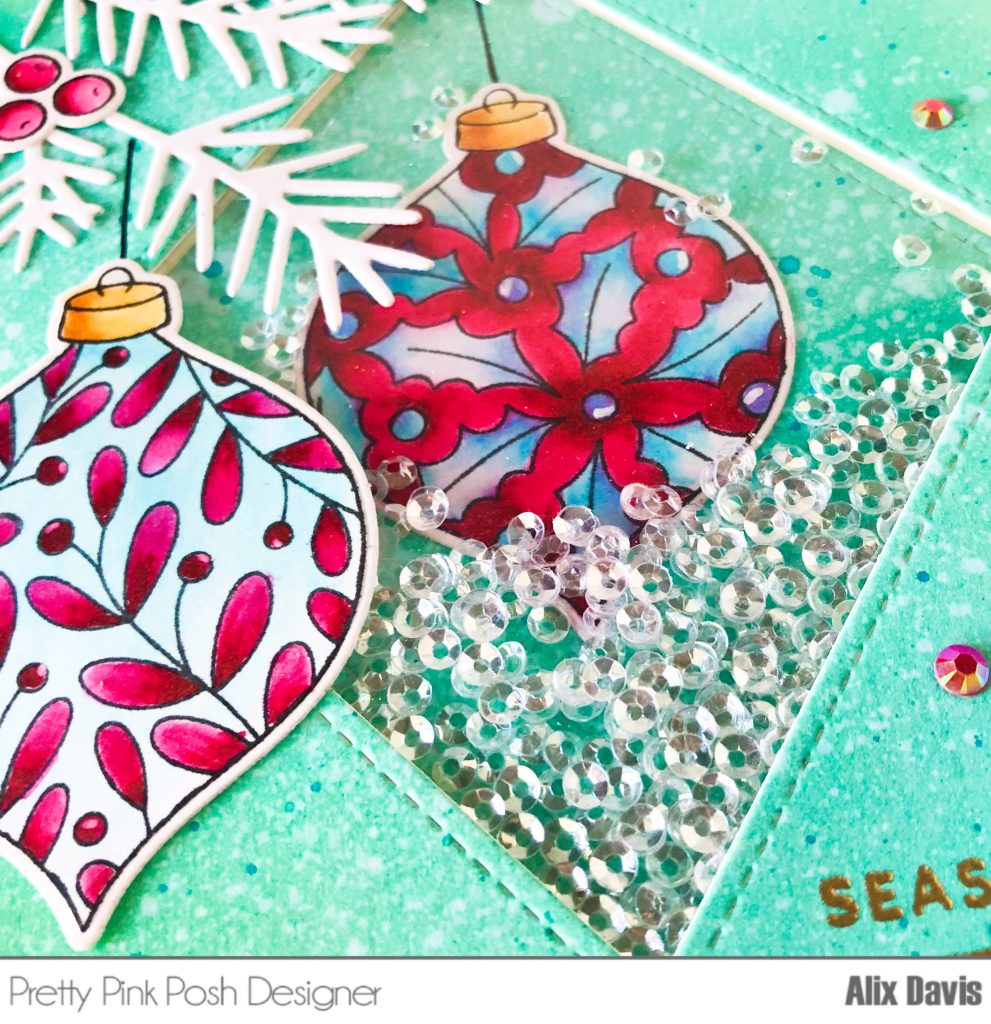
To create the background, I ink blended with Tim Holtz Distress oxide ink in Peacock Feather and Lucky Clover onto an A2 sized watercolor paper. I splattered water and quickly removed all liquid with paper towel to create distress look. Then I splattered the mixture of Peacock Feather ink with water over the background. Once it’s dry, I started to create my shaker window. I positioned Pretty Pink Posh Stitched Diamonds Die in the center of card panel to cut my window. I attached a piece of acetate paper right underneath of window opening. I adhered a colored ornament image to the negative of the window cut out along lots of Pretty Pink Posh 3mm Sparkling Clear Sequins. I sealed the window using Foam Stripes.

I attached colored images and die cuts onto the front panel. I stamped the sentiment “Searson’s Greetings” to the lower corner of card using Vesamark embossing ink, then embossed them with Gold embossing powder and heated to set.  To add some interests, I  used couple of berry images from Pretty Pink Posh Elegant Holly Stamp set and I scattered a few Pretty Pink Posh Jewels in Raspberry color.


<Card 3>

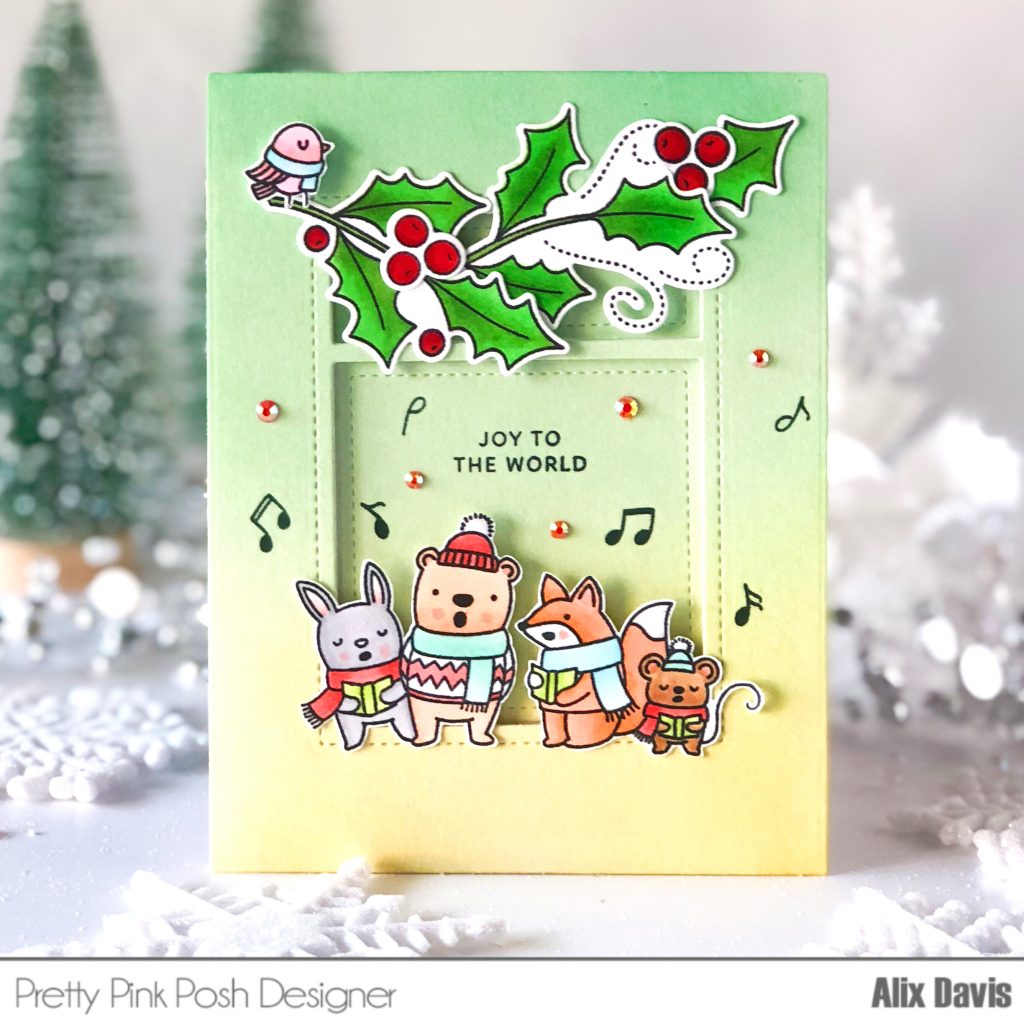
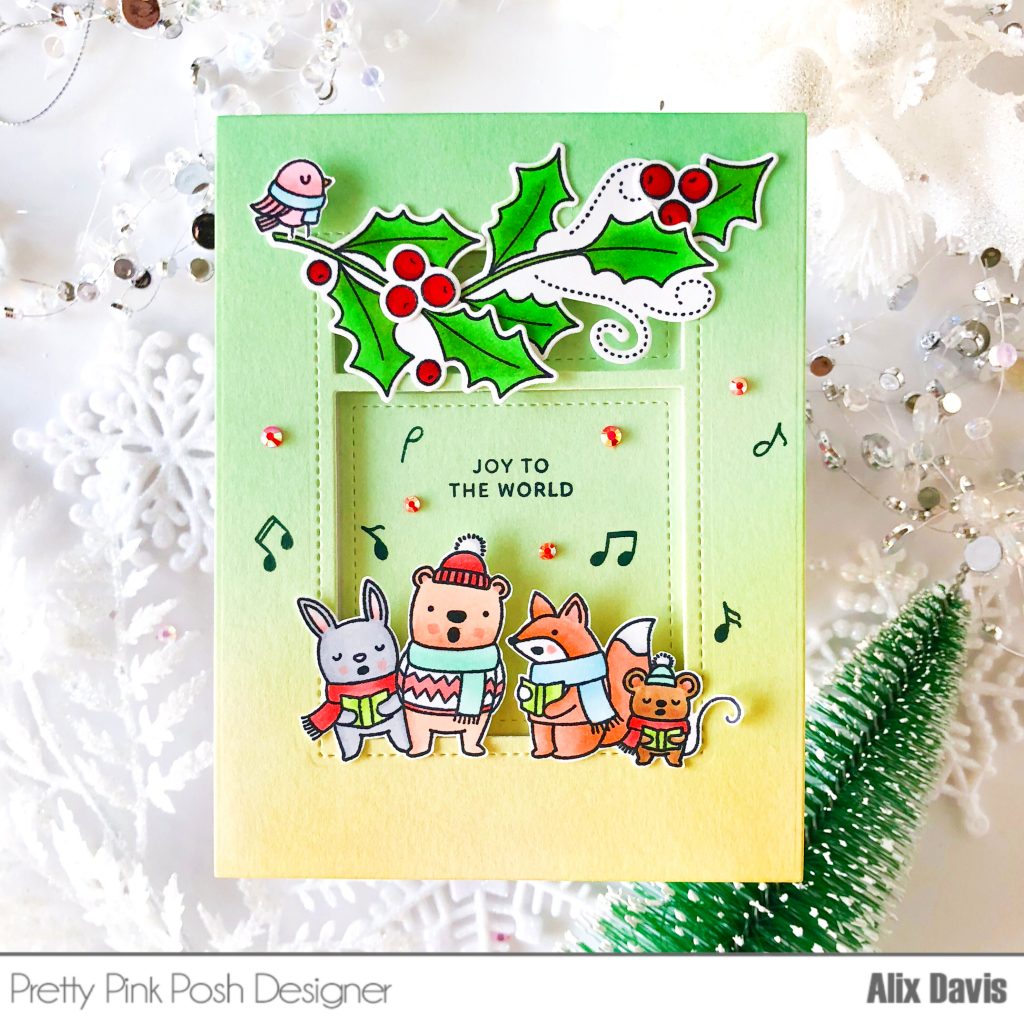
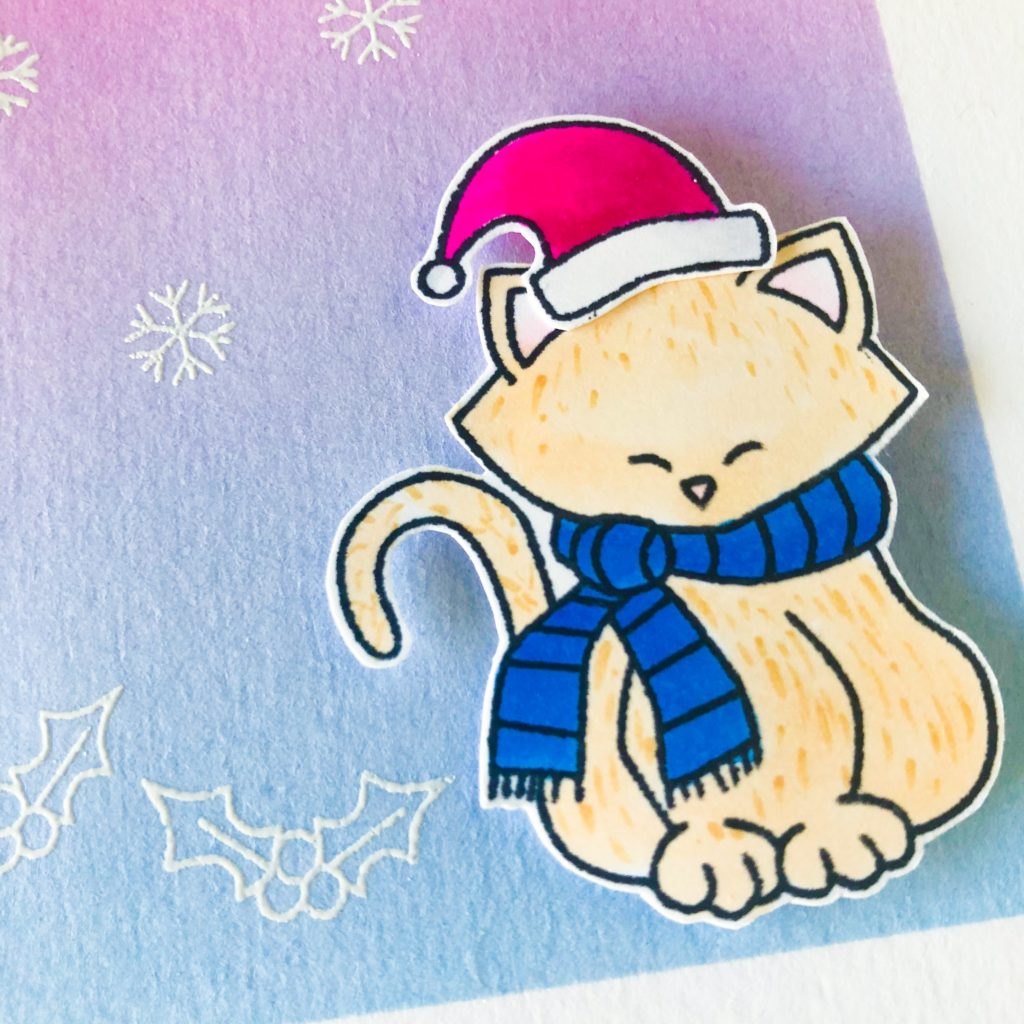
Now let’s shift to a cute and whimsical card. I colored the images from Caroling Critters Stamp set with my copic markers and hand fussy cut them apart. I also colored holly leaves from Elegant Holly Stamp set and cut with it’s coordinating dies.

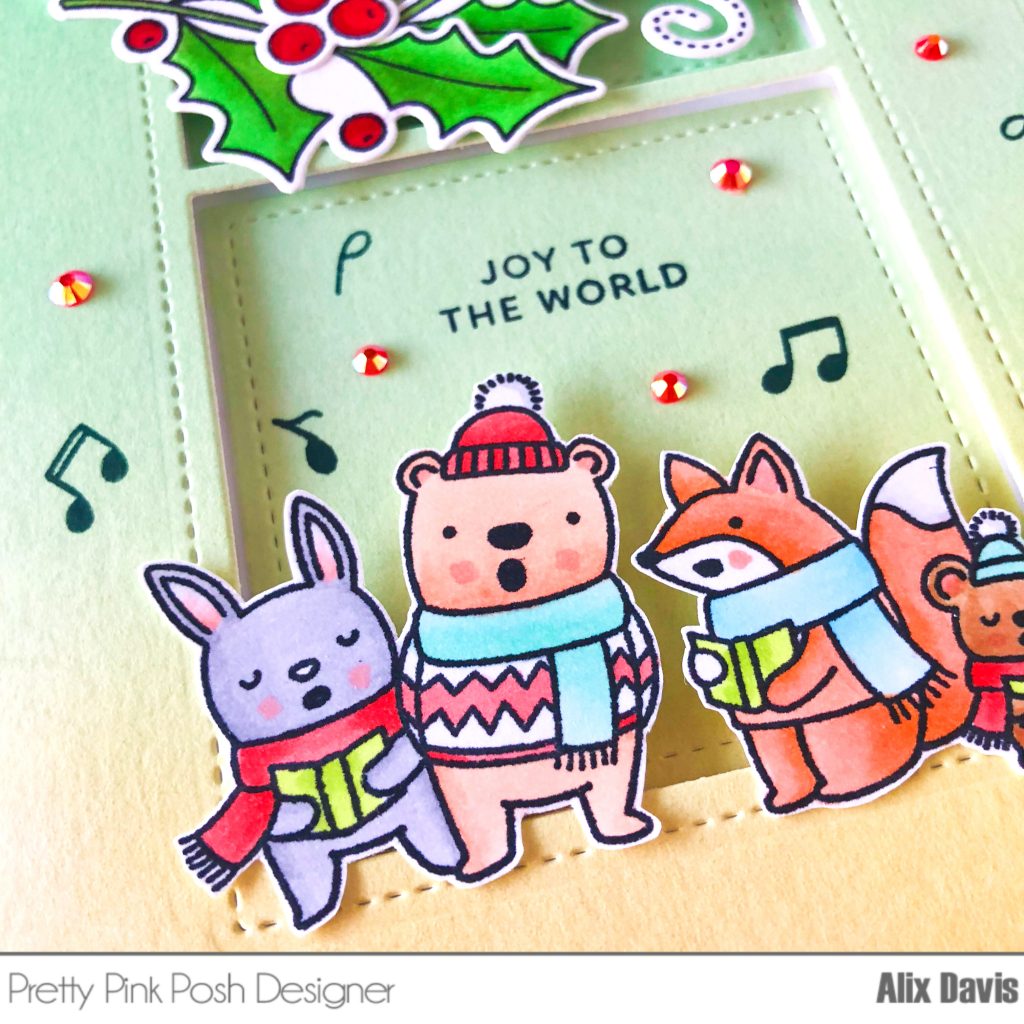
I ink blended the background using Tim Holtz Distress oxide ink in Twisted Citron and Mowed Lawn. Then I cut the window using Pretty Pink Posh Storybook 5 die. I raised the window cut out with some Foam strips to make it more 3D. I assembled all prepared pieces onto the background panel and then stamped music notes and sentiment that are also from Caroling Critters Stamp set. In the end,  I added Pretty Pink Posh Jewel in Raspberry to pull everything together.

There are 4 $25 gift certificates up for grabs (two winners each day). Winners will be picked randomly along the blog hop. Comments must be left by 11:59 PM PDT on 11/20/2018. Winners will be announced on the PPP blog. Hop with us now!

Pretty Pink Posh blog 
Amy Yang
Alix Davis (You are here)
Jeanne Jachna
Kay Miller
Angelica Conrad
Melody Rupple
Mindy Baxter
Yoonsun Hur
Thi Lam
Heather Hoffman
Nichol Spohr
Kelly Latevola

25 Days of Christmas Tags Blog Hop – Pretty Pink Posh

Hello and welcome to the 8th annual 25 Days of Christmas Tags by Tracey McNeely. I am very happy to be joining this event for the first time with Pretty Pink Posh.

I came up with idea of making 3 tags using Pretty Pink Posh Angel Friends Stamp set and other dies and embellishments.I colored all images from Angel Friends Stamp set and Fussy cut them with scissors. To save you tons of time, you could get the matching dies. I then die cut the background using Pretty Pink Posh Scallop Diamond Tags Die to prepare all tags. Now it is time to decorate them!

<Tag 1>

I ink blended with Tim Holtz Distress oxide ink in Tumbled Glass. I splattered ink and water mixture on the top to bring some interests. Then I die cut from a piece of white cardstock paper using Tic Tac Toe Die and attached it to the background with Foam stripes. I attached colored images and embellish the tag with Pretty Pink Posh Jewel in Sea Glass and 3 mm Sparkling Clear Sequins.

<Tag 2>

I ink blended with Tim Holtz Distress oxide ink in Picked Raspberry. I splattered ink and water mixture on the top to bring some interests. I simply attached colored images using Foam tape to finish this tag. Sometimes, less is more!


I cannot resist to make a shaker, so I made my last tag a shaker tag. I ink blended with Tim Holtz Distress oxide ink in Shaded Lilac and wilted Violet. Then I used Pretty Pink Posh Stitched Diamonds Die to cut inside of my prepared tag in order to create a window. I added a piece of acetate paper underneath the frame, poured some Pretty Pink Poshs Seed beads in Lilac and Sparkling Clear, then closed the window with Foam stripes. At last, I arranged colored images on the top.

You are also invited to play along and make your own tags and link them up. Be sure to check out Tracey’s blog to read more about the 25 Days of Christmas Tags event and how you can win all sorts of fantastic prizes and be inspired to create.

No automatic alt text available.

Thanks so much for stopping by! Happy crafting!

Have a Pawsome Birthday – Isabel Cristina Stamp

Hello there,
I hope you had a great weekend so far. Raise your hand if you are a dog lover!I am here introducing you a digital stamp set called Small Doggies from Isabel Cristina Stamp.
To begin with my card, I printed out all digital stamp images using my home inkjet printer and hand fussy cut selected images. Then I colored them with my trusty copic markers.


I did ink blending onto a piece of cardstock paper using Tim Holtz Distress ink oxide in fossilized Amber and Worn lipstick. I cut the background panel using Mama Elephant Fancy Door Frame-Creative Cuts out of a piece of white cardstock and attached it over my inked background.

1

I arranged colored images onto the card panel, cut sentiment that comes with this digital stamp set and color it with copic marker to match the main scene color. I added Pretty Pink Posh Jewels in Pink Blush and Lemon Drop to finish my card.

Be sure to head out Isbael’s Etsy Shop for this stamp set and many more products!


Elves’ Christmas Wishing-Mama Elephant

Friday Finally!

It’s been up and down week for me and my family. I hope we could relax this weekend to catch our breath. How’s your week so far?

Since you can not go wrong with any pastel colors. I colored some images from Mama Elephant Little Elf Agenda using my copic markers and cut them with scissors, then I have them set aside for later. I pulled out an A2 sized Bristol Smooth paper and ink blended it with Tim Holtz Distress oxide ink in Shaded Lilac and Mermaid Lagoon. I splattered white paint to create snowflakes background.

I used a die from Mama Elephant Speech Trio to split the card to two parts. For the lower part, I stamped big script “Merry Christmas” sentiment from Mama Elephant Merry Christmas Wishes using Versamark ink and heat embossed with silver embossing powder. I lined up four cute elves on upper part of card using Foam tape and stamped small sentiment also from Mama Elephant Merry Christmas Wishes. To match the lower sentiment, I did heat embossed silver as well. I added one more elf for fill an empty space and finished the card by adding Pretty Pink Posh 3mm Sparkling Clear Sequins.

I hope you like my card. I will see you soon with more new projects!


Happy Turkey Day-Pretty Pink Posh

Happy Wednesday!

The weather is getting a little cooler and tree leaves are turning a little yellower. We all know Thanksgiving is approaching! It is time to pull out my Pretty Pink Posh Happy Turkey Stamp set to play! This is a mini set which means you get everything with price point.

To make this card, I cut the frame using Pretty Pink Posh Storybook  5 die out of a piece of A2 sized watercolor paper. I ink blended the front panel with Tim Holtz Distress oxide ink in Seedless preserves, Aged Mahogany and Wilted violet, then inner window with Fossilized Amber and Carved Pumpkin.

After I attached a piece of acetate and  Foam Tape underneath the frame and attached it onto background panel to create a 3D Shaker window. Before I closed up the window, I poured Pretty Pink Posh Seed Beads in Lilac and Daffodil.

To decorate the card front, I colored all images from Happy Turkey Stamp set and color them with my Kuretake Zig Clean color real brush markers. I hand fussy cut them but feel free to using the Coordinating dies. I attached them using glue and Foam tape. At last, I used Pretty Pink Posh Jewel in Espresso to finish my card.

Be sure to check out Pretty Pink Posh Blog to see all inspirations. Pretty Pink Posh has 15% off items in the Thanksgiving section!

Pretty Pink Posh + Glue Dots Collaboration Blog Hop

Please join us for a fun collaboration blog hop with Pretty Pink Posh and Glue Dots !We are going to bring you a fun blog hop where there are PRIZES from both companies up for grabs, along with inspiration and videos. The crafters involved in this hop are going to bring you an array of projects, coloring inspiration and a variety of ways to have fun with both Pretty Pink Posh & Glue Dots collectively.

To begin with my card, I cut the frame with a rectangle die such like Pretty Pink Posh Stitched Notes Die from an A2 sized watercolor paper. I ink blending the positive and negative parts of die cuts using Tim Holtz Distress oxide ink in Tattered Rose (For the frame) ,  in Mowed Lawn an Carved Pumpkin (For the background).

In order to create a shaker window, I adhered a piece of acetate paper using Glue Dots Permanent Glue tape. I stamped sentiment onto the background first, then I cut 6 strips of paper to add underneath the front panel for raised dimension. I poured Pretty Pink Posh Jewel in Marigold, Seed beads in Spring Green and 3mm Sparkling Clear Sequins, and firmly sealed the window with Glue Dots Permanent Glue tape again.

To decorate the front panel, I colored images from Pretty Pink Posh Pumpkin Patch Critters Stamp set using g Kuretake Zig Clean Color Real Brush Markers on a piece of Bristol smooth paper and cut with Coordinating Dies. I also die cut the leaf shapes from Pretty Pink Posh Small Stitched Foliage Dies and inked with Tim Holtz Distress oxide ink in Mowed Lawn, Carved Pumpkin and Worn Lipstick. I arranged them using Glue Dots Glue Squares and Glue Dots Pop-up dots for some dimensions. At last, I added some Pretty Pink Posh Jewels in Marigold to finish.

***GIVEAWAY***

No blog hop is complete without some prizes. Are you ready for some awesome giveaways? Each company has a prize pack to give away!

Glue Dots Prize Pack- An assortment of adhesives valued at $100!

Pretty Pink Posh Prize Pack- An assortment of goodies up to the value of $75!

The only thing you need to do for a chance to win is leave a comment on each of the design team members blogs!

Winners will be chosen at random from comments left on all blogs on the blog hop by 6:00 AM PST on October 23rd. Winners will be announced on the Pretty Pink Posh and Glue Dots blog.

We have a super talented line up ahead….

Glue Dots blog

Danielle

Caly

Samantha

Alix (You are Here)

Robyn

Melody

Suzy

Heather

Pretty Pink Posh blog

You make life fun- Pretty Pink Posh

Wednesday Hello from me!

Wednesday is that day in the middle of the working week that we need to struggle to love. It is difficult to see Wednesday as exciting and thrilling because most of us spend every Wednesday working hard. one thing for sure is that it is better than Monday and its coming close to Friday!How about brightening up your days with some cute animals then?

To create the background, I applied 3 watercolor paints from Kerutake Zig Clean color Real brush Markers (#023, #052 and #202) onto a piece of A2 sized watercolor paper, and set aside to dry. I stamped selected images from  Pretty Pink Posh Cuddly cat stamp set and colored with real brush markers, then die cut them using Coordinating Dies.

I cute the window using Pretty Pink Posh Mini Storybook 1 Die , I trim the edge of window to create an actual window frame for kittens to sit on.  When my watercolor background is dried, I splattered some white paint over it to create interests. I attached the window frame onto the lower right corner using Foam tapes.

I arranged my colored images and stamped sentiment from Pretty Pink Posh Simple Sayings: Life using Memento Tuxedo Black ink. I added Pretty Pink Posh 3mm Sparkling Clear Sequins and Jewels in Lemon Drop and Pink Blush to finish my project.

A quote to share,

Inspiration is one thing and you can’t control it, but hard work is what keeps the ship moving. Keep up the good work.

– Kevin Eubanks