Thanks from a cute bear

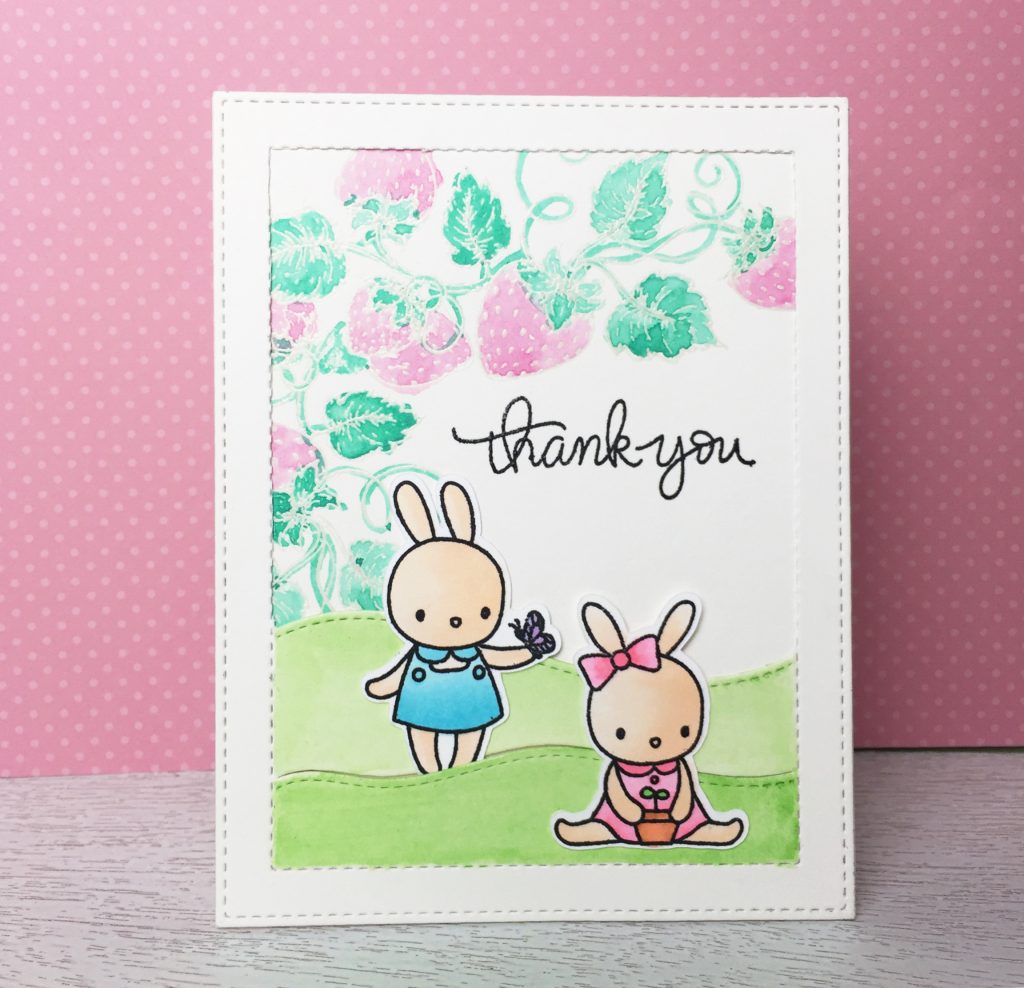
I am back from a Long Long break since May, 2016. Making cards is very soothing, stressful also in a good way.

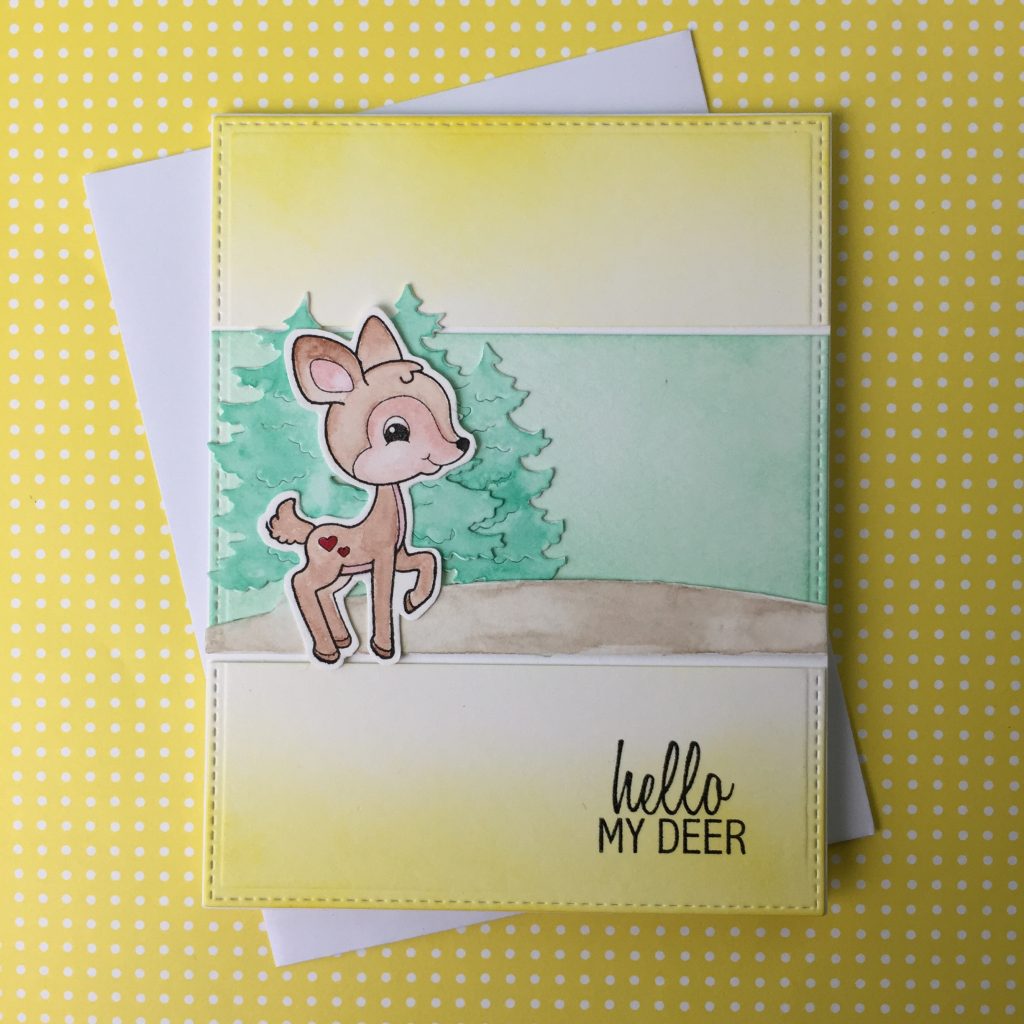
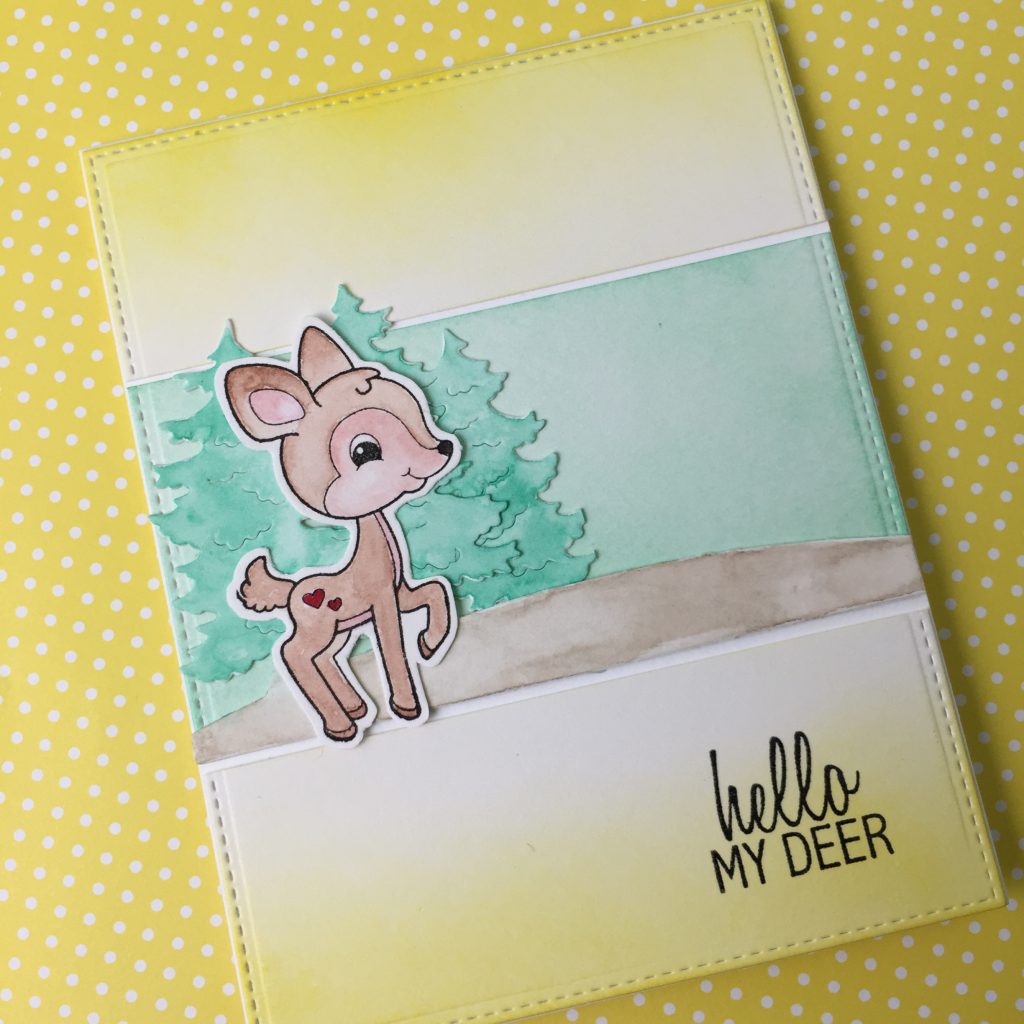
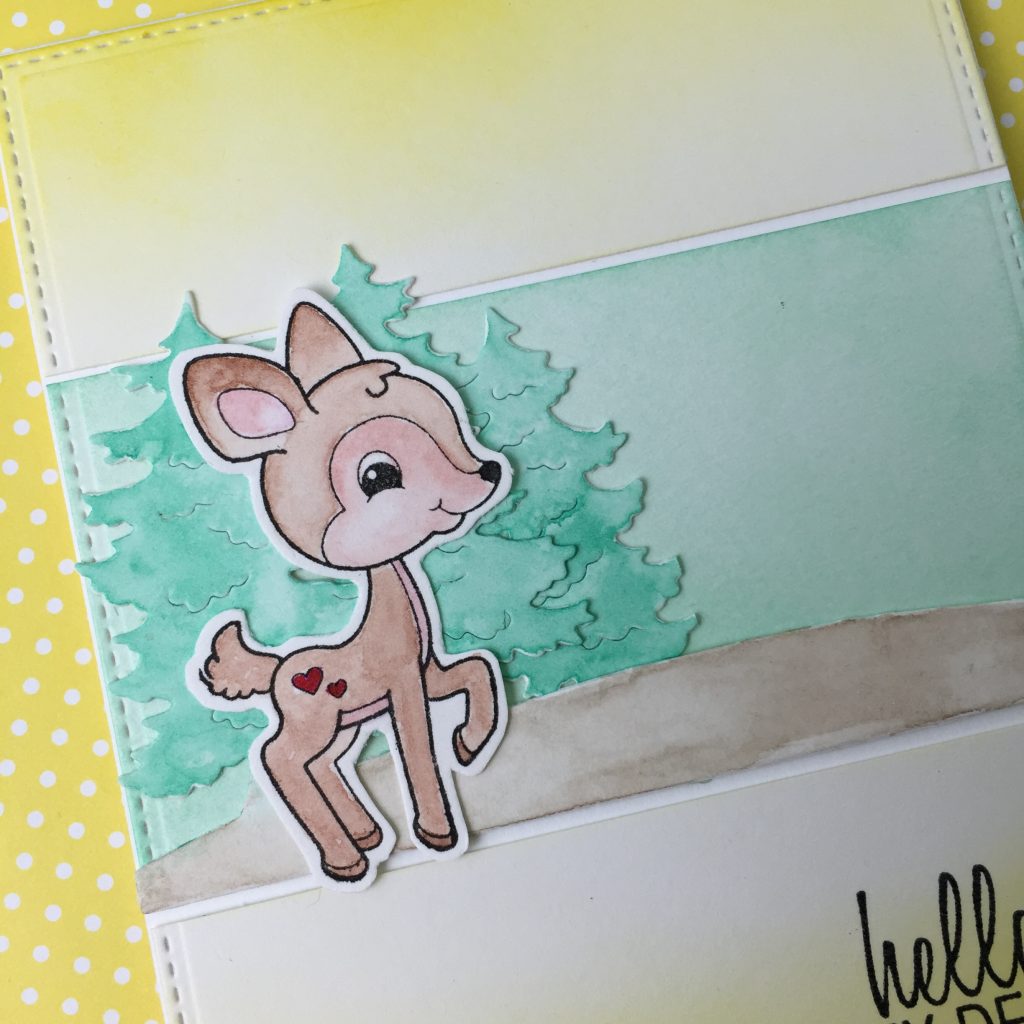
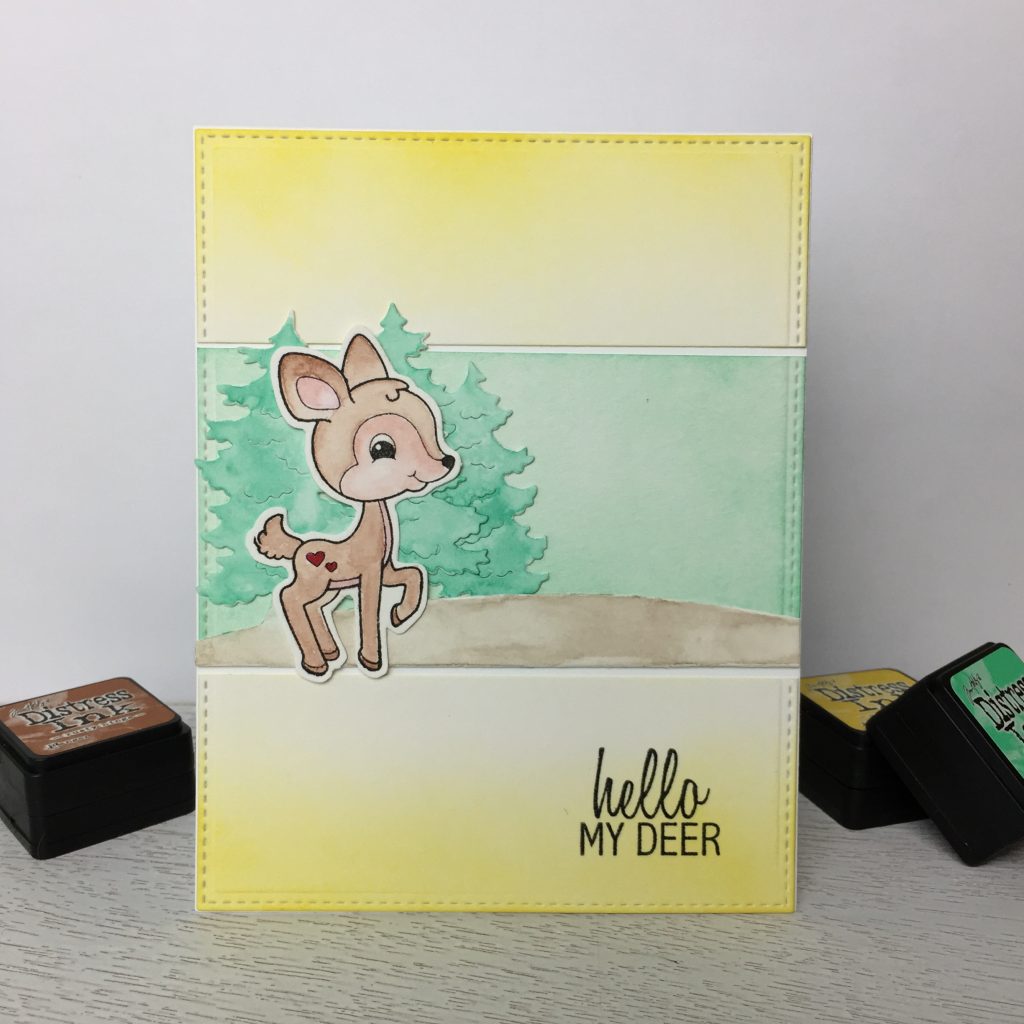
For this card, I used Waffle flower Bear&Bird Stamp set .

IMG_5474

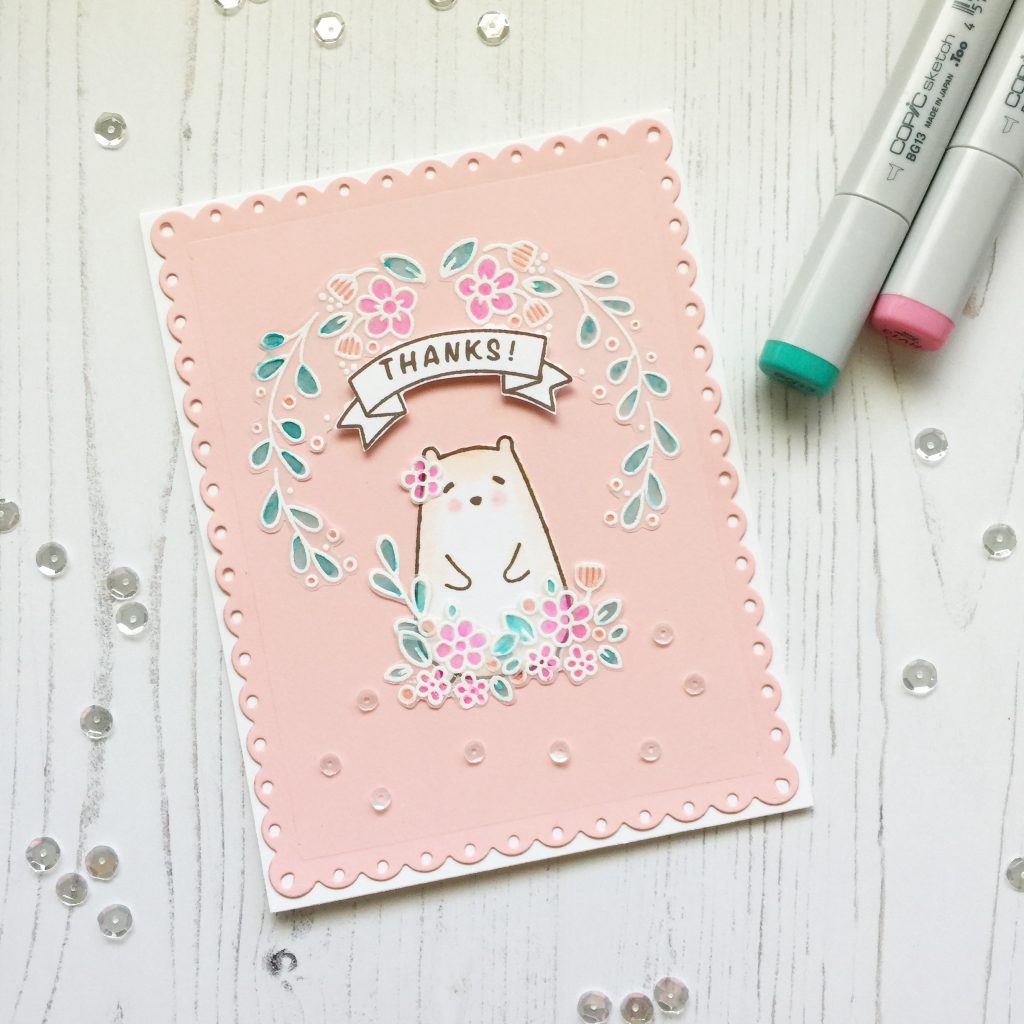
  1. I stamped flower and leaves images on velum paper using VersaMark ink, then used WOW white embossing powder.
  2. I also stamped bear image on Neenah solar white paper using Memento ink in Rich coco.
  3. I colored all images with copic markers and fussy cut them out.
  4. I cut the background using Lawn fawn Fancy scalloped rectangle stackable die
  5. Glued everything on the background and decorated the bottom with Pretty Pink Posh 4mm Marshmallow Sequins
This entry was posted in Cards.

Oh I love you Daddy

This is the first card that I made during Memorial long weekend. It’s been more than a week since my last creation. My dad’s birthday is coming up in three weeks. This card is perfect for him!


27309018086_88bd7062fd_o

27309016366_85302569b5_o

27244867492_183ca25523_o

  1. Cut out the background and frame using My Favorite Things Wonky stitched rectangle dies.
  2. Blend the background with distress inks.
  3. Add foam tape under the frame to create 3d effect.
  4. Copic coloring images  and adhere them onto the background. The stamp images are from Mamaelephant Cud Cuddles stamp set.
This entry was posted in Cards.

Sweety Fruity

Summer time is pretty much here. I have home grown strawberries to share and I also like to make my own lemonade or limeade. Why don’t I make some tags with my homemade goodies to our nice neighbors?! I came up with this idea and straightly dive in the process. I am using Your next stamps Jam-Packed full of fun stamp set.

27224895376_2d4ab1866f_o

27224895306_1cec6693fe_o

26983171350_7f7057185b_o


26983173850_1ec65122b4_o

27224893366_23d20d4db9_o

1.   I cut out the tags and essentials using My favorite things Tag builder blueprints 5 with Neenah Solar White 80lbs cardstock.

2.  To prepare the background, there are 3 ways to do it. I stamp the images with simple copick coloring, cover the whole background with copic coloring or blend distress ink color.

3.  Since they are shaker tags, of course I add my sequins stash. I don’t have a lot sequins color options so they are my best choice. Gosh, does that means I need to hoard the sequins     too? My drawers are very full!

4.  Assemble the tags with glue and foam tape.

5.  Decorate the top of tag with some more stamped images, sentiments or leave it as it is.

6. Attach color coordinating baker’s twines to finish the tags

This entry was posted in Cards.

Your Next Stamp Sketch Challenge #39

Who doesn’t love cupcakes for their birthday? No one! Sending this sweet card to a birthday girl/boy would be a fantastic choice! I fell in love with this image the first time I saw it. This is the first time that I color it probably because I am becoming a craft hoarder LOL. The stamp set is called Jessica with cupcakes from Your next stamp .

26971615922_6fa2ff7551_o

26462096563_58b19fc77e_o

12

27065946585_5ca7061070_o

  1. I stamped the cupcake image 3 times on the masking tape, then cut them out for masking purpose.
  2. Stamped the same cupcake image with versamark ink to overlapping pattern by using the masking images I prepared, then embossing it with clear embossing powder.
  3. Cut 2 long stripes of masking paper to create a vertical rectangle space, then distress it with distress ink in spun sugar.
  4. Colored all images with copic markers. Cut out Jessica image and adhere it with foam tape on the card base panel.


This entry was posted in Cards.

Happy birthday to my baby bear

When I start to create a scene, I always like to make up a story. Mama bear took baby bear to the strawberry stand for a treat because it’s baby bear’s birthday. They cheer up when they get there. Isn’t it cute?!

26987318726_735d5c6e99_o

26952511351_457373d03c_o

26926624042_1804fc3c0a_o

26415292484_93f293d2f5_o

  1. I stamped the background stamp which is Berry Cafe from Heartfelt creations with versafine ink, then embossed it with clear embossing poweder. The paper I used is Canson XL watercolor paper.
  2. I colored the background image using Gansai Tambi watercolor paint.
  3. I colored the bear image from Mamaelephant Cub Cuddles stamp set using Copic markers.
  4. Popped up the bear image with a foam tape to create 3D demesion, then adhere the whole image panel on 110lb cardstock base.
This entry was posted in Cards.

Your Next Stamp Sketch Challenge #38

Hello my deer! I’ve been thinking about making this scene for a few days but I had no time to create. I quickly put everything together before Mae get off school. I mainly used watercoloring and distress inking techniques. This card can be a Valentine’s Day card or a card for a friend. There are a lot of potential with “Oh my deer”  this sentiment.

26335455893_1312fc538c_o

26939968805_3d66197c8f_o


26845595512_9228c70a53_o

26845595362_19056c5820_o

YNSSketch38

  1. I cut out the background panel with a die from MFT Die-namic blueprints 25, then cut them to 3 parts.
  2. I inked the background by using Tim Holtz distress ink in mustard seed and cracked pistachio.
  3. For the background forest scene, I used my cottagecutz die. The deer image and sentiment is from Your Next Stamp Oh Deer! stamp set.
  4. I colored the deer image and the forest scene by using Gansai Tambi watercolor paint.
This entry was posted in Cards.

Sisters’ Love

In the strawberry world, two bunny sisters like to play with each other….

When I experiment a new background, I always do a tryout for colors and textures to make sure it works. I ended up having two backgrounds because tryout and final all turned out good. Then why not use them?!

26117632434_c1da788484_o 26698056426_a0793f0159_o

26724083875_bfe415a018_o

  1. For the background, I white heat emboss the bloomingberries onto a watercolor paper. Then I cut the frame with mamaelephant Hillside Cover die. I cut some parts off and left two hills at the bottom.  I watercolored the background image and hills with Gansai Tambi watercolor paints.
  2. Copic colored the bunny image from pix’s favorite stamp set and adhere it onto the background.
  3. Stamped the sentiment with versamark in oynx black.
This entry was posted in Cards.

A bunny who lives in strawberry world

Welcome to strawberry world! Unrealistic large strawberries comparing to the bunny makes you feel like being in a fairy tale. Trying to have simple watercoloring the background and it worked.

26657942221_370c002925_o

26451435940_c8150cc97e_o  ;26630597182_b565e2883a_o

  1. I stamped Bloomingberries image from Heartfeltcreations on Canson XL watercolor paper with versamark ink and embossed it with clear embossing powder.
  2. Watercolored the image and created the lawn background with Gansai Tambi watercolor paints.
  3. Copic colored the bunny  image from mamaelephant pixsfavorite stamp set and adhere it to the background.
  4. I chose sentiment from Wplus9 That is all stamp set with hero arts dye ink in bubble gum.
  5. Framed it with framed tag-madison avenue die. I cut out 3 frames and stack them together to give it some demision.


This entry was posted in Cards.

Monster note cards for Teacher

Teacher appreciation day is coming soon. As usual, I like to make a card or something go with a gift card. I chose mamaelephant Monster Jam stamp set to make note cards for Mae’s teacher. I bet all kids will think its cool to receive a note card like this instead of a white piece of paper. First of all,  let me show ya all the box

26604382531_a5c81c7048_o

26064281174_9a3a48a92b_o

I cut this box by using silhouette cutting machine. It only took me about 15 minutes to cut and assemble them.

  1.  I stamped image on the note card by using memento ink in black
  2. Colored all monsters with my primsacolor pencils.
  3. Added Gamsol to help blend all colors more evenly.

26396736600_5bf95aeb1b_o

26670003925_d20e8c6270_o

This entry was posted in Cards.

Dear coffee, Thanks for being there!

In a cold day, you always appreciate to have a cup of hot coffee. Oh well I am super happy to have my coffee everyday. Thank to people who discovered coffee! Here is a card that could explain how I feel about it.

26557811792_2fd714373a_o

26557804942_e57569a49f_o

26377657930_016056fd6b_o

  1. Cut the background by using die from Cottagecutz. The original die image was a winter sence with deer. I removed deer to fit the purpose.
  2. Ink the background die cut with distress ink in mermaid lagoon and cracked pistachio. At this step, I made a huge mistake to cut out the background before inking it. I should’ve ink the paper first then die cut it. Please learn my lesson. Adhere the background on to 110 lbs white card base.
  3. Stamp image on Neenah solar white 80lbs cardstock with memento ink in black. I colored the bunny with copic marker and cut it out with brother scan n cut 2, adhere it with a foam tape. This cute bunny stamp is from mamaelephant pix’s favorites stamp set
  4. Stamp the grass with Hero Arts dye ink in Mont Julep.