Happy Easter!

Happy Easter and Happy April Fool!

How could these two holidays land on the same day?! I don’t know but it happened. I have this card to share with you all, my crafty friends!

I colored all images with Copic markers from Pretty Pink Posh Bunny Friends Stamp set and cut with coordinating dies. Then set them to aside. I grabbed a piece of Tim Holtz distress watercolor paper and cut it with Lawn Fawn Large Cross stitched rectangle die. I smudged Distress oxide in Squeezed Lemonade and Cracked Pistachio on glass surface, then sprayed some water over it. I pushed the watercolor paper against this color mixture and dry it with heat tool. We are done with the background.

I cut 3 egg shaped frame out of Pretty Pink Posh Decorative egg dies and raised them up with a little bit foam tape. Then I assembled all images with foam tape and Multi Medium Matte.

I stamped the sentiment to the upper corner of background using Memento ink in Tuxedo black. At last, I added some Pretty Pink Posh Jewels in Sea Glass and Lemon Drop.

Hope you all have a great Sunday! I will see you around pretty soon!


This entry was posted in Cards.

Happy St. Paddy’s Day Party

Its been raining, hailing all day. I stayed home making some party decorations for St, Paddy’s day on coming Saturday. First of all,  I colored all images from Pretty Pink Posh Best of Luck stamp set using Copic markers and cut with coordinating dies.  Then  I cut some cupcake wrappers by using my silhouette cutting machine. To decorate it, I adhered colored images and Pretty Pink Posh Shamrock Jewels. I attached some tooth picks on to the back of colored images to make cupcake toppers.

I also cute tags using Pretty Pink Posh Scallop Square Tags Die and added white square paper on the top.  I decorated it with colored images and Pretty Pink Posh Spring Green Jewels.

Now you know how easy to create a scene party with stamp set that you already own. Hope you will have a good time playing with your crafting toys!

PPP March Product Release Blog Hop + Giveaway

march2018hop

Hi Crafty Friends,

I am so honored to join Pretty Pink Posh for their March Product release blog hop. I am madly in love with this brand lately. I started to hoard their products like no tomorrow. If you are one of my Instagram followers, you probably know what I am talking about. I immediately created a few projects out of the March release products. I am showing two of them here to tease you a little.

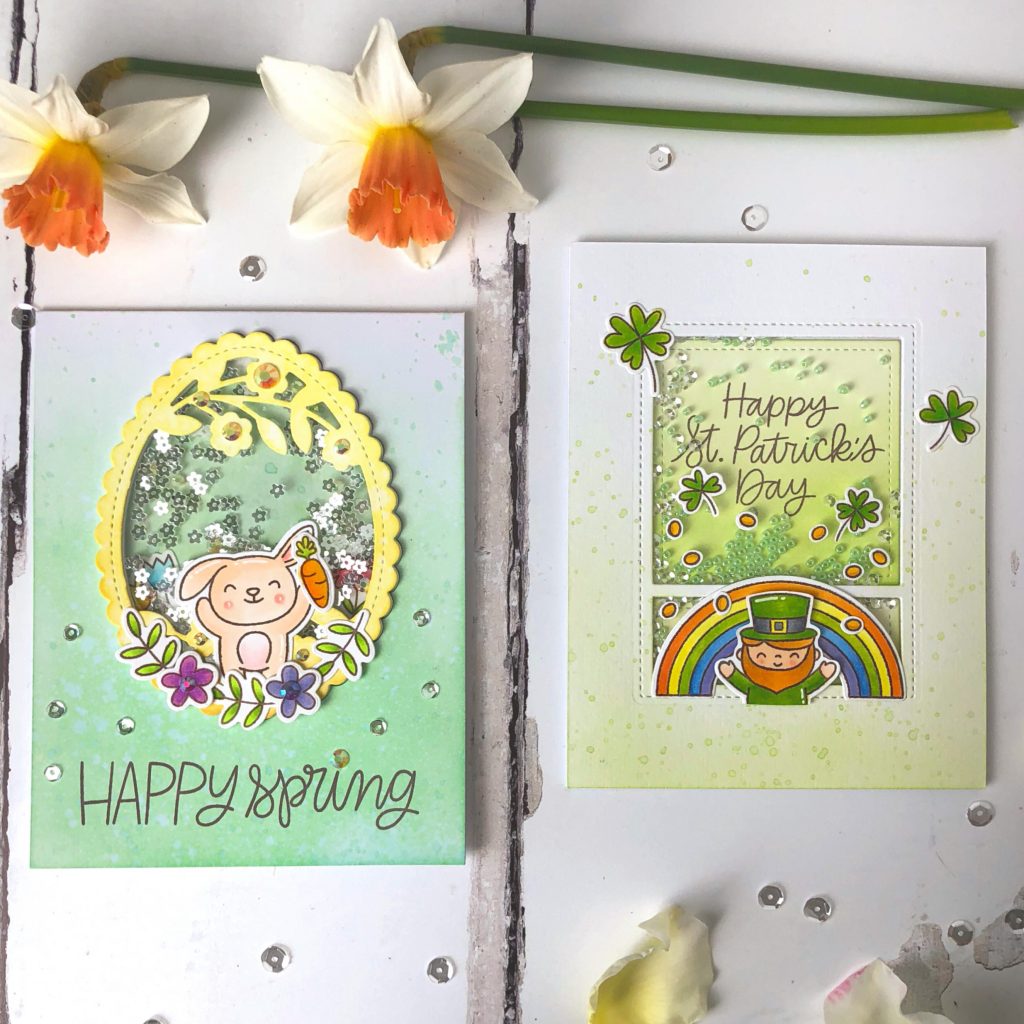
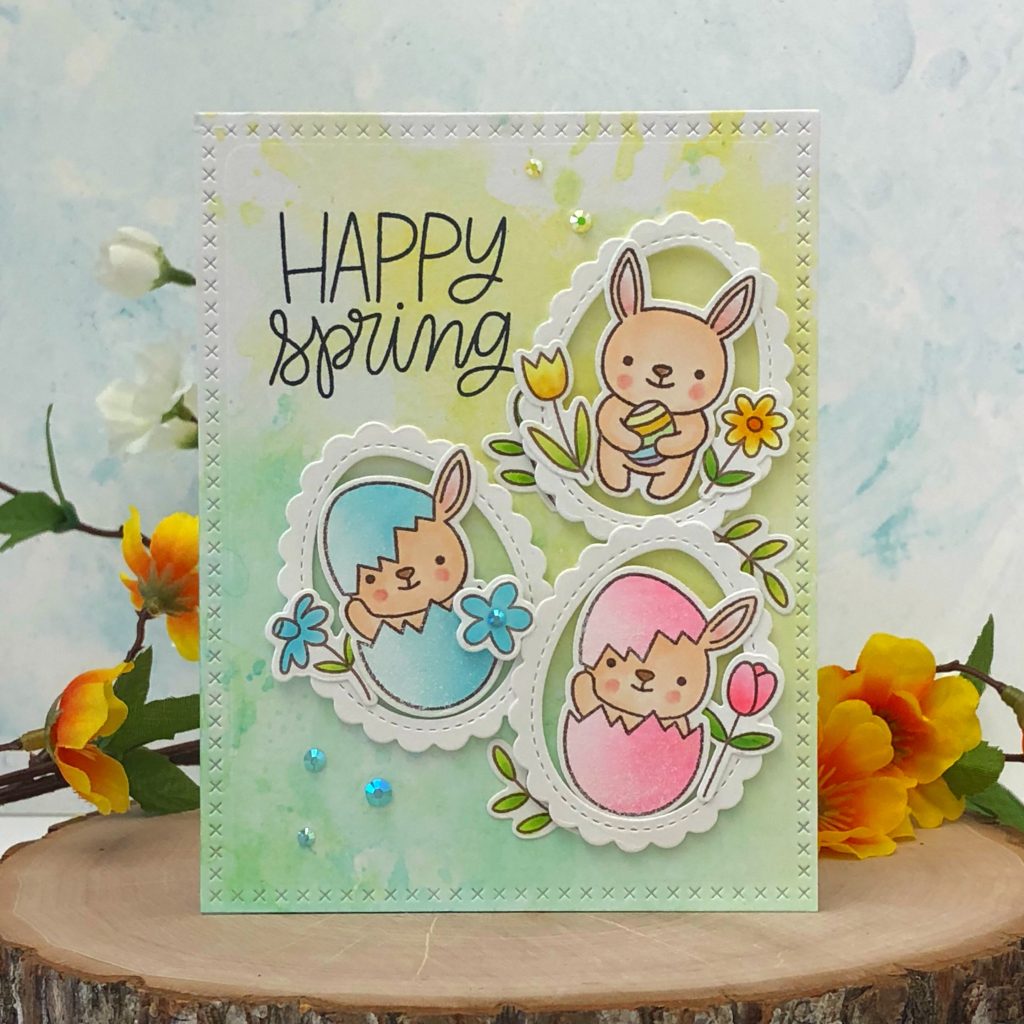
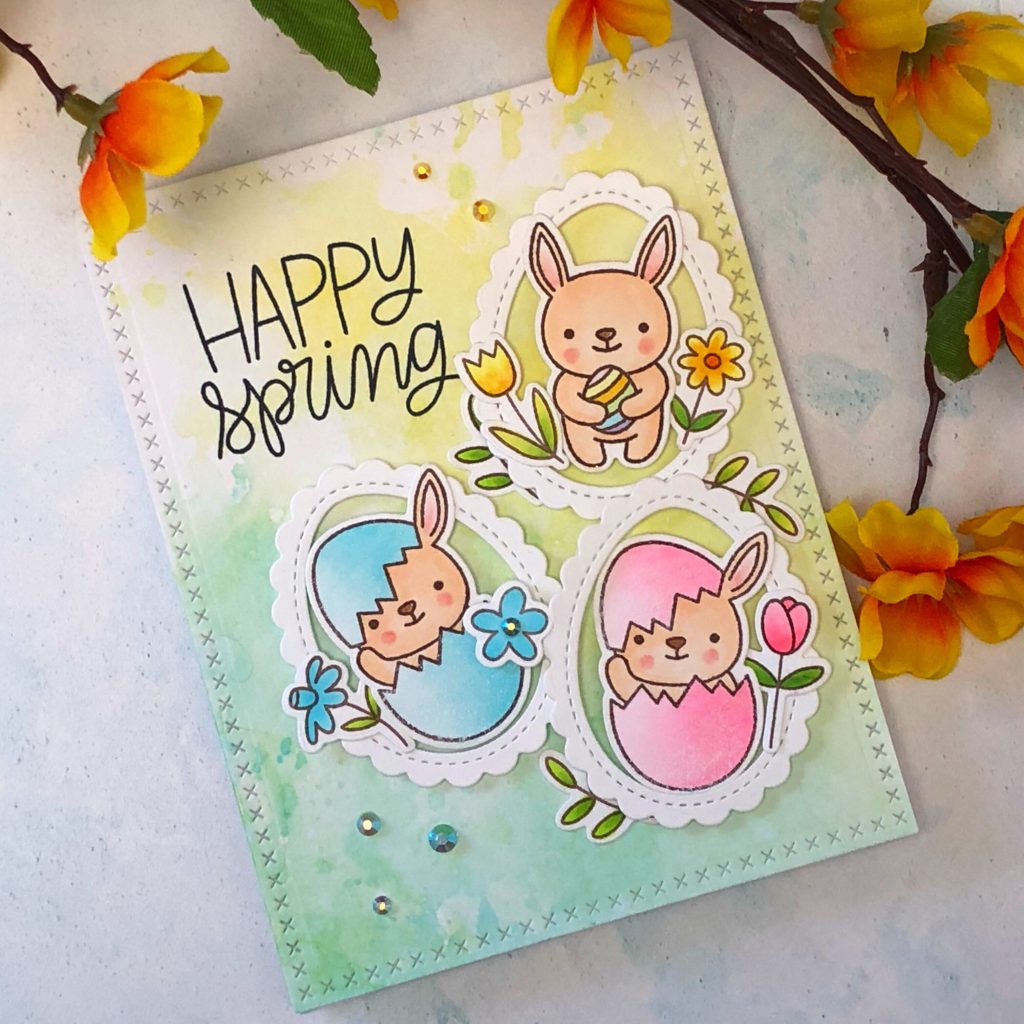
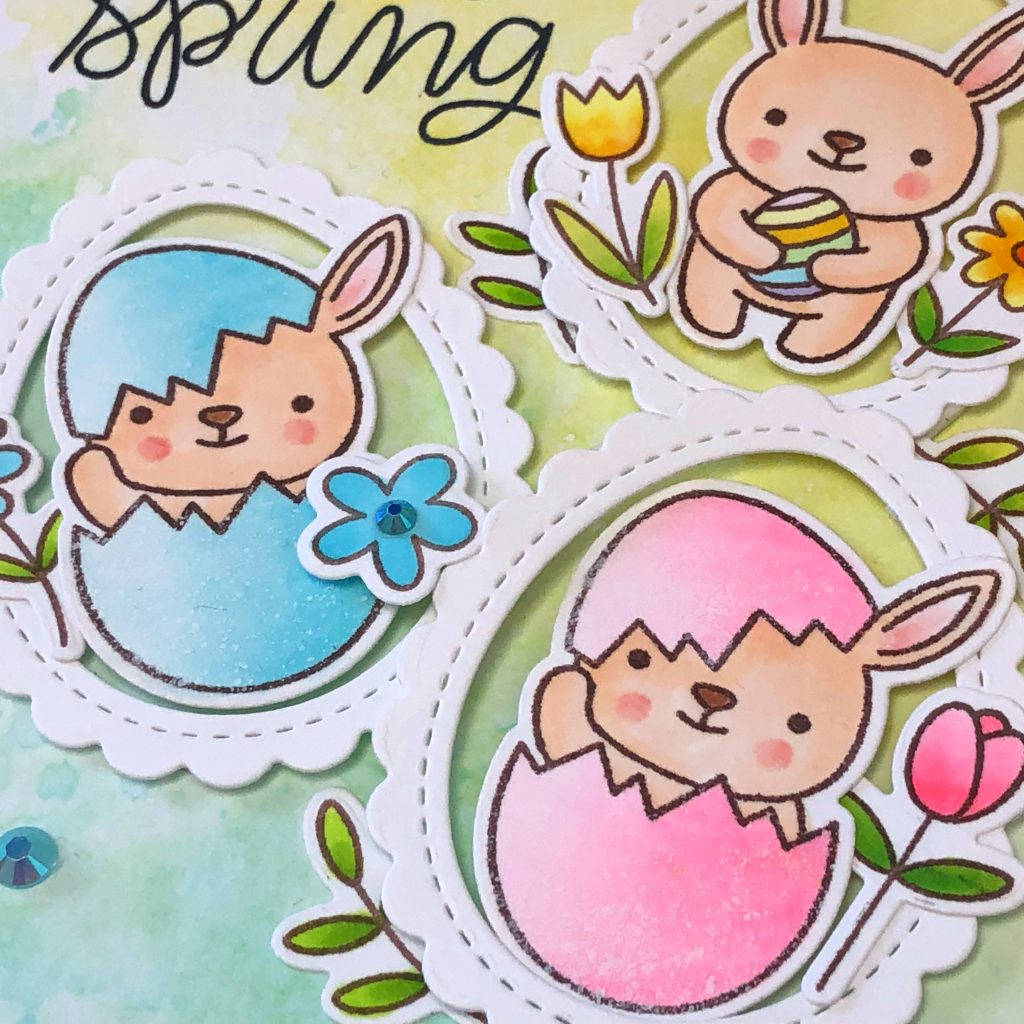
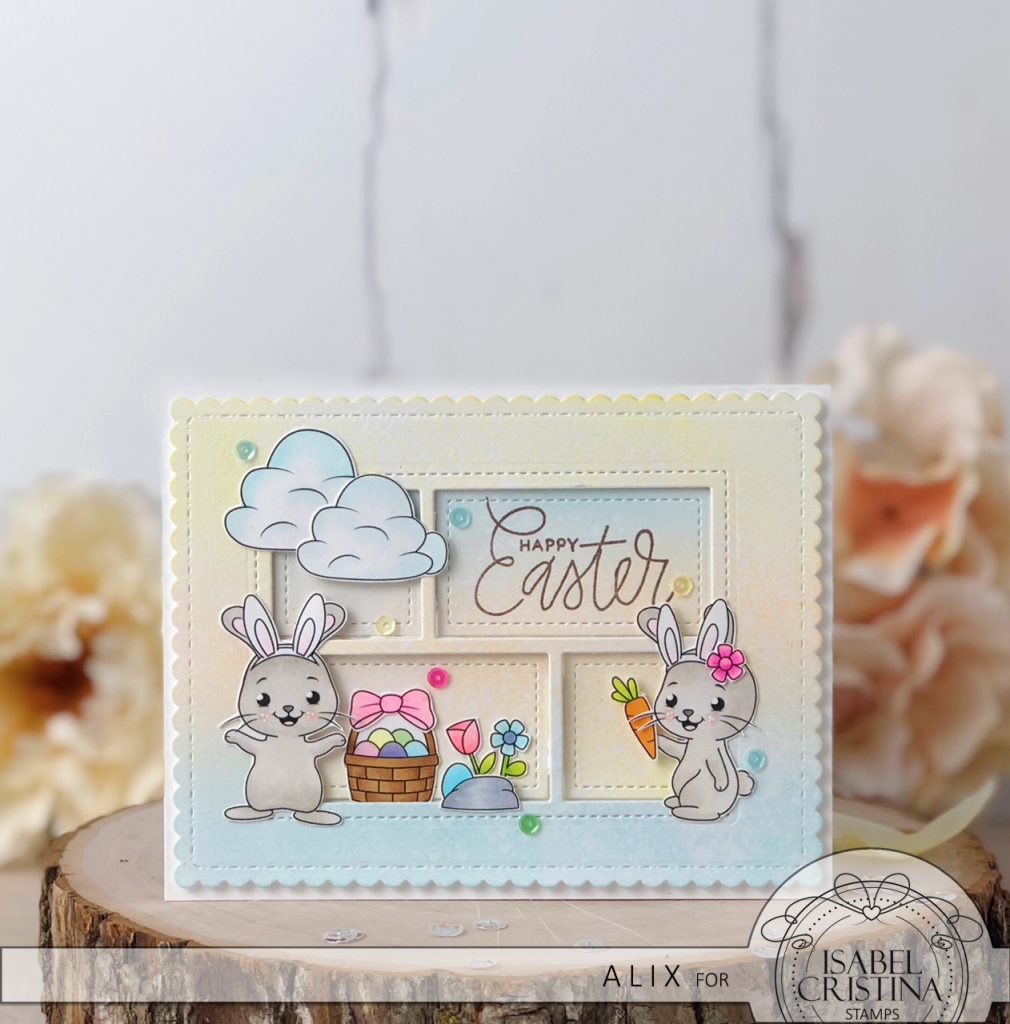
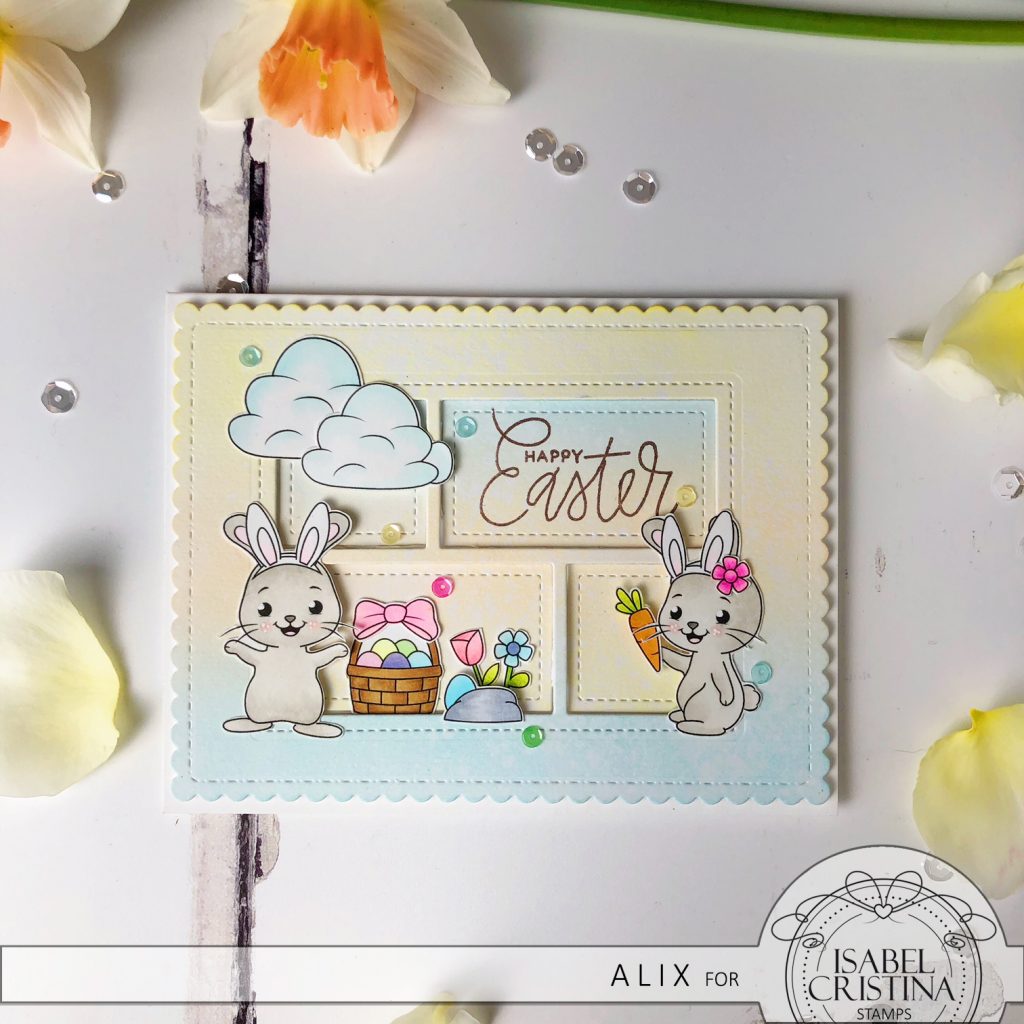
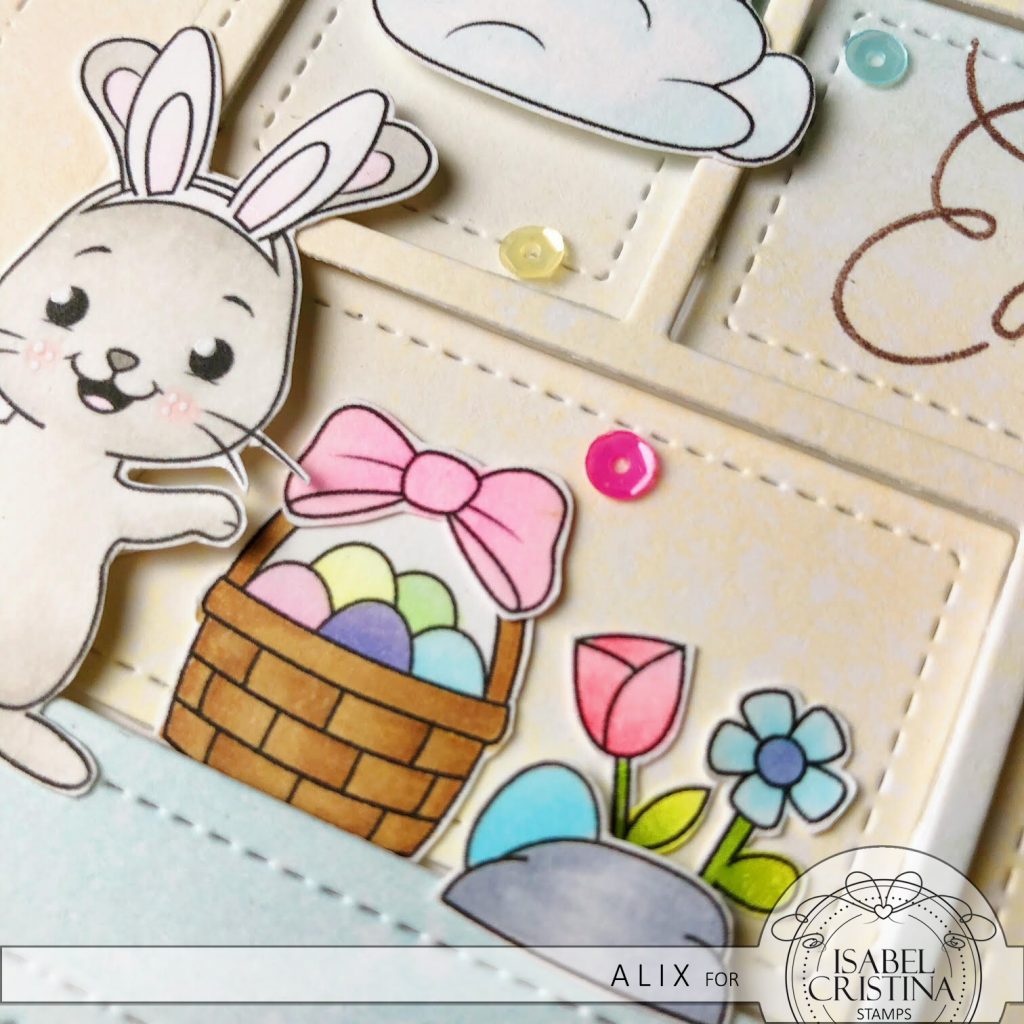
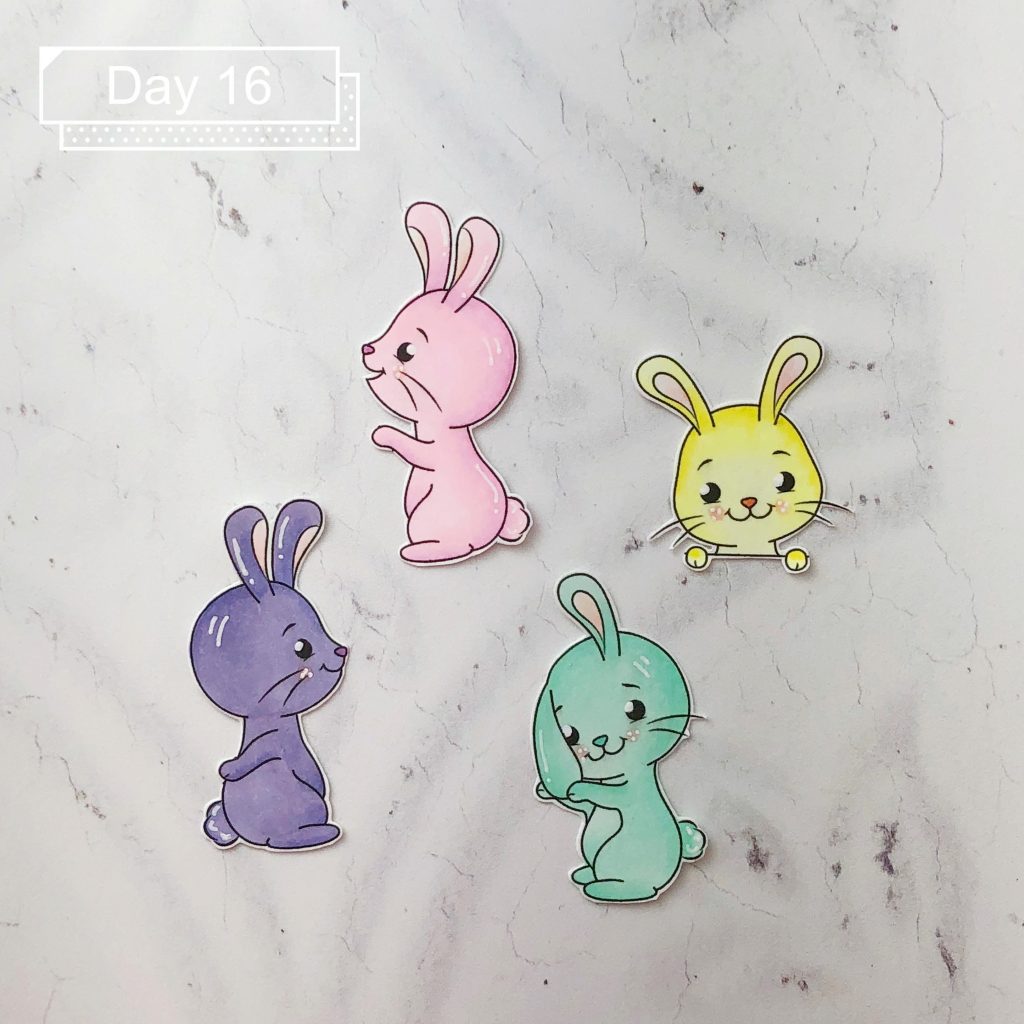
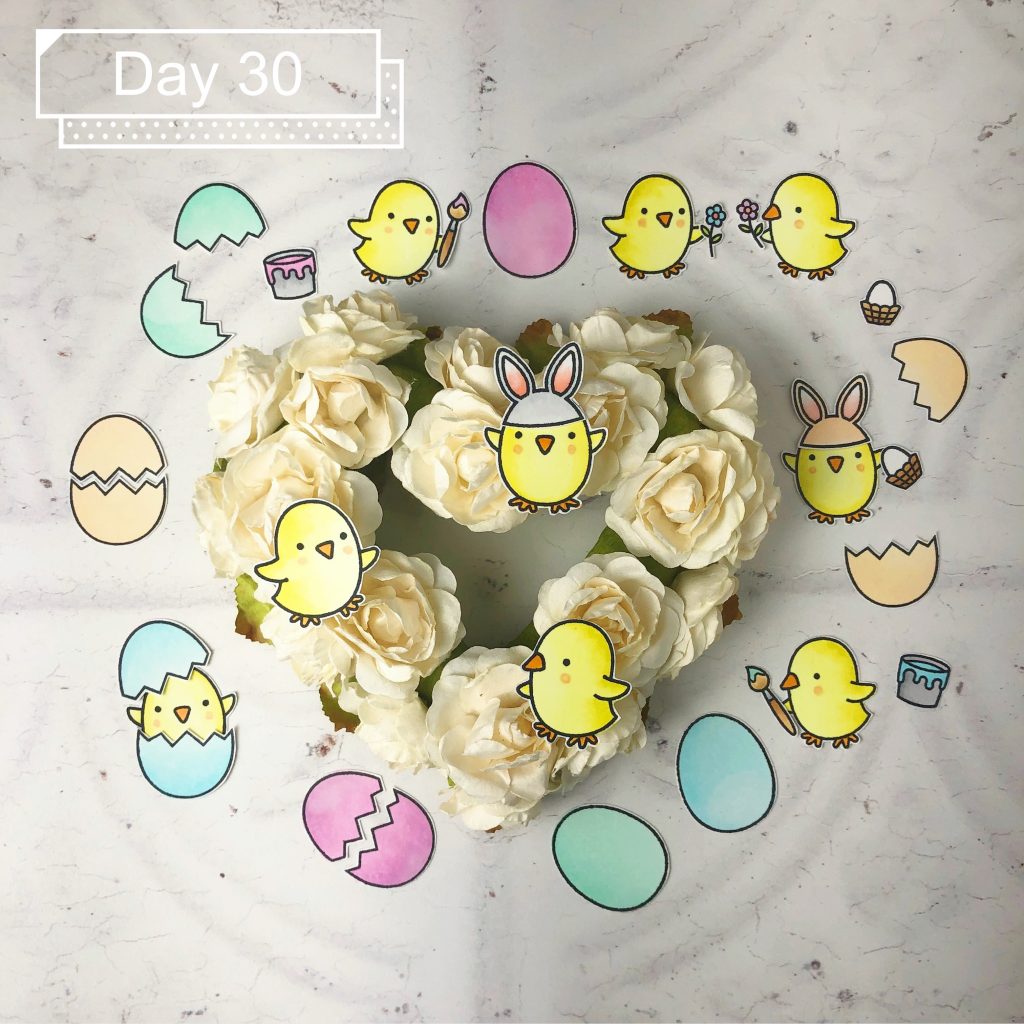
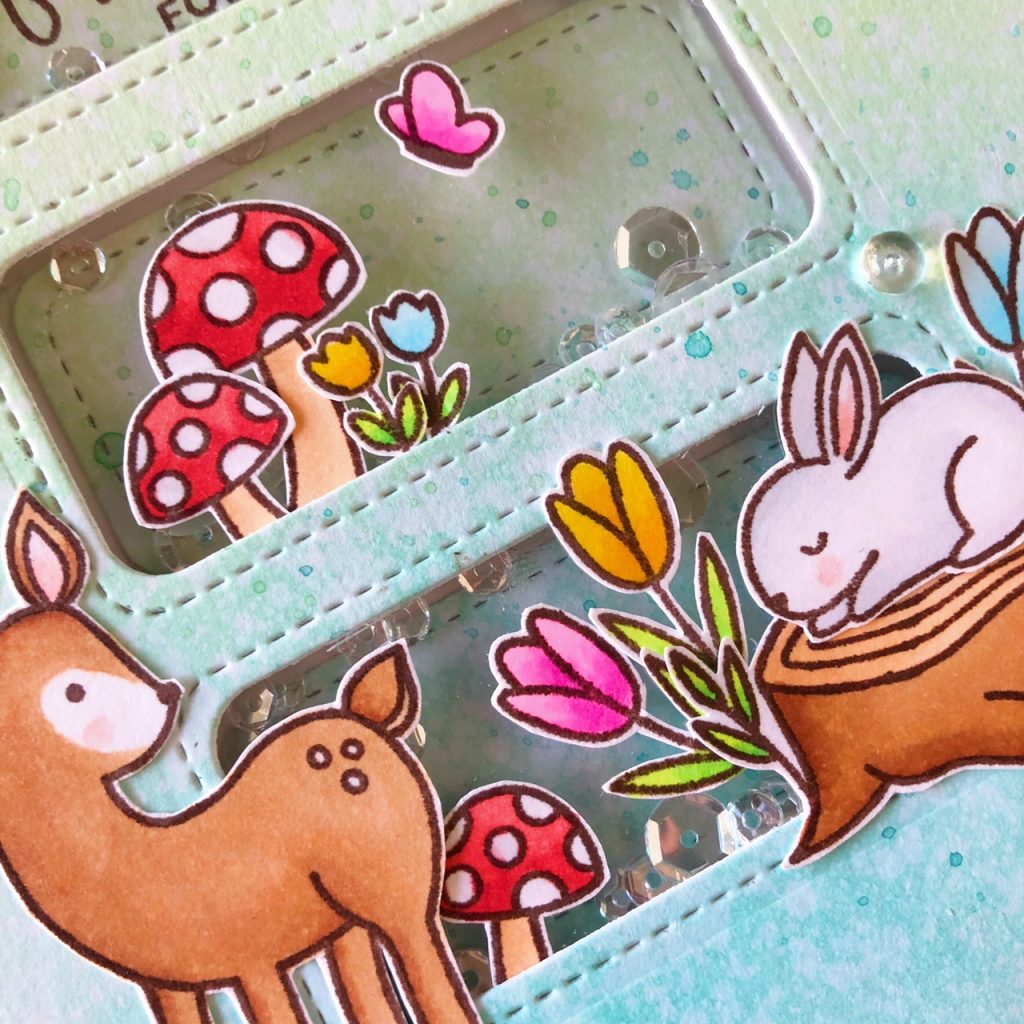
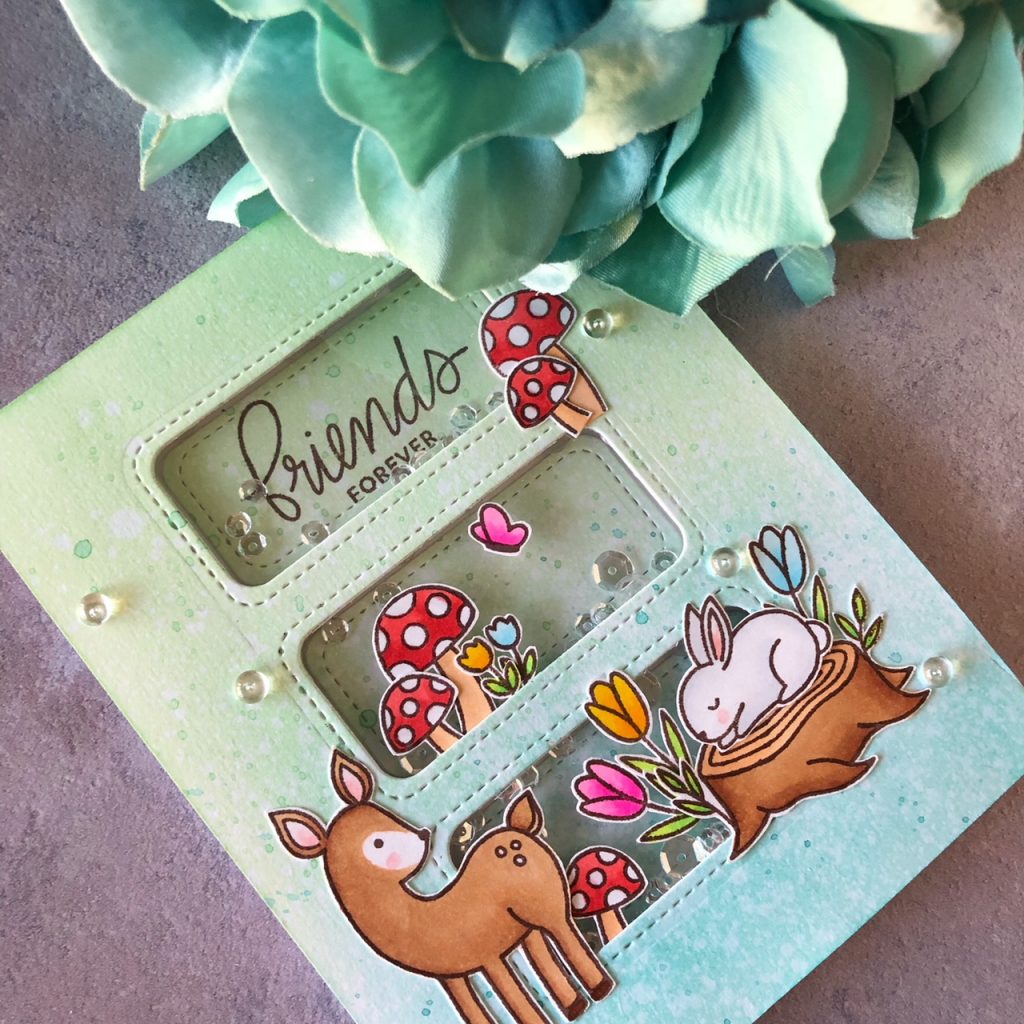
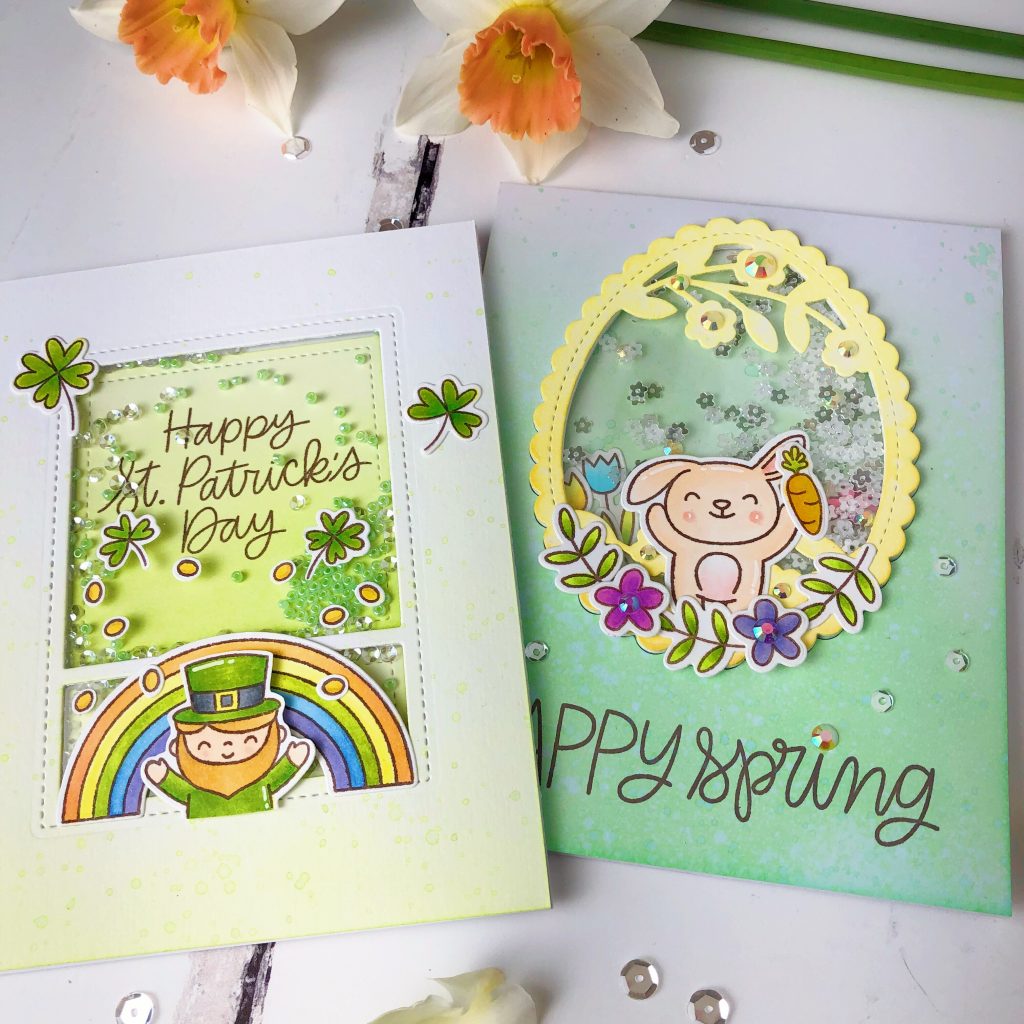
For my first card I used a sweet stamp set called Bunny Friends and Bunny Friends Coordinating dies. For my background I used Neenah Solar white 110 lbs Cardstock  and blended Distress ink in Cracked Pistachio. I speckled it with mixture of water and the same ink after it was dry.


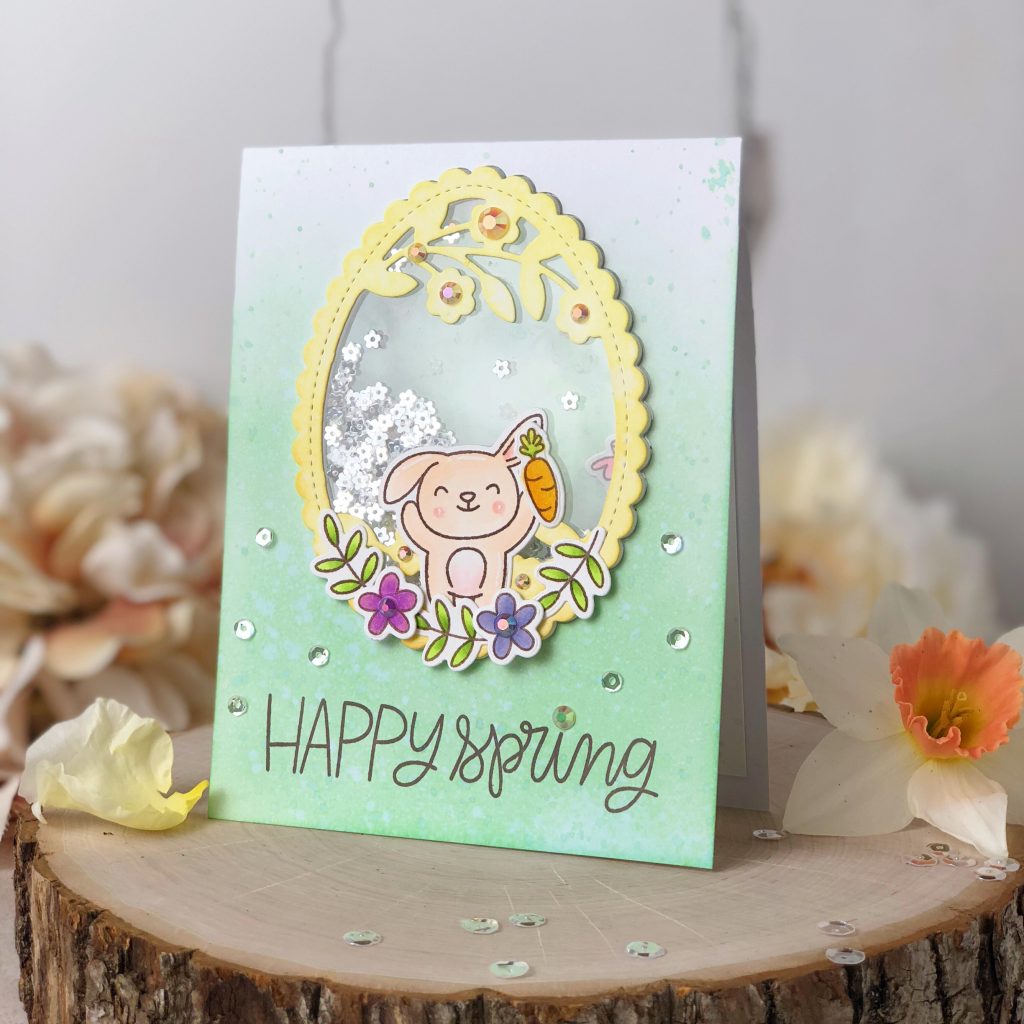
I cut the egg shaped window out of front of card with Happy Easter Shaker die. Then I used the same die to cut 5 sets of die cuts and adhere them together using Ranger Multi Medium Matte. I cut out the “Happy Easter” phrase so the center part of the window looks bigger. I ink blended the top surface of this die cuts using Distress ink oxide in Squeezed lemonade.


To create the shaker window, I placed a piece of Acetate over the cut out card base, and another piece of Acetate under the die cut. I used powder tool around the inside tape of the frame to prevent sequins sticking to the side of foam tape. I added Mini Sparkling Clear Flowers Sequins and Jewels in the middle, then adhere top and bottom to create a see through window.

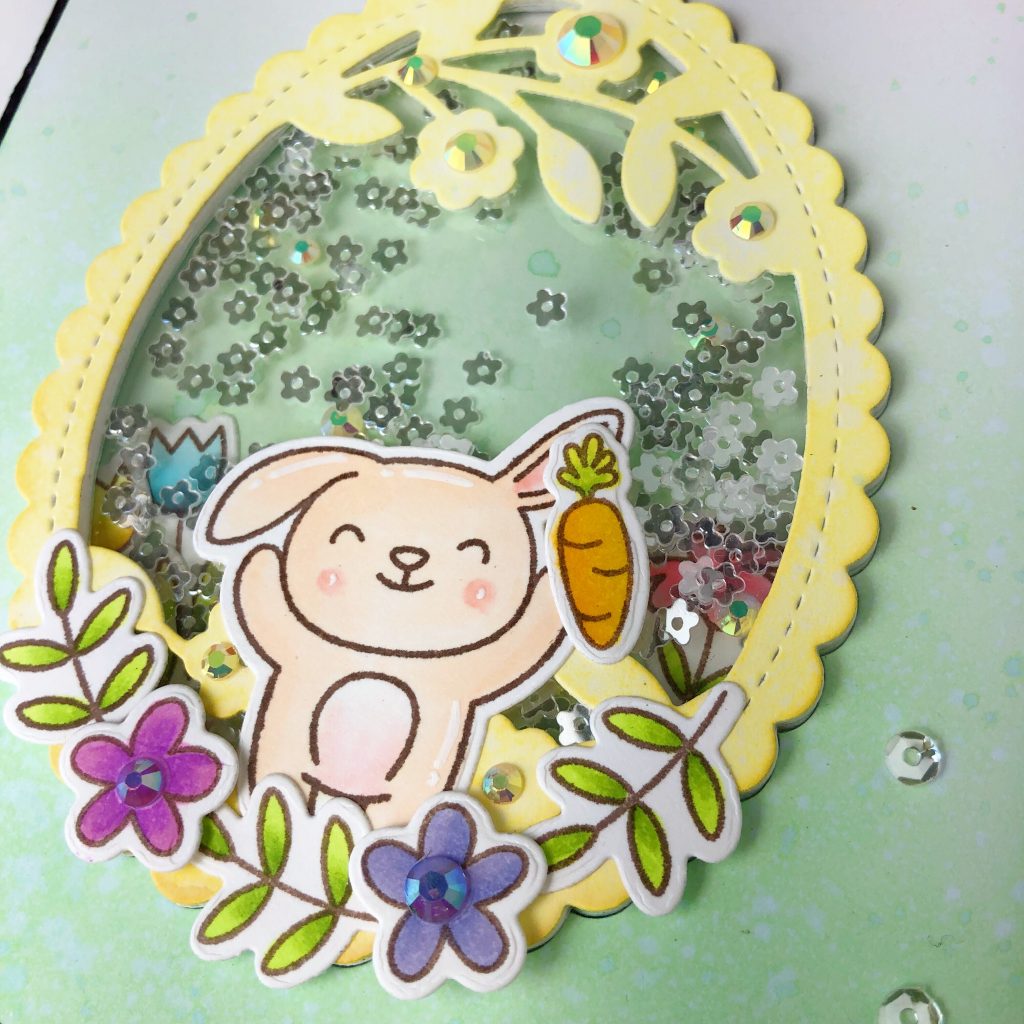
Now it’s decorating time. All of the cute images were colored with Copic markers and cut out with the coordinating dies. I adhered colored images to the card and randomly placed 4mm Sparkling Clear Sequins and Buttercream Jewels. For the sentiment, I was brave enough to cut the original sentiment stamp apart so I could fit into this card then stamped with Memento Ink in Rich Cocoa.

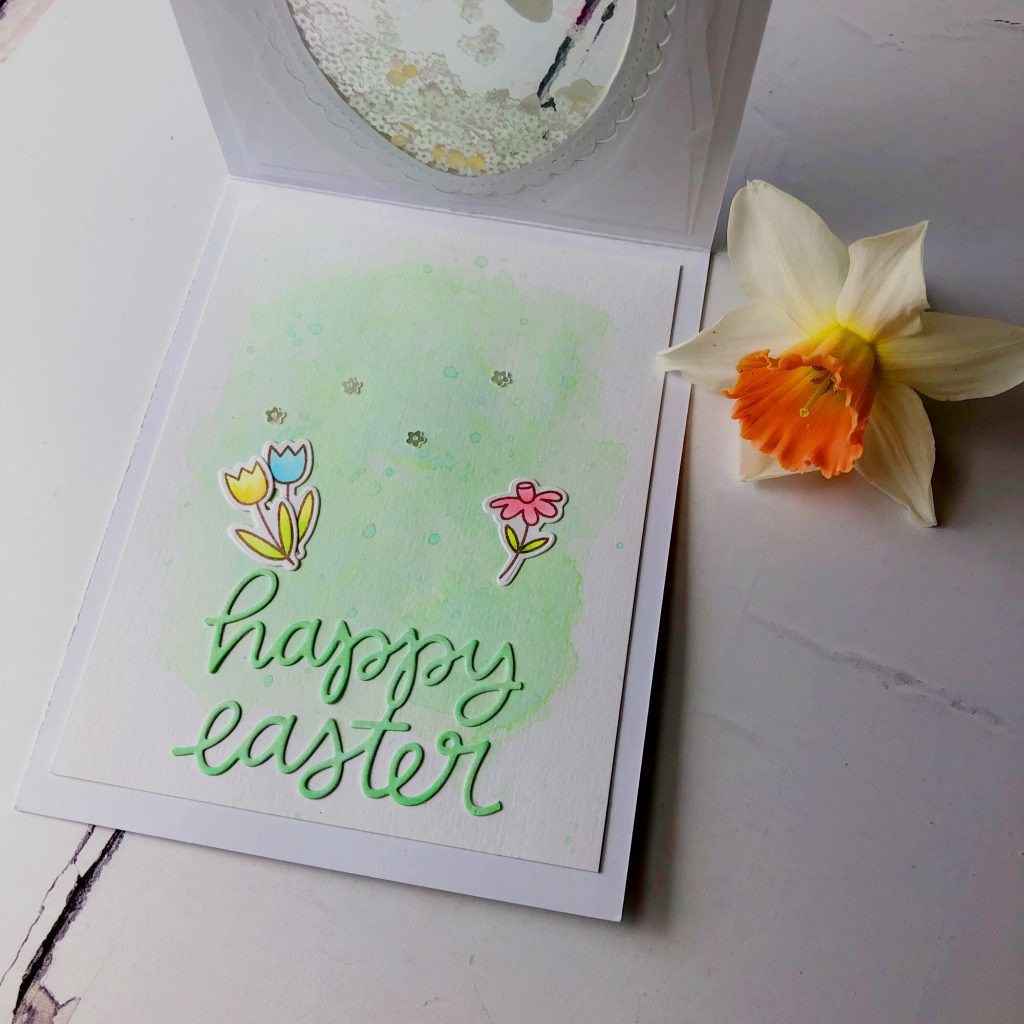
For inside this card, I watercolor smudged on Tim Holtz watercolor paper using Distress oxide in Cracked Pistachio for the background. I also added some colored flower images, sequins, the Phrase from Happy Easter Shaker Die.

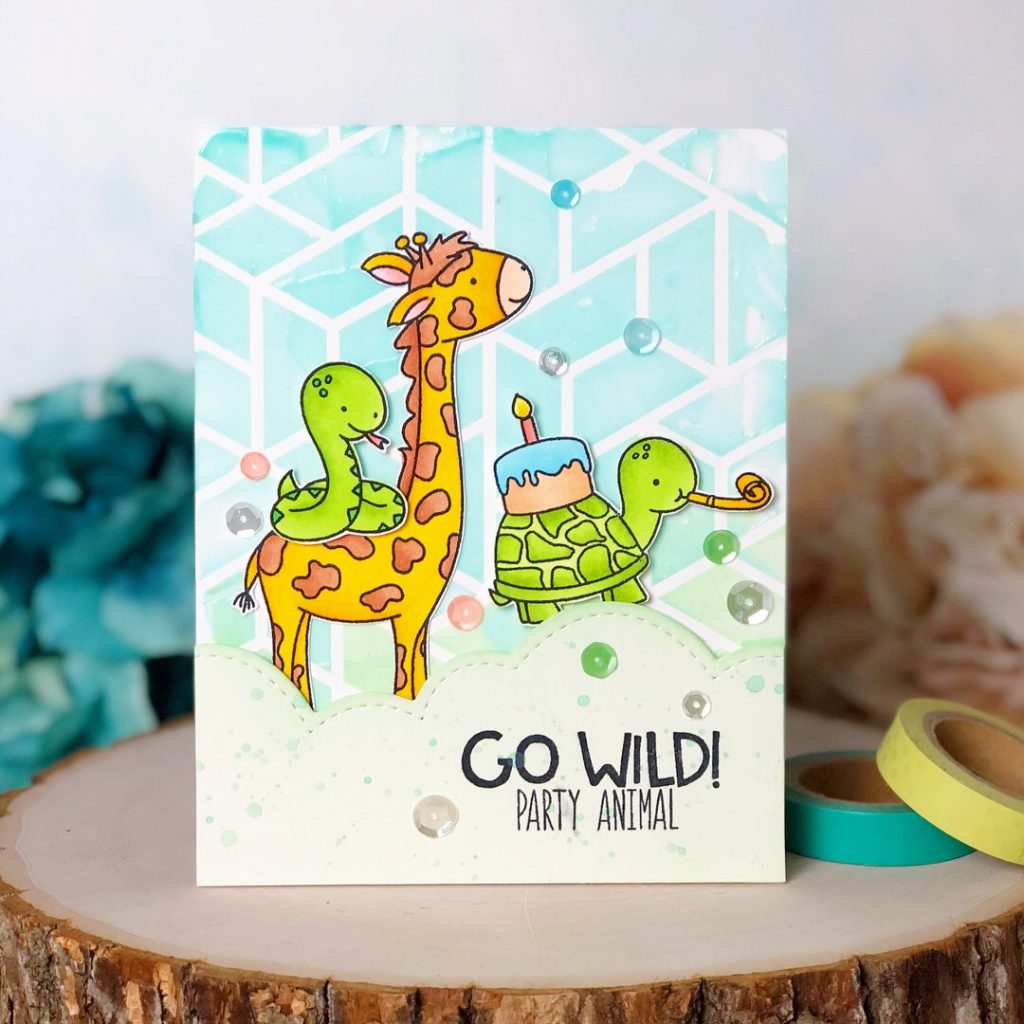
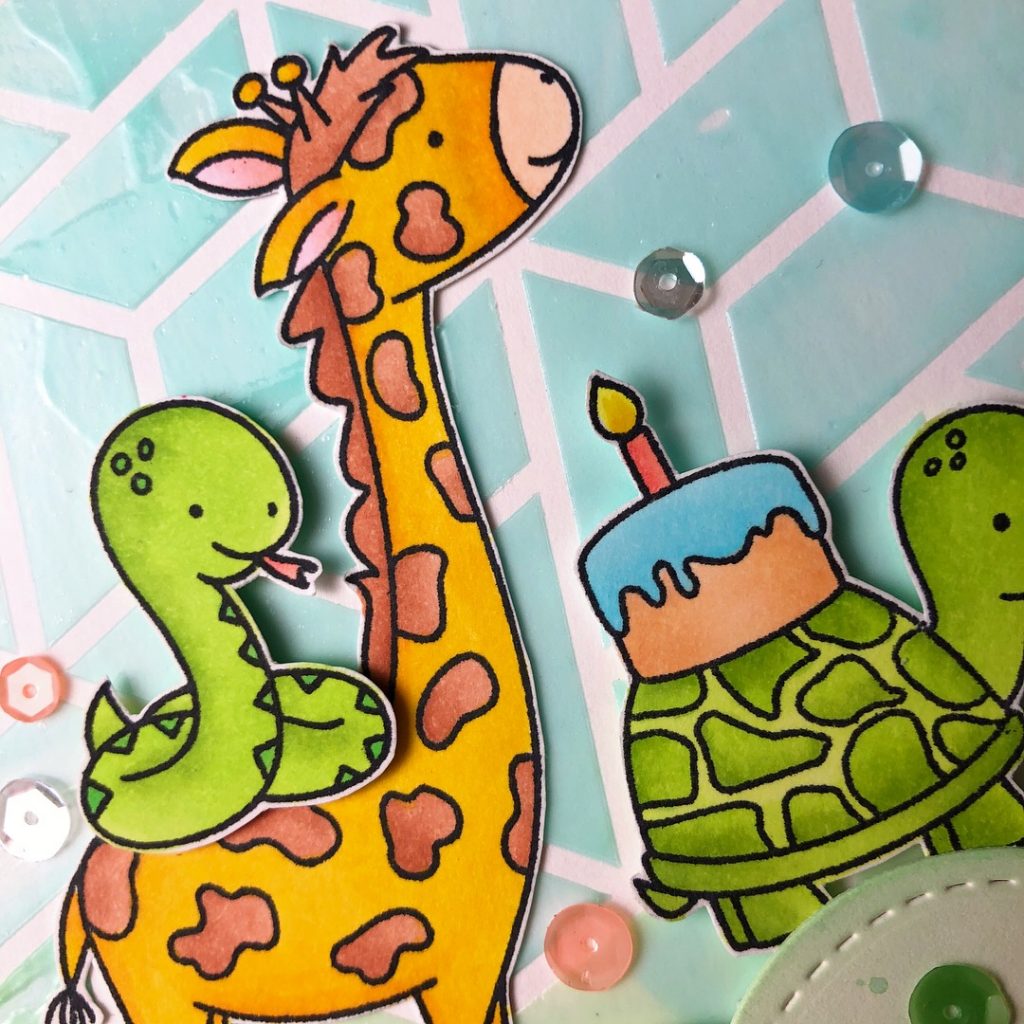
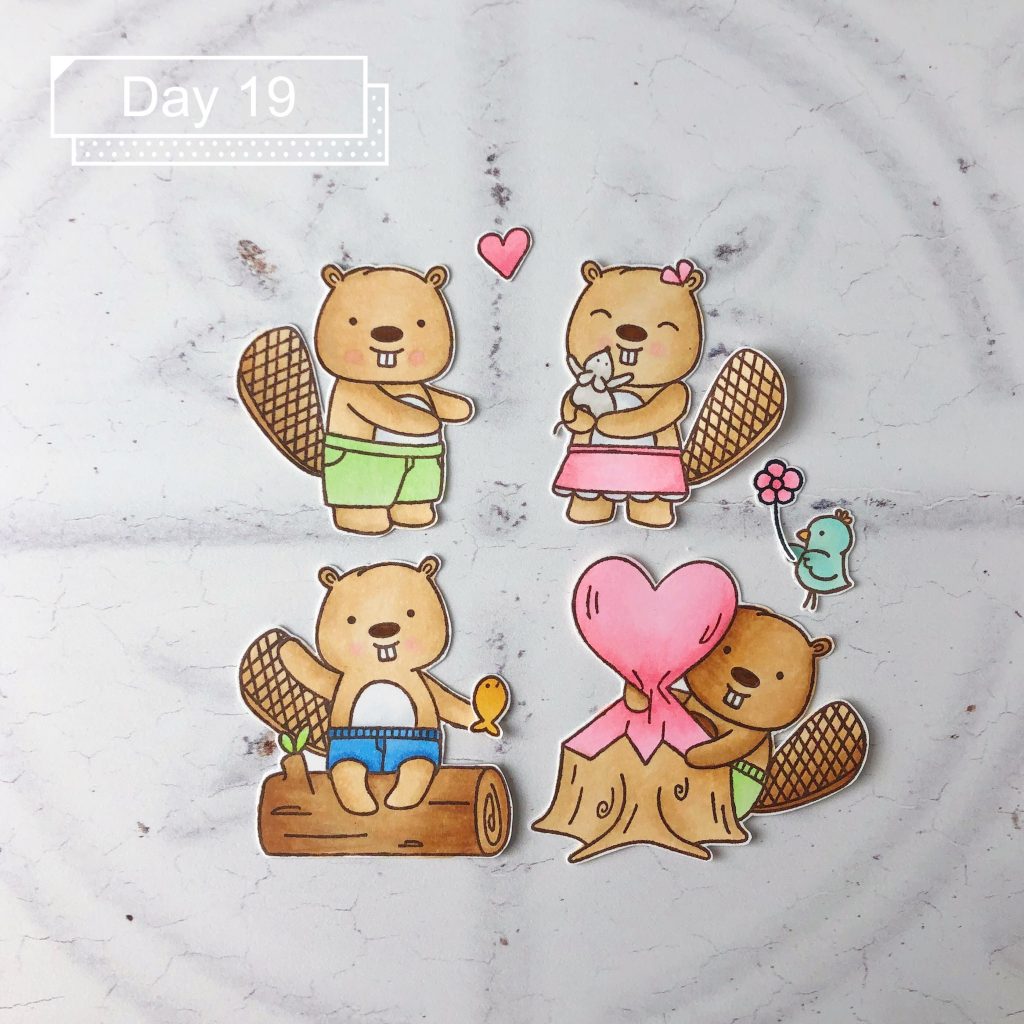
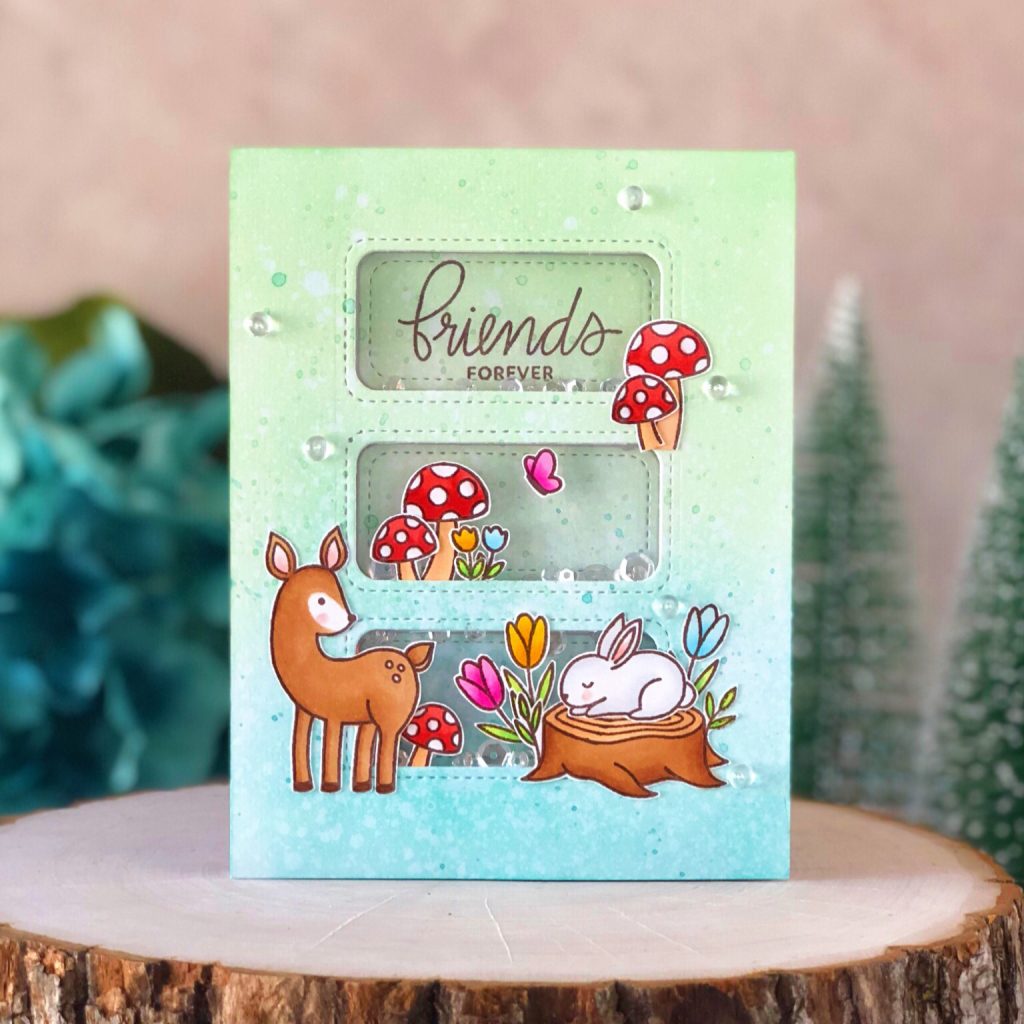
For my second card I used Best of Luck stamp set and Best of Luck Coordinating dies. To begin with, I cut out the front window using PPP Storybook 5 Die. I ink blended the card front and negative cut out of the window using Distress ink in Twisted Citron. Since I am so into speckling technique, I speckled the front with mixture of the same ink and water.

This time, I made shaker window again. Yes I just cannot have it enough. I stamped the sentiment onto the negative cut out using Memento ink in Rich Cocoa. Added acetate and foam tape to create the dimension so I could add Seed Beads in Spring Green and 3mm Sparkling Clear Sequins. I arranged all colored images onto the card front. There you go. A cute and easy shaker card is made! 
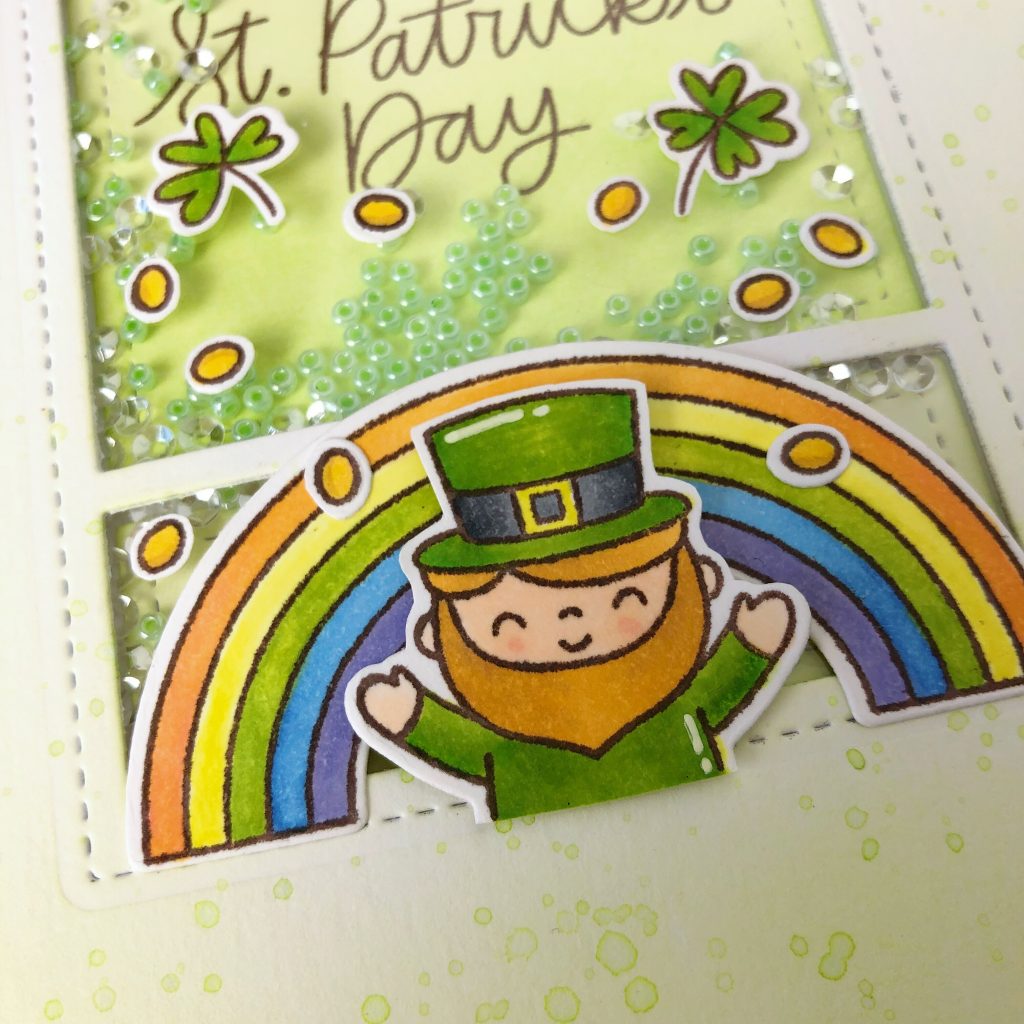
GIVEAWAY!!!

There are 4 $25 gift certificates up for grabs (two winners each day). Winners will be picked randomly along the blog hop. Comments must be left by 11:59 PM PST on 3/12/2018. Winners will be announced on the PPP blog.

DAY 2 BLOG HOP LIST:

Pretty Pink Posh Blog

Liz Sarkisyan

Heather Hoffman

Carissa Wiley

Suzy Plantamura

Melody Rupple 

Dana Gong

Crystal Thompson

Teri Anderson

Joni Andaya

Thi Lam

Alix Davis (You are Here!) 

Yoonsun Hur 

Cute bunnies’ Easter Greeting

Happy Sunday!

Today I am showcasing a new digital stamp set from  Isabel Cristina Digi Stamp called “Easter Bunnies”. I love these bunnies so much that I could not stop coloring them. Now I want to introduce them to you. Be sure to head out to Isabel’s Etsy shop to grab these images for your Easter project!


To start making this card, I stamped all images with Memento ink in Rich Coco and colored with Copic markers.I used Uni-ball Signo White gel pen to add interest on bunnies. I ink blended the background by using Tim Holtz distress ink in Squeezed Lemonade, Tattered Rose and Tumbled glass. I sprayed background with clear water then quickly dry the surface with a piece of paper towel.


I cut the background using Pretty Pink Posh Story Book 6 Die to create windows. I attached a piece of acetate and two layers of foam tape behind the windows to create dimensions.

In the end, I arranged all colored images onto top of card using Multi Medium Matte and added a few Pretty Pink Posh Easter Sequins Mix . A cute card is made! I hope you like my card with these super duper cute images!

Go Wild for your Birthday

Today was a busy day. I got up at 6 am to attend a dental convention. Then I ended up being there late for my first continue education class just  because of congested traffic. Fortunately I like all the speakers and learned quite a bit for my specialty. I got home late and I thought I would head to my comfy bed. Surprisingly I started to have ideas of making cards. It must be the prolong effect of the coffee I drank in the morning (2 Cups). I used the background that I made yesterday for the base of this card. It made assembling much easier.

I pre colored all images with Copic markers. Then I cut the Puffy cloud using Lawn Fawn Puffy Cloud Border , and hand stamped the sentiment with Memento in Tuxedo Black . I attached it on to the background with some foam tape to create dimension. To adhere the images, I also used foam tape to do the work. I pulled out my Neat and Tangled Sequin mix in Starry Night and Sherbert to decorate background. Believe or not, that is all I did. Very simple steps but good enough when you have a good background as focal point.

Here are some backgrounds I made yesterday. To create the background of this card, I used Tim Holtz distress oxide in Peacock Feather and Cracked Pistachio , Neat and Tangled Polygon Stencil, Ranger Texture paste in Transparent Gloss.

The 9th of #the daily marker 30 days challenge overview

Kathy Rac hosted her 9th Instagram coloring challenge in January. I went along joining in this fun challenge and was proud of myself that I participated on every day. Here is an overview of my coloring challenge results. Since Day 18 was about ink pad coloring swatches, I did not include it in my post.


Friends forever from Woodland critters

Happy Friday my crafty friends!

If you remember, I did lots of coloring on images from Pretty Pink Posh Woodland critters Stamp set. Now it is time to assemble them into all kinds of fun cards. The weather here in Sacramento is quite strange. It was like spring last week and winter seems back in this week. You never know what you are going to get!

22946924-13F7-45C1-8CF5-7F9FF5D30801

To start making this card, I stamped all images with Memento ink in Rich Coco and colored with Copic markers.I used Uni-ball Signo White gel pen to add interest on hedgehog, it turned out pretty good. I ink blended the background by using Tim Holtz distress oxide ink in Cracked Pistachio and Peacock Feather. I sprayed background with clear water then quickly dry the surface with a piece of paper towel. After that, I splattered water mixture of these two colors onto the background using a paint brush.

IMG_6357

I cut the background using Pretty Pink Posh Stitched Pieces Die to create windows. I attached a piece of acetate and two layers of foam tape behind the windows to create dimensions. Then I added Pretty Pink Posh 4mm Sparkling Clear Sequins to lighten up the background.

IMG_6359

IMG_6358

At last, I arranged all colored images onto top of card using Multi Medium Matte and added a few Pretty Pink Posh 4mm Clear Droplets to make front card more sparkling. Easy breezing card making today. Isn’t it?! Thanks for stopping by and I hope you will have a wonderful weekend!

Rawr…

Happy Weekend! Today I created a Dino love story. The story goes like this. Dino boys are all wanting to ask Dino girl to be their valentine. But she is only into Him. Everyone else is just nobody but only him 💜 I used Lawn Fawn Rawr mini stamp set to create this card. This is a very low price point stamp but high possibility to create all kinds of cards. Why not getting one from Butterflyrefection ink ?!

445AEEF8-F9F0-40BB-A23F-A16B3E00E6AE

DFDB37C3-D1D5-4E2E-AA40-A4B8CC6D151E

  1. I stamped whole bunch of dinosaurs on masking paper, then cut them out to make a few masks for creating overlapped dinosaurs in the background.
  2. Without removing all masks,  I created  background colors with Tim Holtz Distress oxide in Picked Raspberry and Cracked Pistachio.
  3. Then I cut the paper using Lawn fawn Large stitched rectangle die and Outside In Stitched Scalloped Rectangle Stackables Die. I raised the border by adding foam tape.
  4. I cut images using Rawr Lawn cuts except the dino girl. I did mirror image stamping (Simply stamp the image on a piece of acetate, and layered your paper on top of acetate.) Now it’s time to color everything with copic markers.
  5. i created another mask for making yellow spot light. The distress oxide ink color I used is in Fossilized Amber. I go ahead decorating the spot light with Pretty Pink Posh Iridescent Star Confetti
  6. I cut out some clouds using Lawn Fawn Spring Showers Lawn Cuts. Then I adhered them with our main Dino characters.
  7. Last, I stamped some tiny hearts using Lawn fawn ink in Lobster to show how much the Dino girl was into the boy.

I love you to out of this world

It’s been raining 3 days in a row. I kinda wish it could stop a little since my succulent garden is soaked. Whoever has succulent plants should know they do not need a lot of water. It might kill them if you water too much because it would rotten their leaves and roots. It is the first winter since I planted them. I consider it as an experiment to see which plant will survive in Sacramento and which one will be suffered, that why I will know what to purchase for the coming year if I want to expand my garden. OK. I created this card couple days ago and I was hoping the weather would get better today so I could have better result of photography. Oh well I cannot wait to share it anymore, so here we go

C6FE0577-1B6B-4A10-BD30-ECCE71419996 1007695E-ED6F-4BBF-B46C-16D9C21B3952 863E8F70-7011-428B-B3A4-3EC17BC8B957

  1. First of all, I colored all images with copic markers and fussy cut them.
  2. I cut the background using Lawn Fawn Crossed Stitched Rectangle die, then using a smaller rectangle frame to cut the center so I can create a frame.
  3. I used Tim holtz distress ink in Pickled Raspberry, Mustard seed, Seedless preserve,Black soot to ink blending the background. I splattered some water on the surface then quickly blot it with kitchen towel.
  4. To create the bottom part ,I arranged colored images and randomly glued some of Iridescent Star Confetti
    on the background, then pour some more to shaker purpose. Using Foam tape to create dimension.
  5. To prepare the top surface, I adhered Acetate to the frame then attach to the bottom piece.
  6. I cut out two layers of clouds by using my favorite things Stitched Cloud Edge die and adhered it to the top surface.
  7. I used foam tape again to adhere astronaut and rocket ship onto acetate surface.
  8. Last but not least, stamped the sentiment on the bottom of card using Memento ink in Tuxedo Black
This entry was posted in Cards.