Cheer Up

Hello crafty friends,

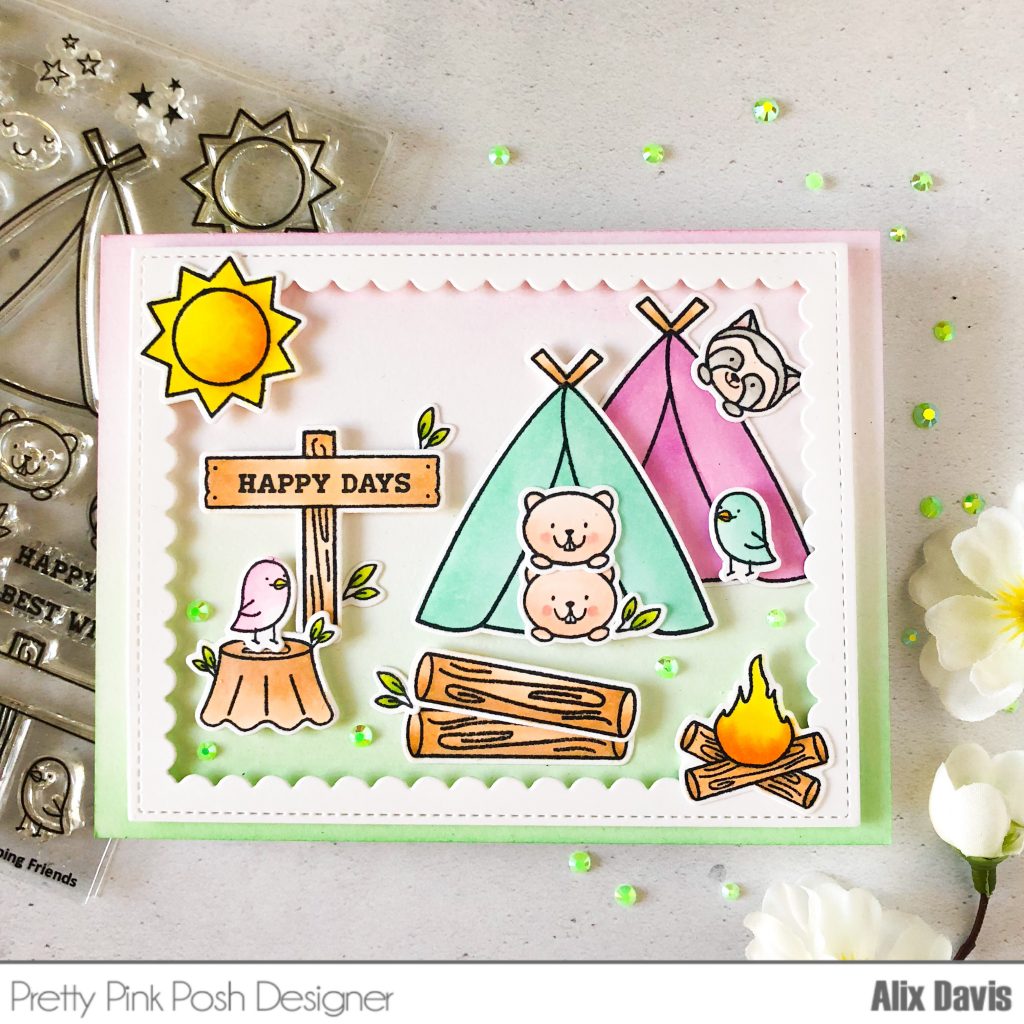
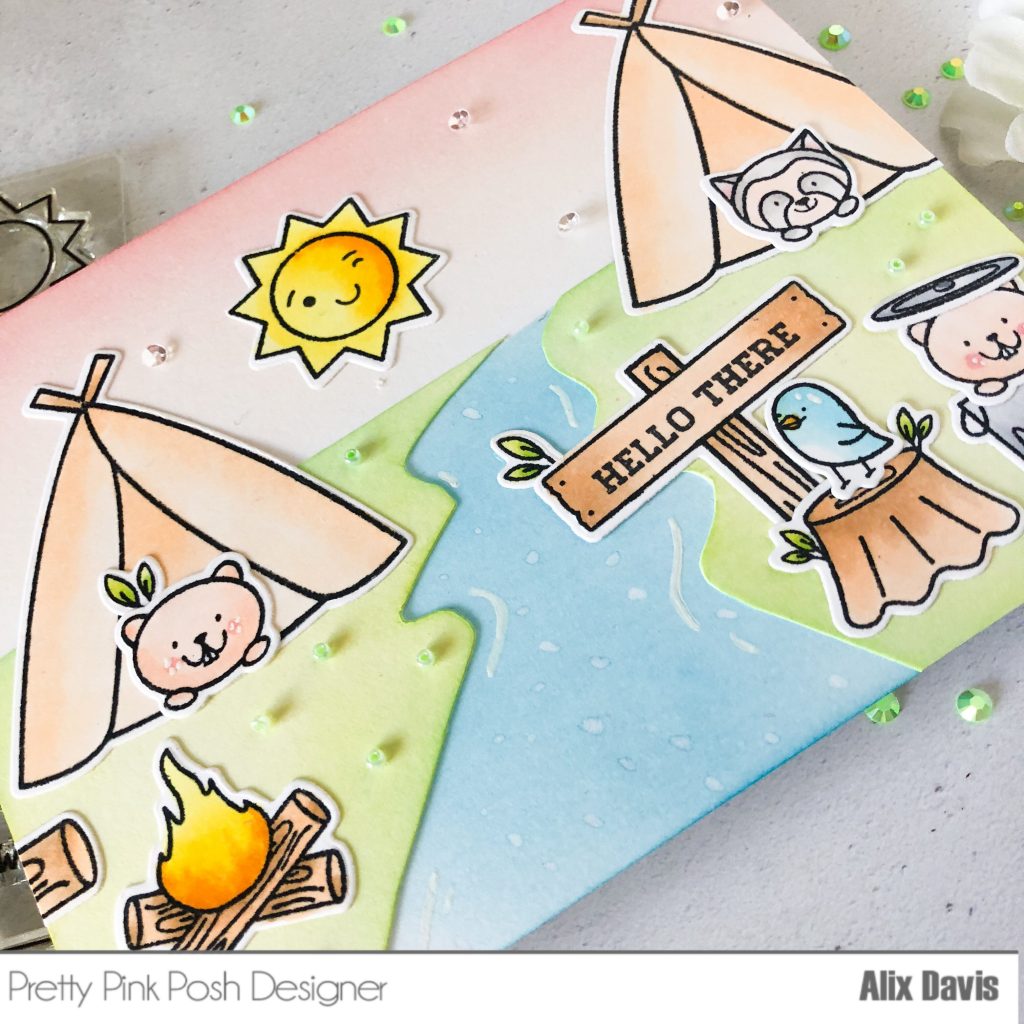
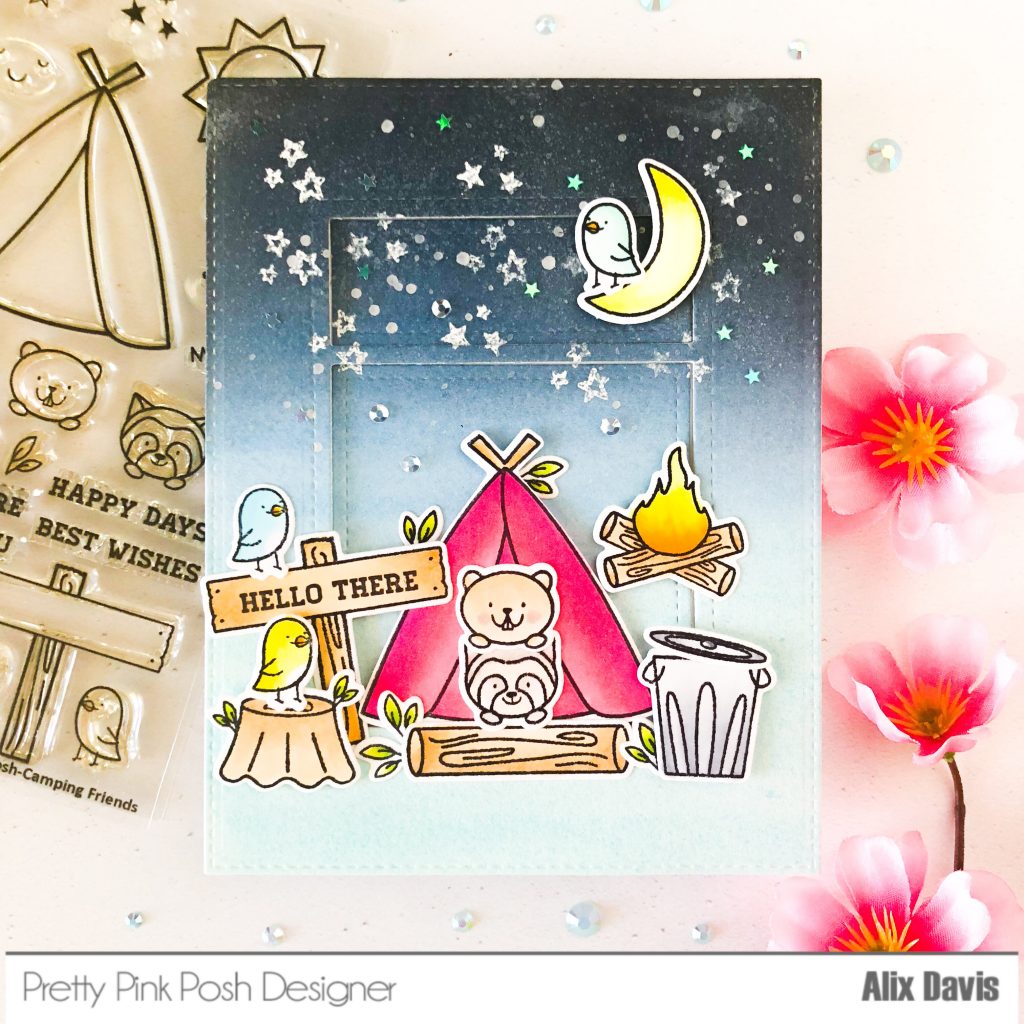
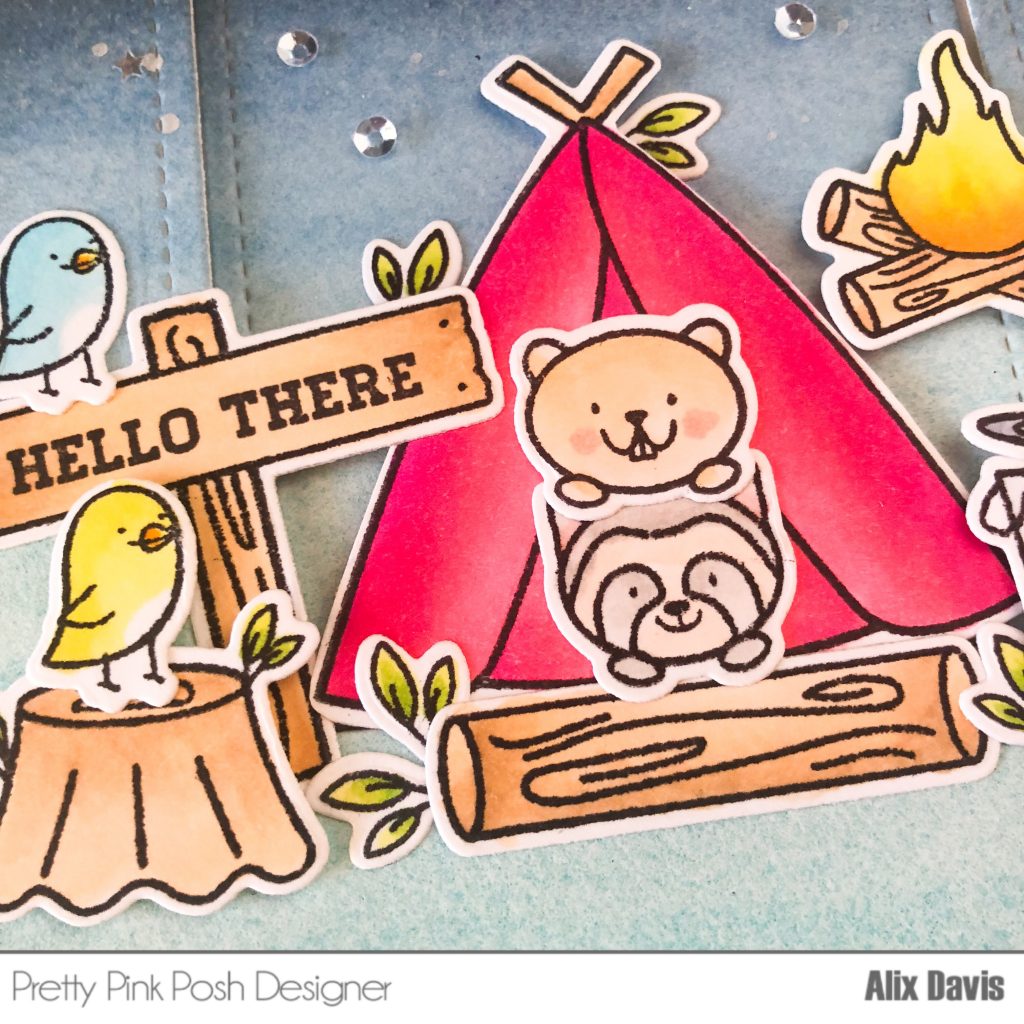
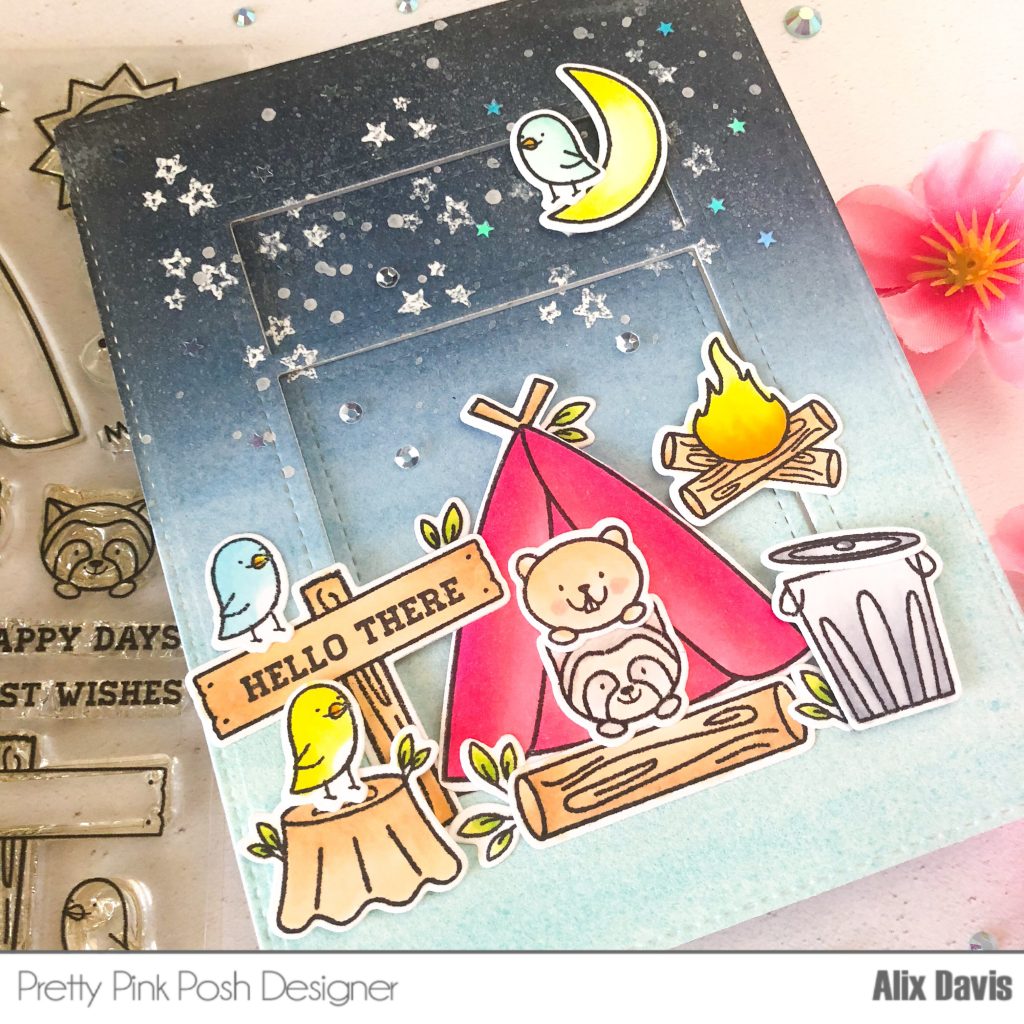
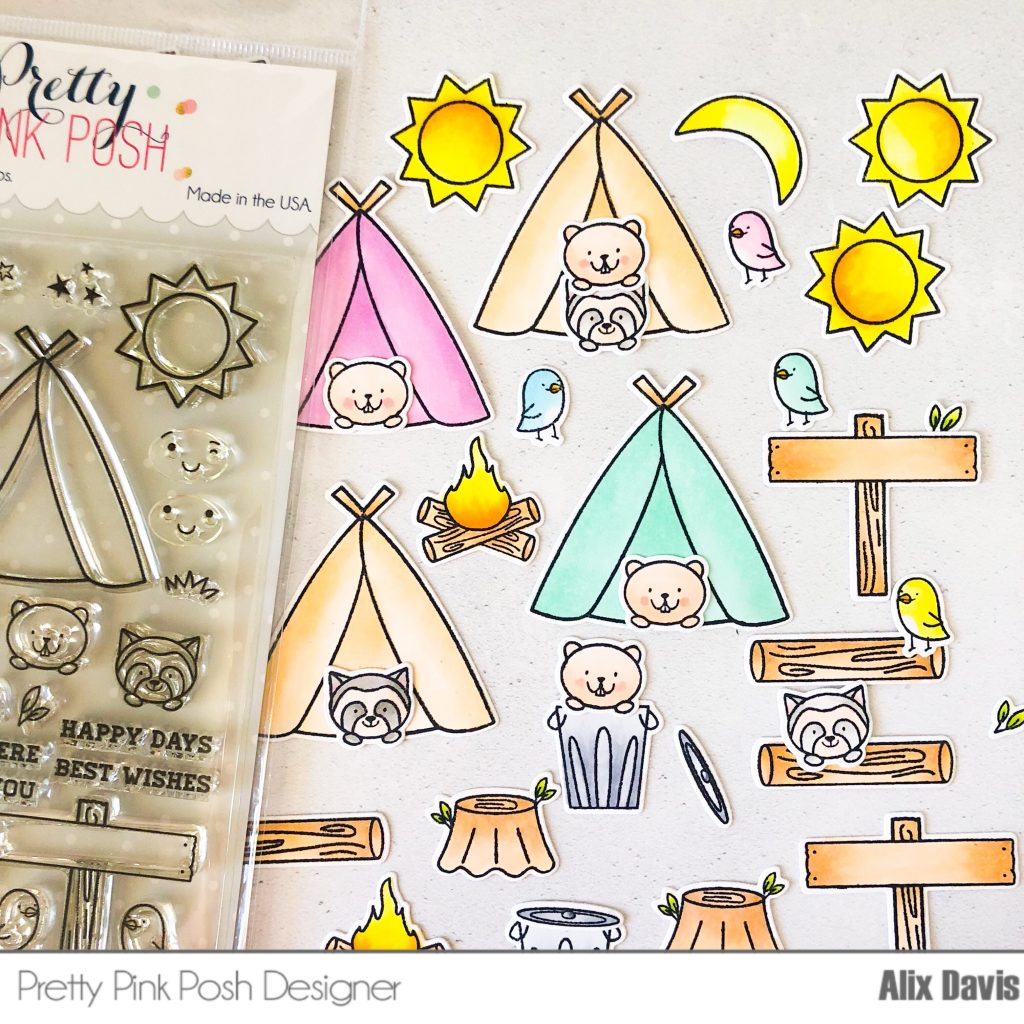
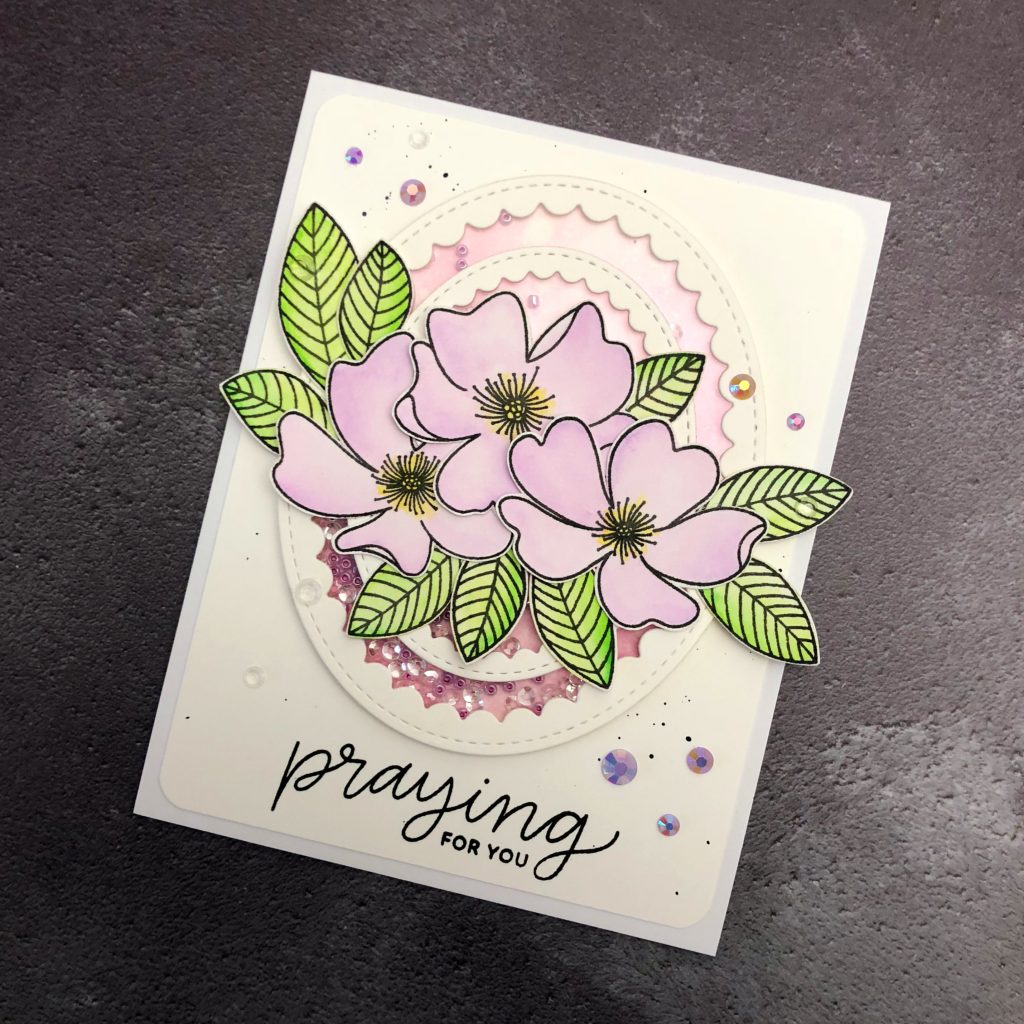
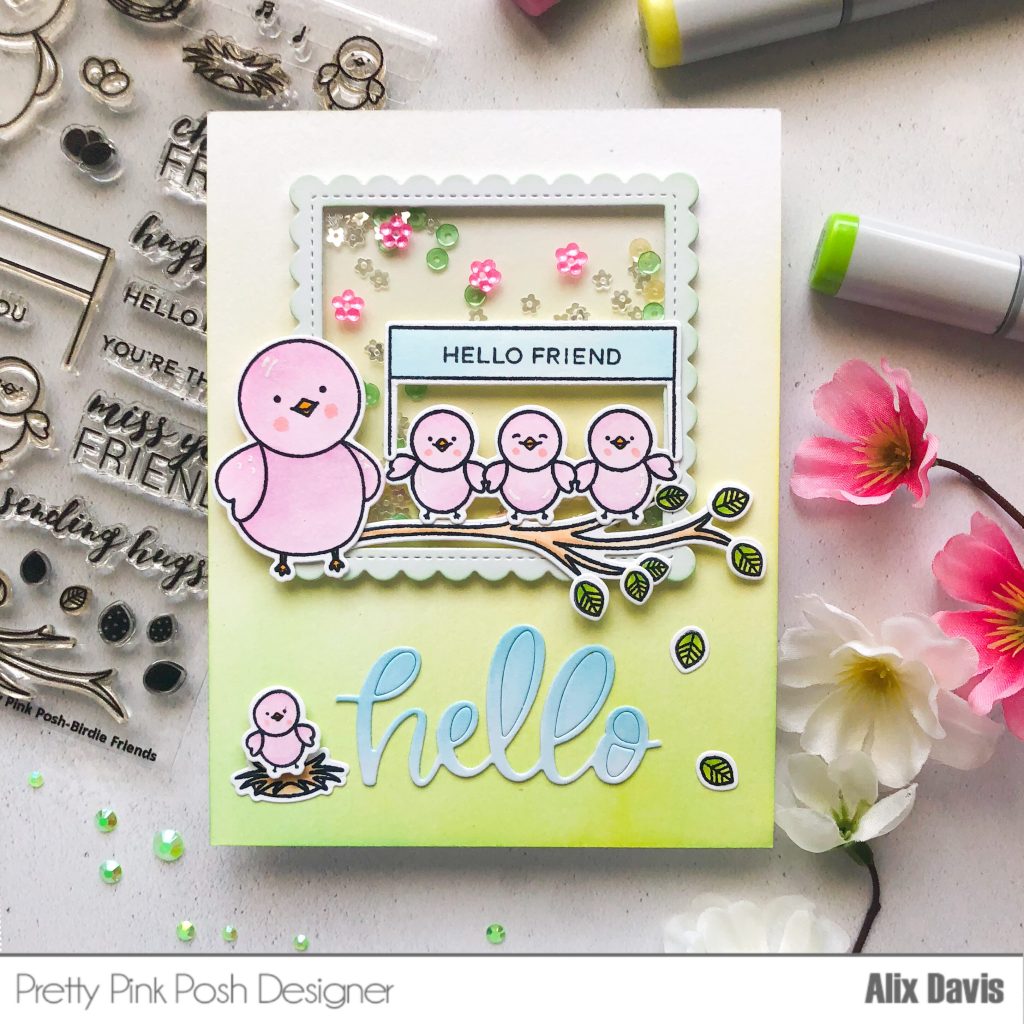
I am back from my Alaska trip for couple days now. I am slowly but surely getting back to my daily routine. Today I pulled one of my recent purchase stamps and dies from Pretty Pink Posh and started to play around with all colors I like. I found all colorful images I stamped are very pretty and useful for using along or being a scene building tool.

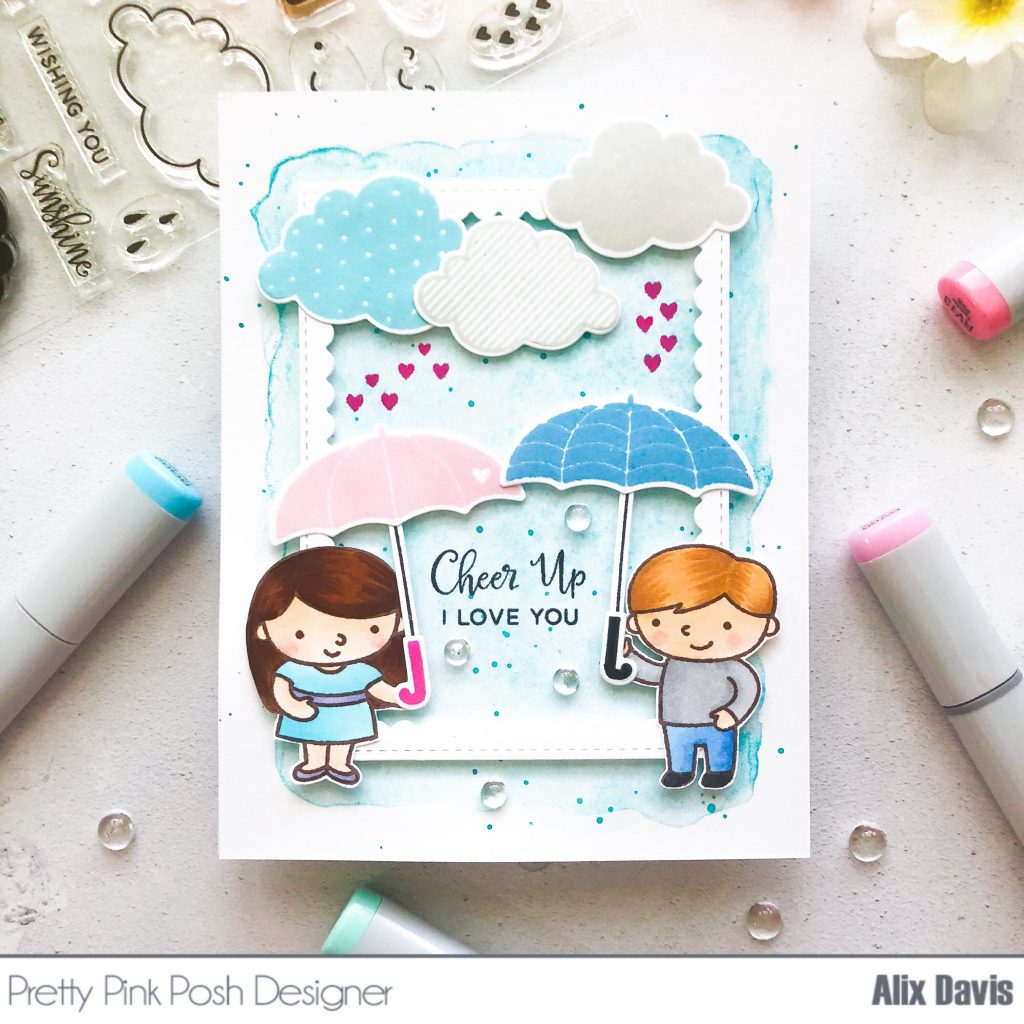
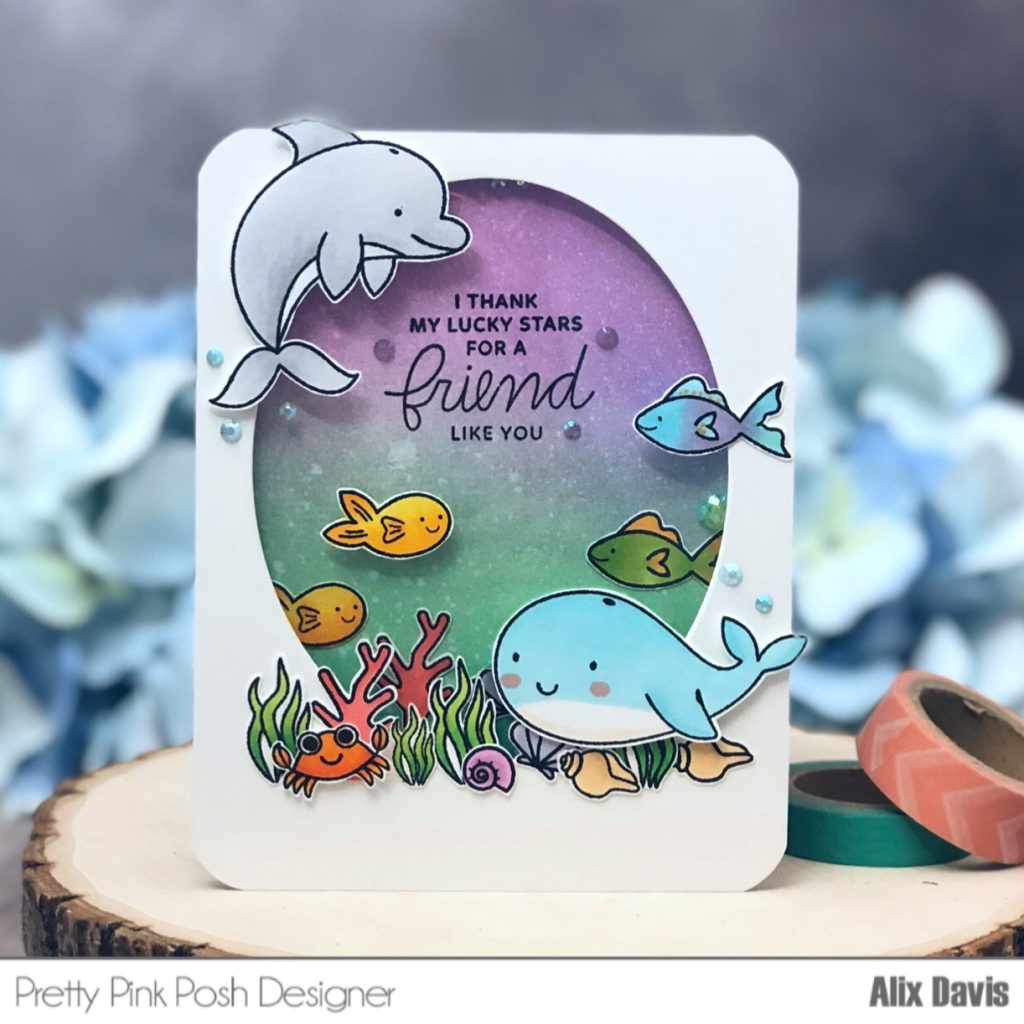
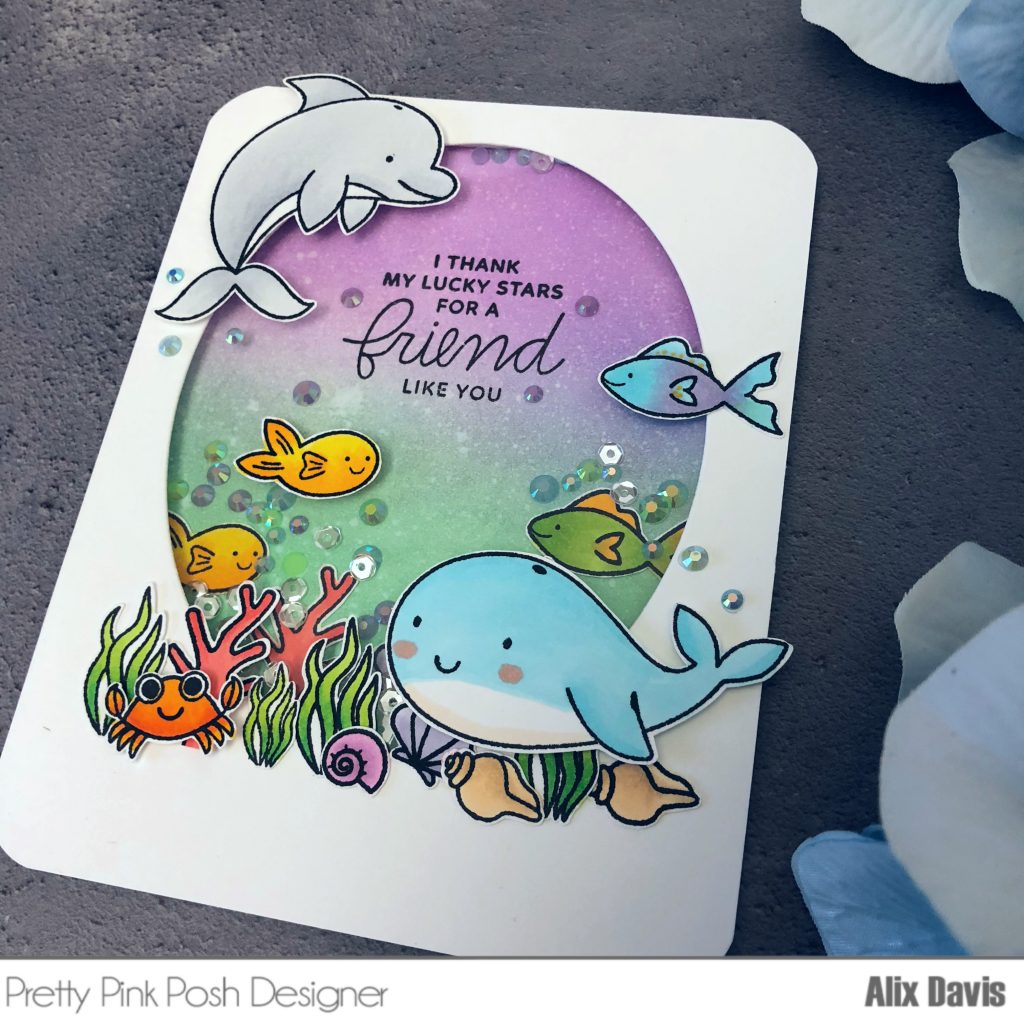
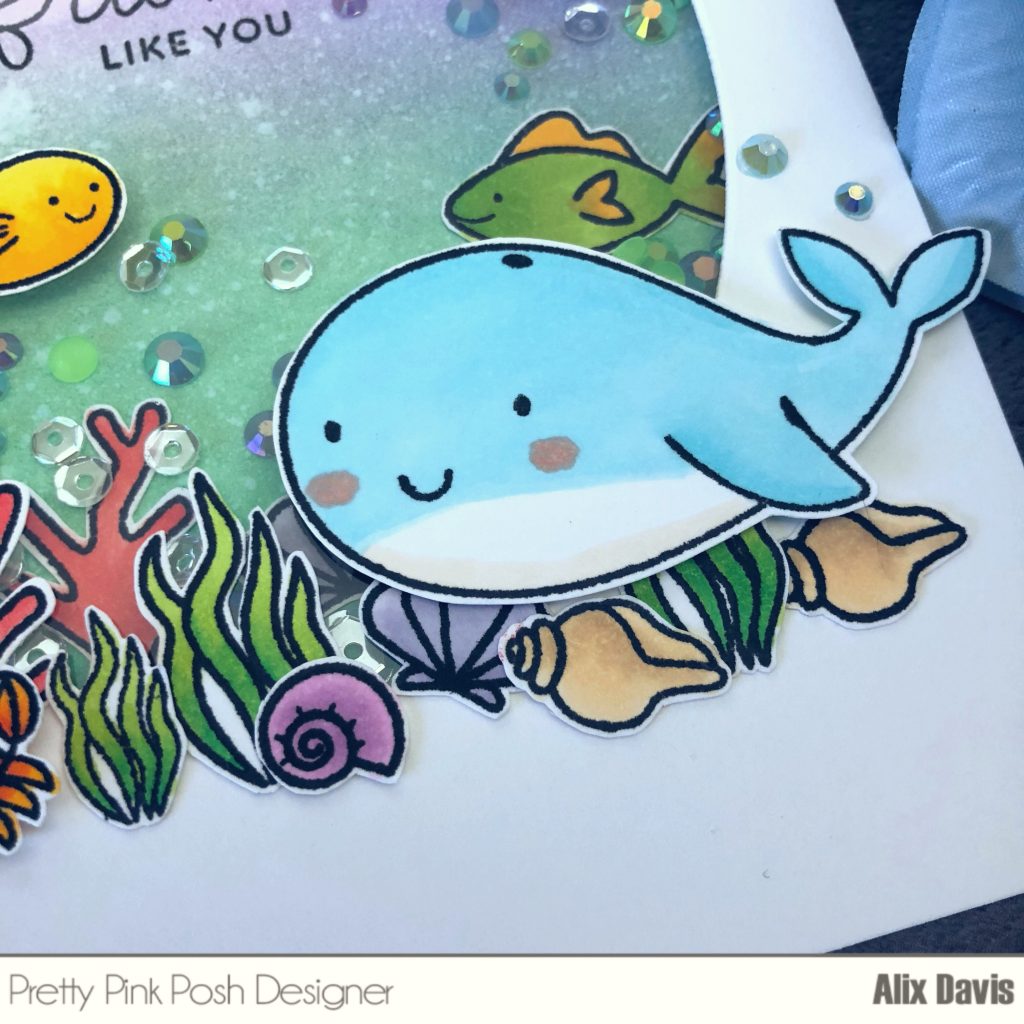
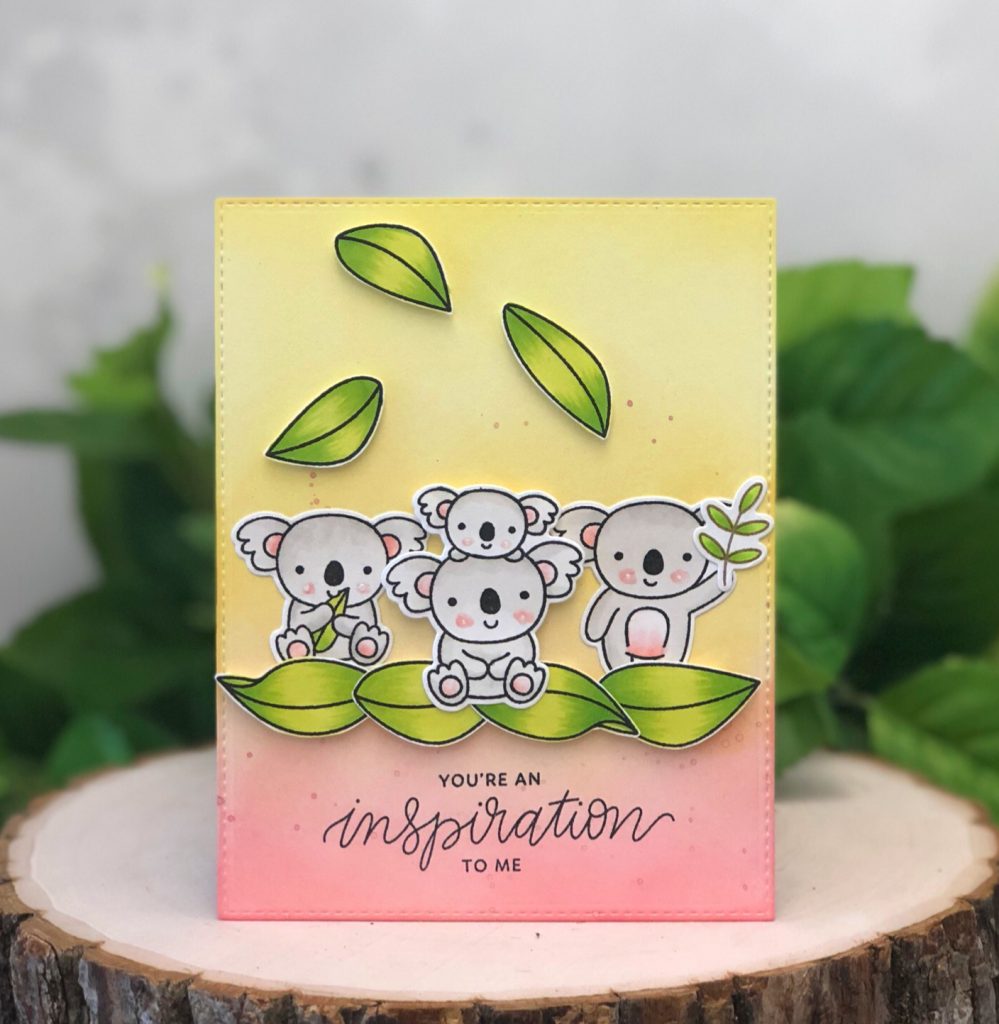
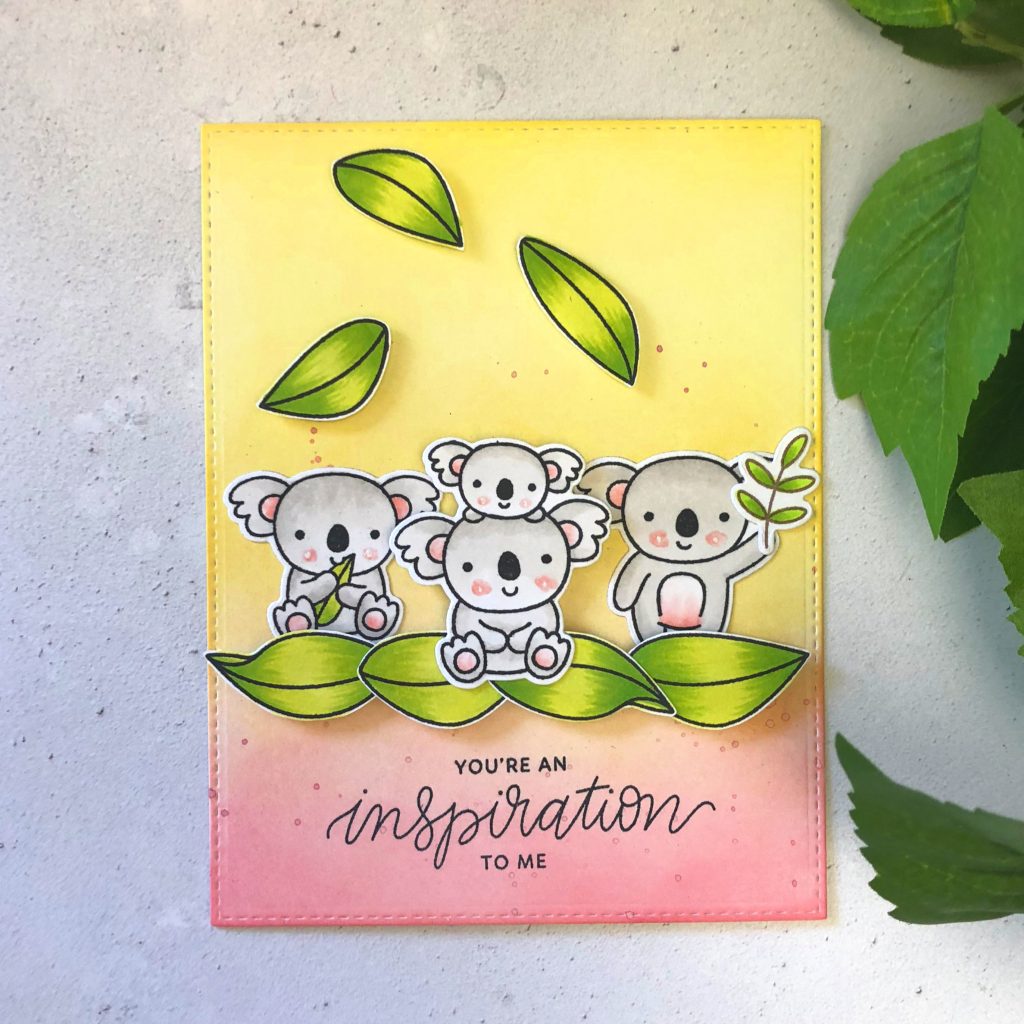
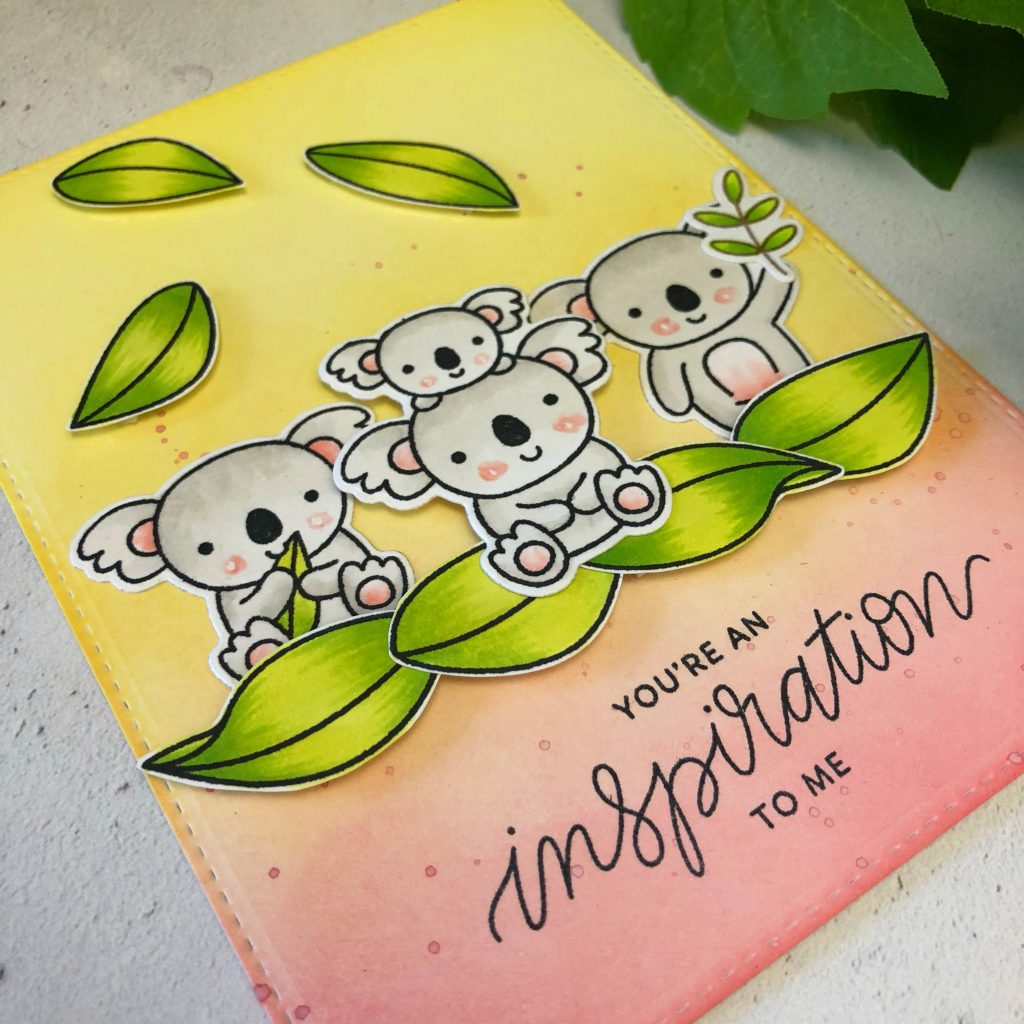
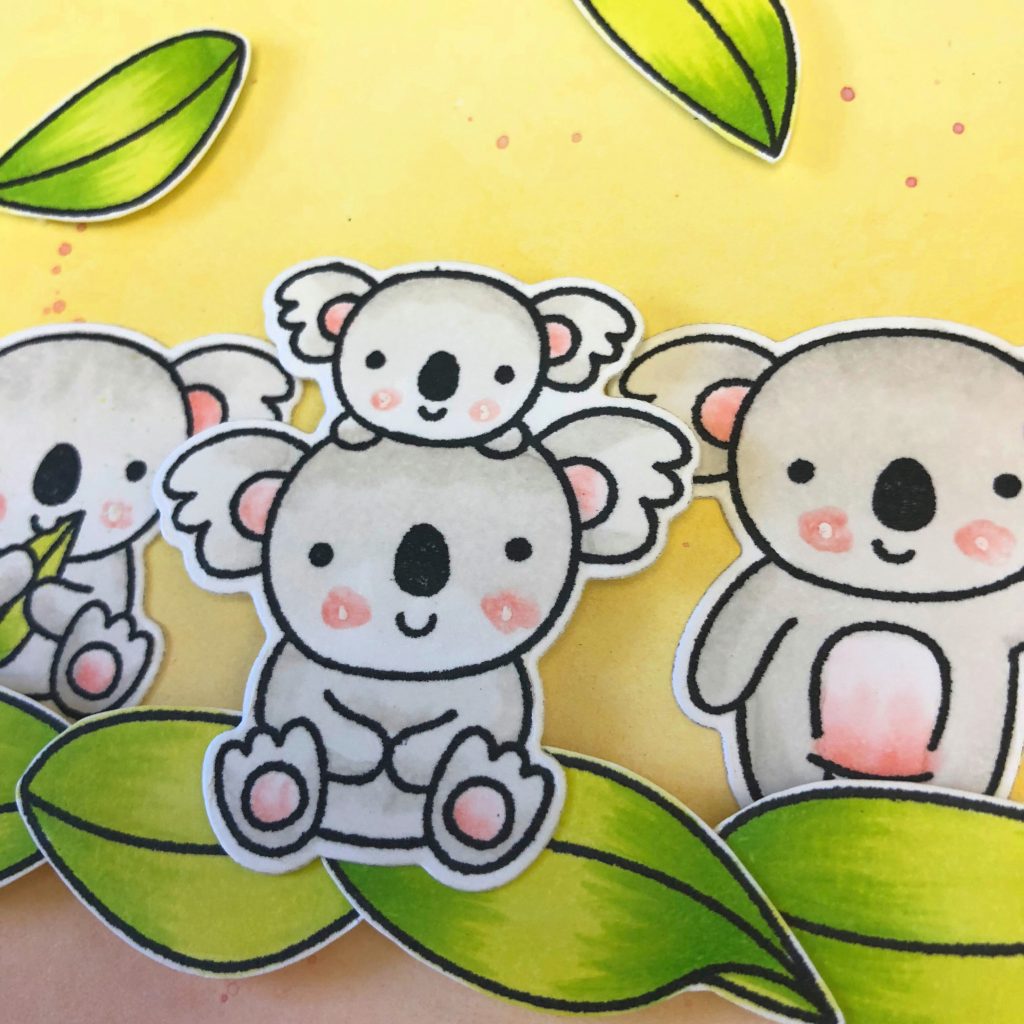
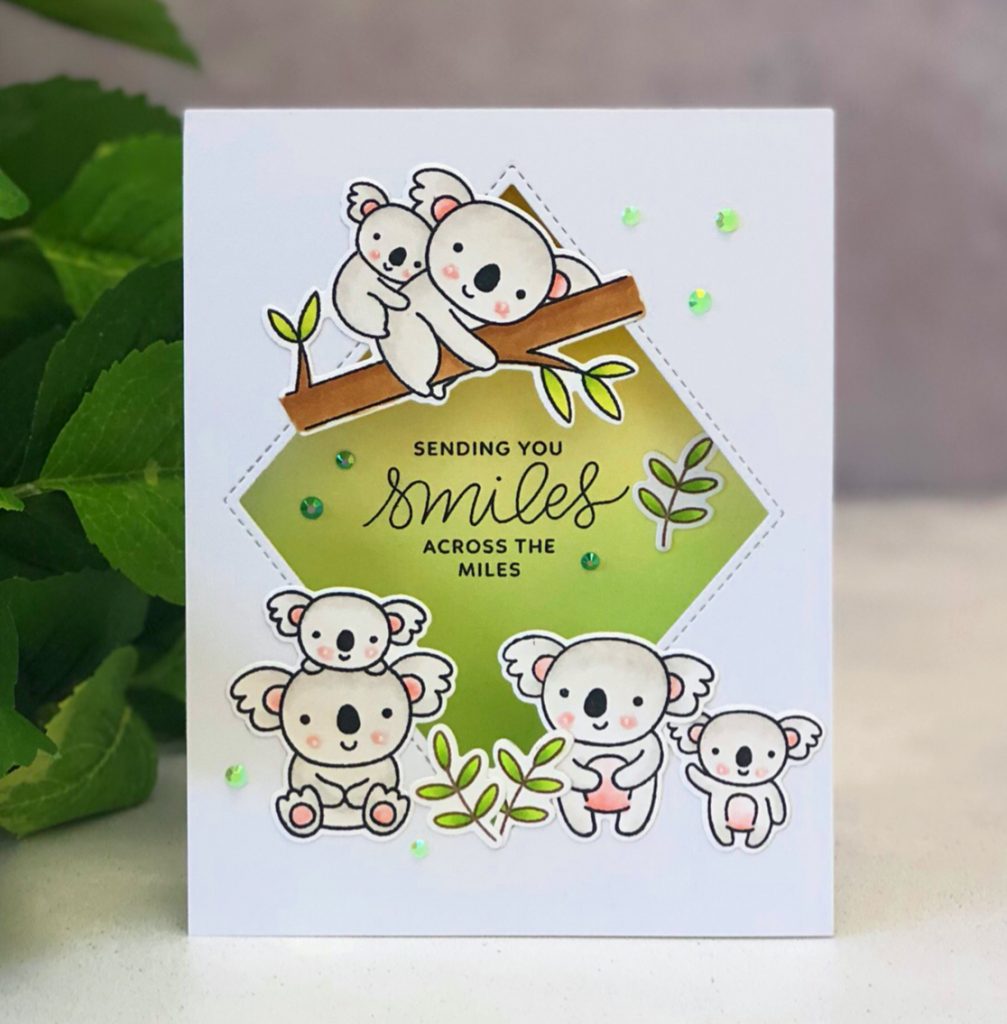
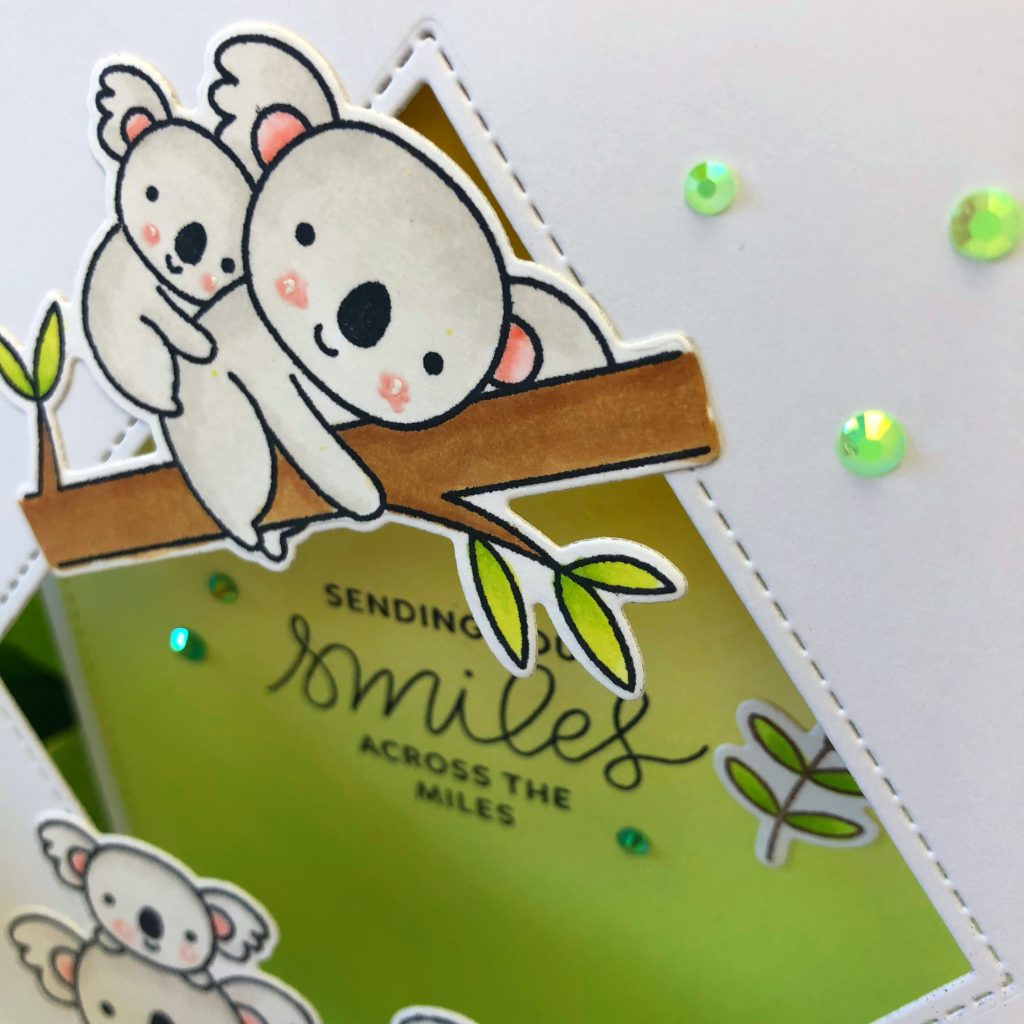
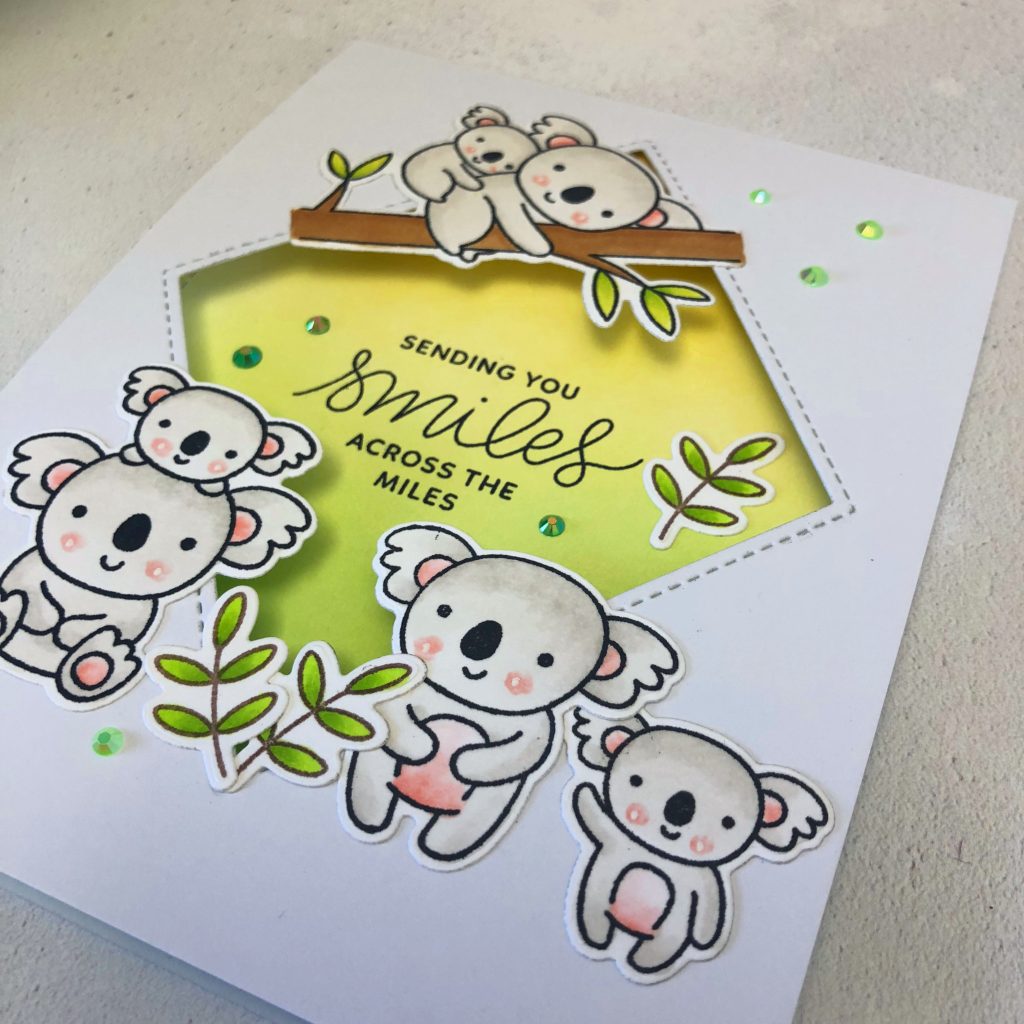
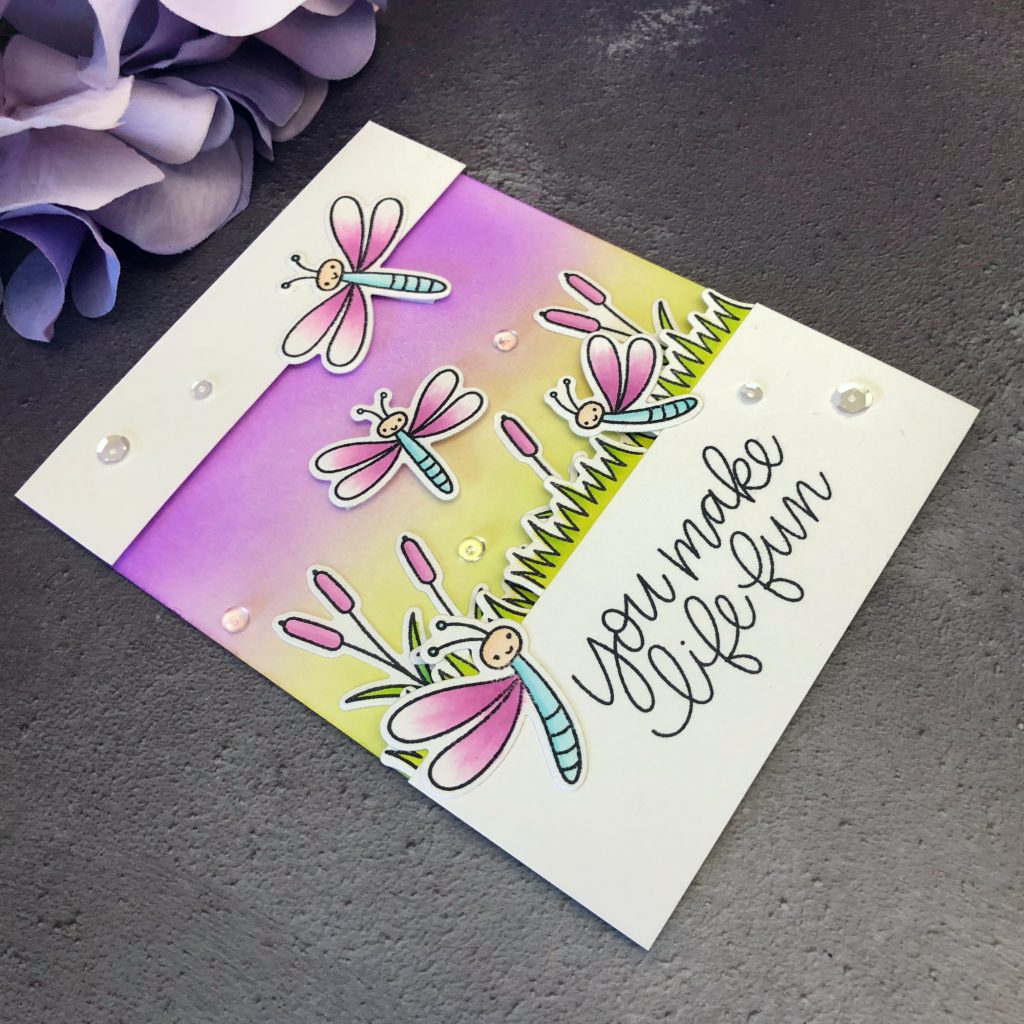
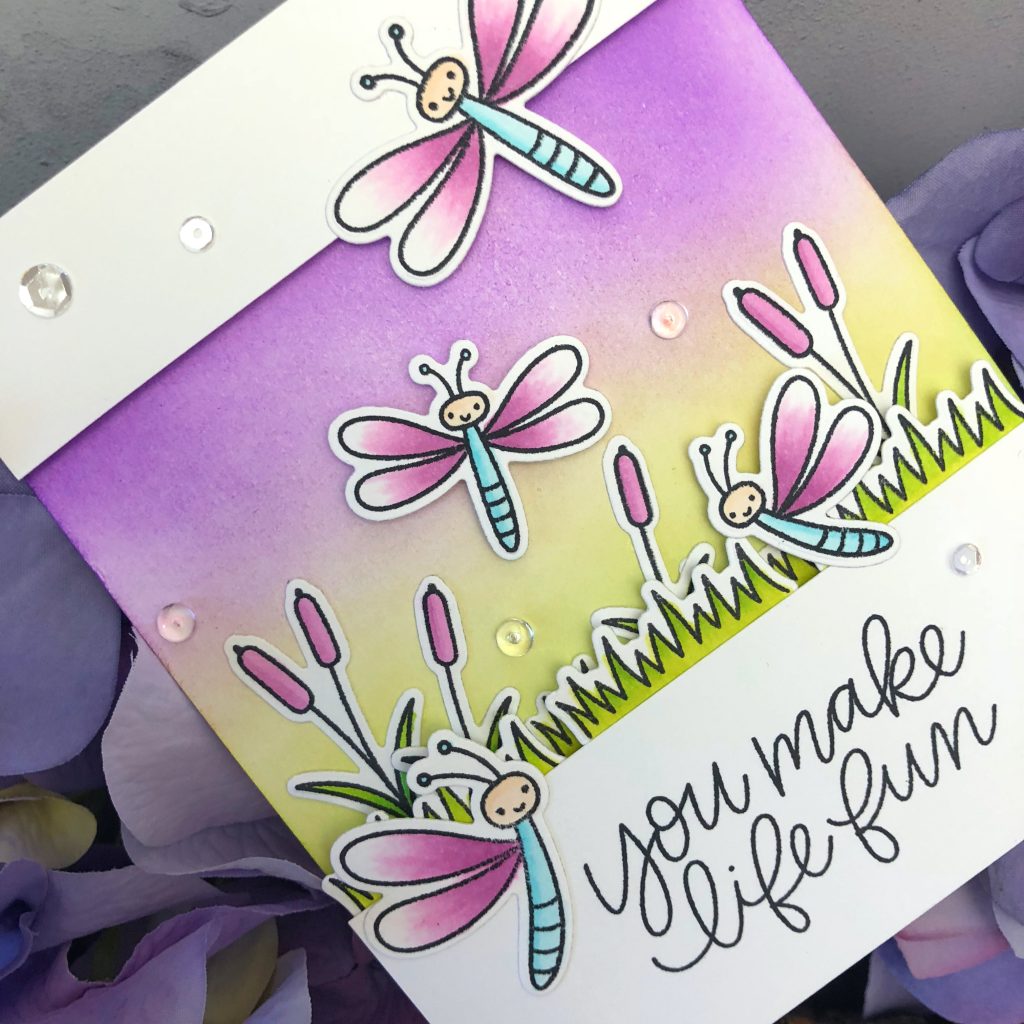
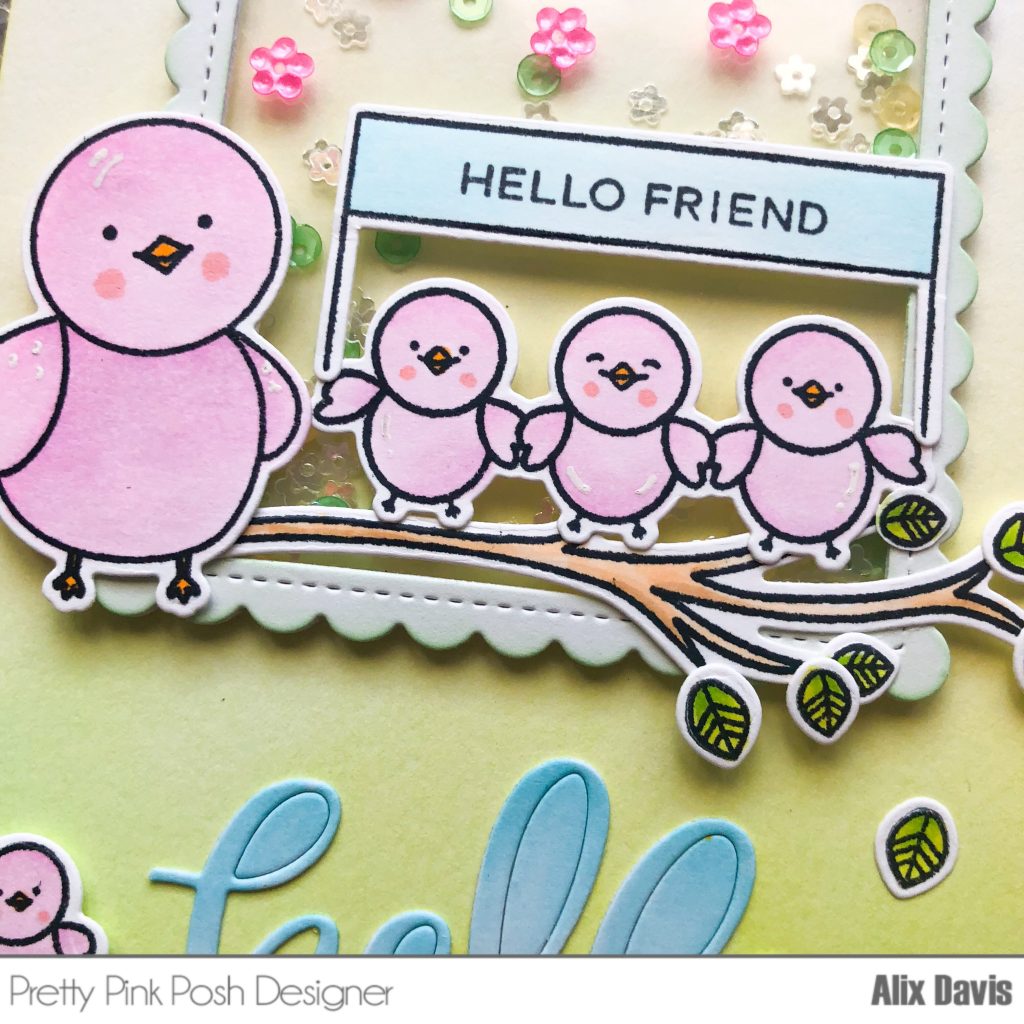
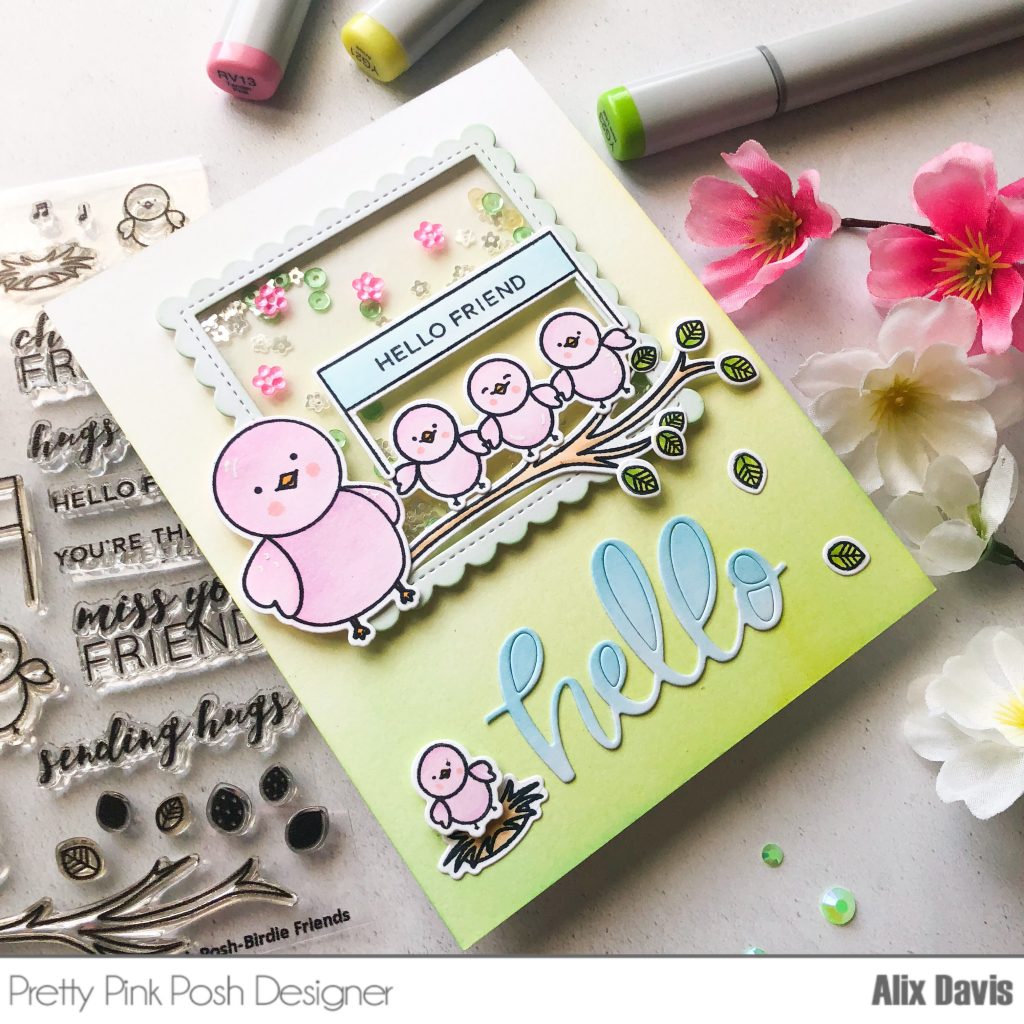
To make this card, I first stamped Clouds and Umbrella images from Pretty Pink Posh Rainy Days Stamp set and Rainy Days Additions Stamp set and cut them with coordinating dies. For ink colors, I used Altenew dye ink in Sea Breeze, Turquoise, Pink Diamond and Limstone. I also stamped and copic colored images from Pretty Pink Posh Birthday Friends Stamp set.

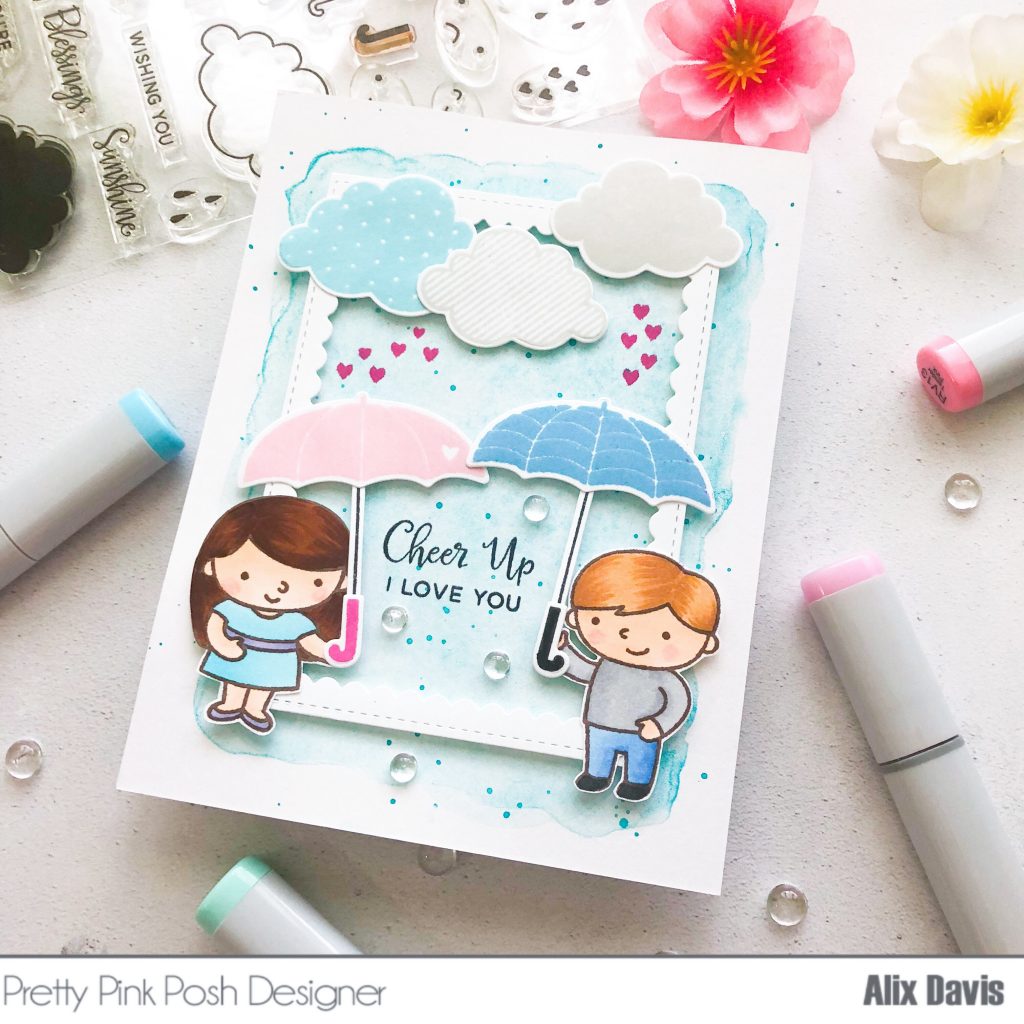
To make the background, I applied Daniel Smith watercolor paint in Cobalt Teal Blue and Cerulean Blue mixture onto a piece of Tim Holtz Distress watercolor paper, then splattered the paint in higher concentration by tapping the watercolor brush handle, and set aside to dry.

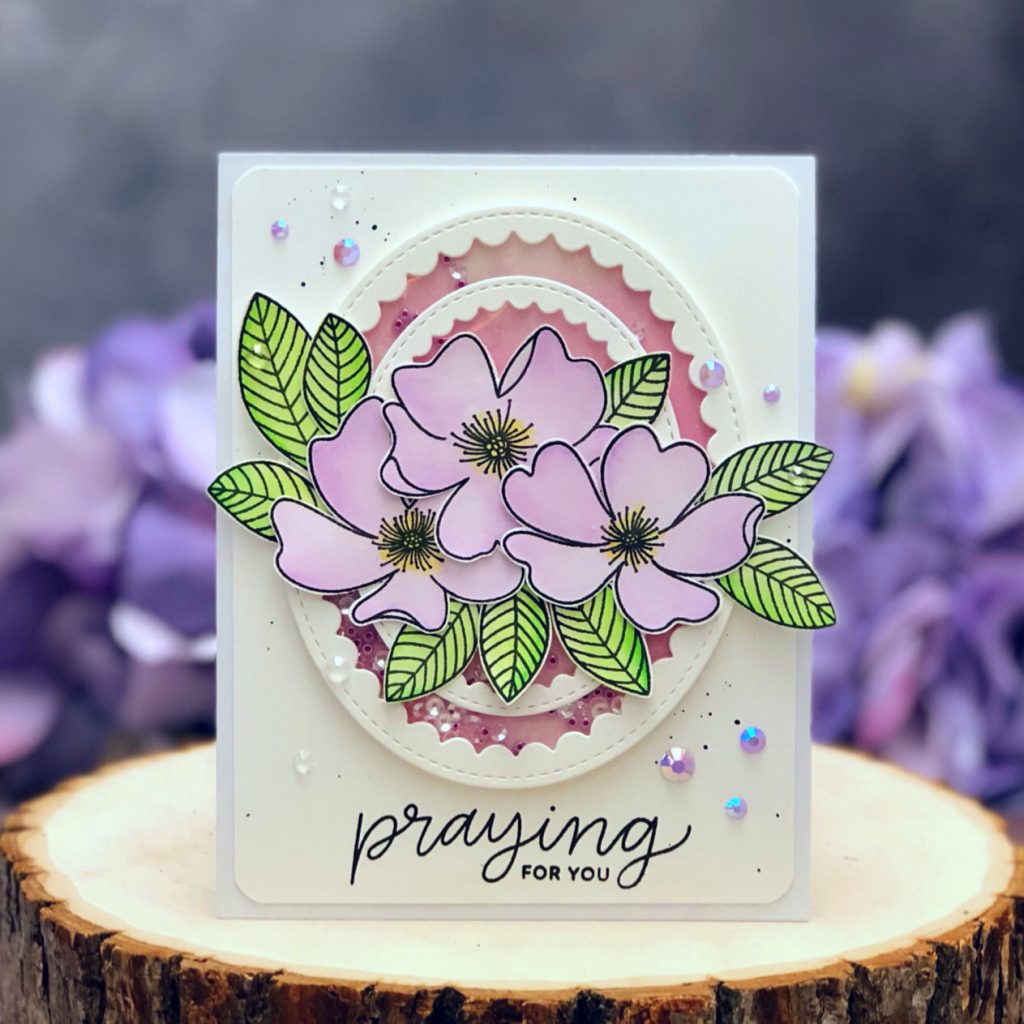
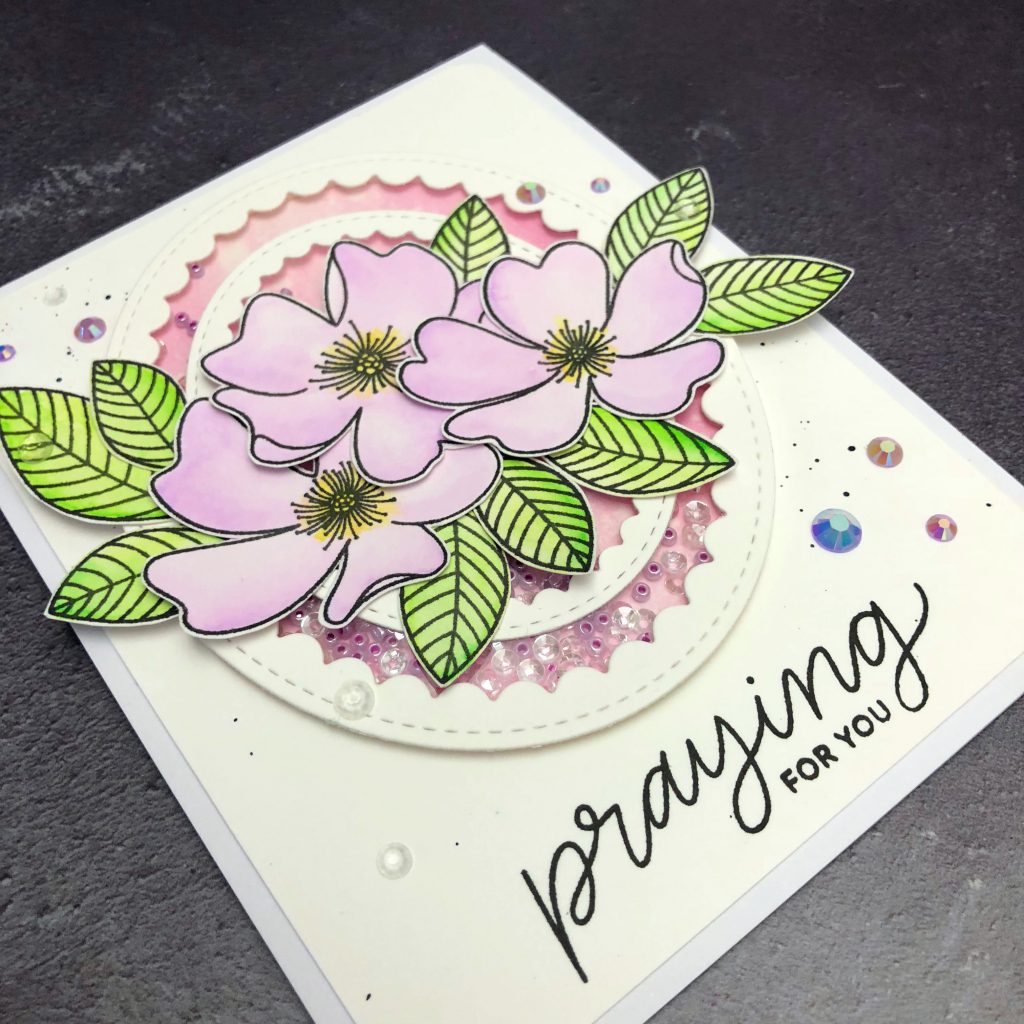
I die cut the frame using Pretty Pink Posh Scallop Frames Dies in smaller size out of a piece of Neenah Solar white 80lbs cardstock. I added the Foam tape underneath the frame and attached the frame on the top of background panel.

I arranged prepared images onto my background using Multi Medium Matte and Foam tapes, and I stamped the sentiment from Rain Days Additions Stamp set using Memento ink in Tuxedo Black. For embellishments, I stamped some hearts using Altenew dye ink in Ruby Red and added Pretty Pink Posh 4mm Clear droplets for rain effects.

I hope you like this card. I am in process of using these clouds and umbrella images for more cards. I will see you soon with more inspirations! Have a good day!

Hello Friend


Hello from Anchorage, AK

I had great adventures for the past a few days in Alaska. Wild life watching was such fun activity for our trip. We saw moose, fox, seals, sea lions, and lots of birds. Speaking of birds, I have this card made with cute birdies.

First of all, I colored all images from Pretty Pink Posh Birdie Friends with copic markers and cut with coordinating dies, then set aside. I ink blended Tim Holtz distress oxide ink in Twisted Citron and Cracked Pistachio onto a piece of Tim Holtz distress watercolor paper.

I die cut the frame using Pretty Pink Posh Hello Shaker Die out of Neenah Solar white cardstock 110lbs. I used scissors cut out “Hello” sentiment, then I glued a piece of acetate paper to bottom of this frame using Multi Medium Matte. I added 3d Foam tape underneath to create some dimension to add shaker materials from Pretty Pink Posh Mini Sparkling Flower Sequins and 6mm Springtime Mix Sequins

Assembling was pretty fun around the shaker window. At last, I used copic marker colored “Hello” cut out and attached it to the bottom of the panel.
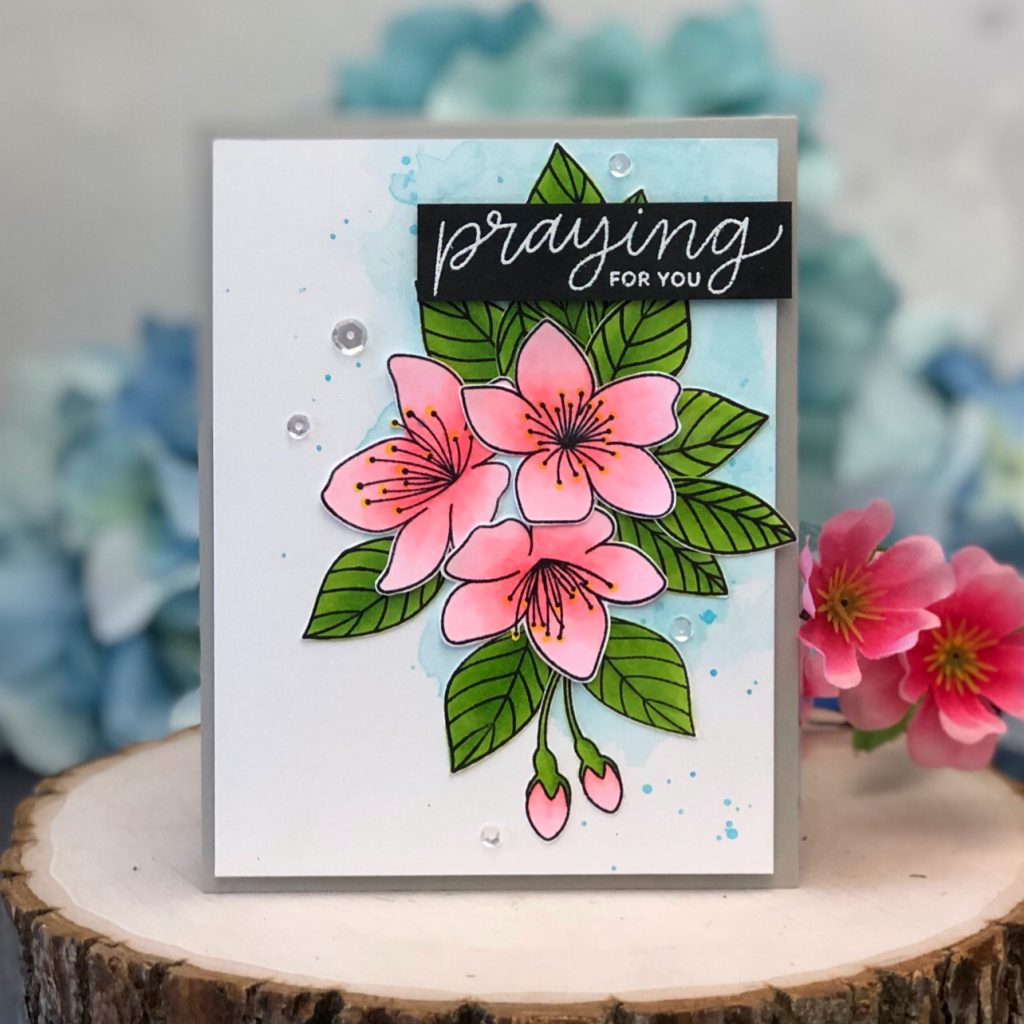
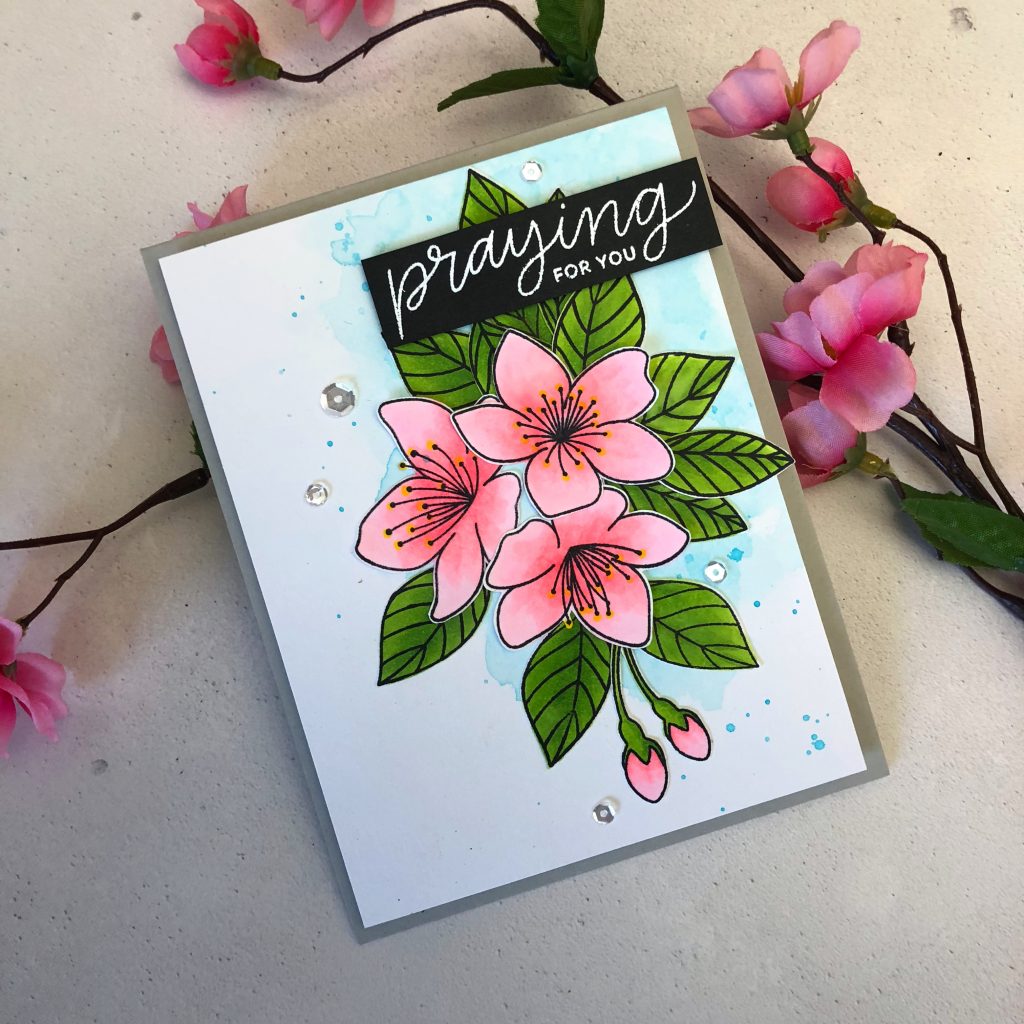
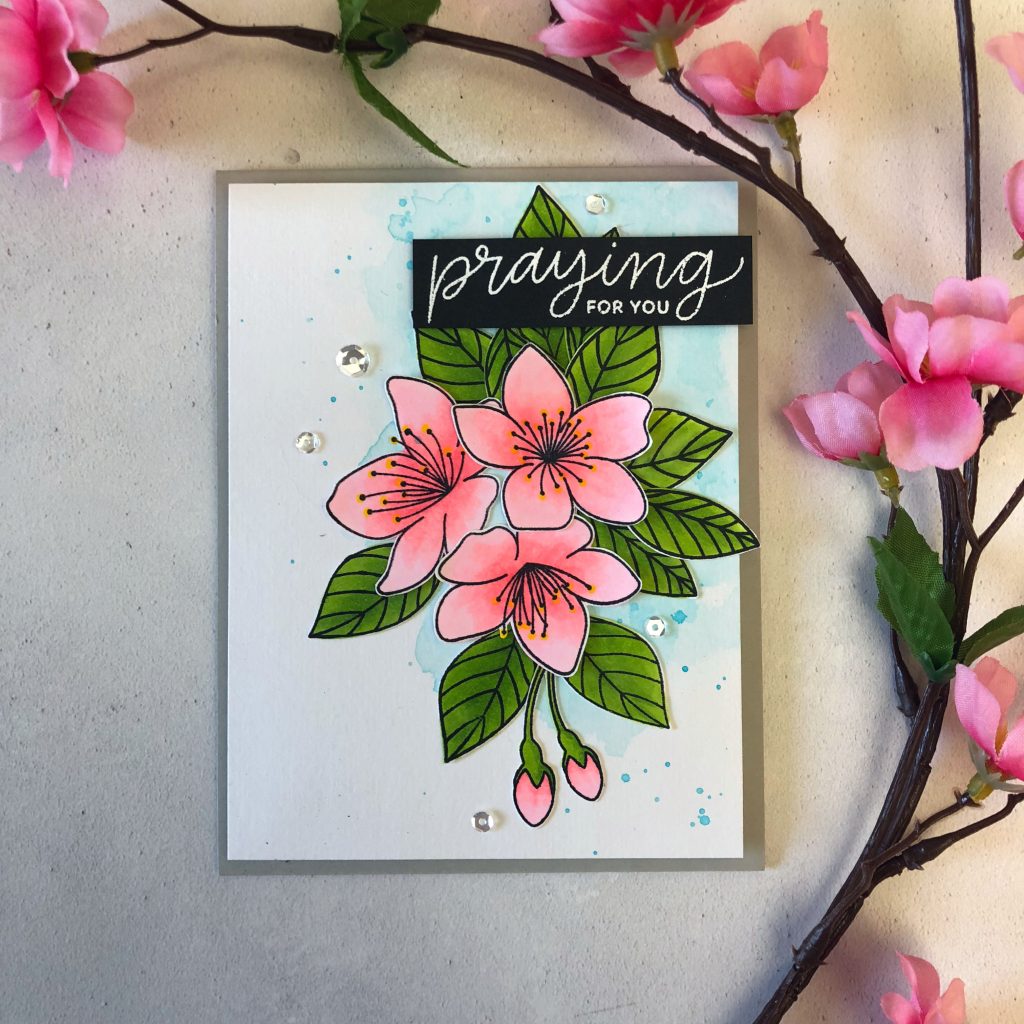
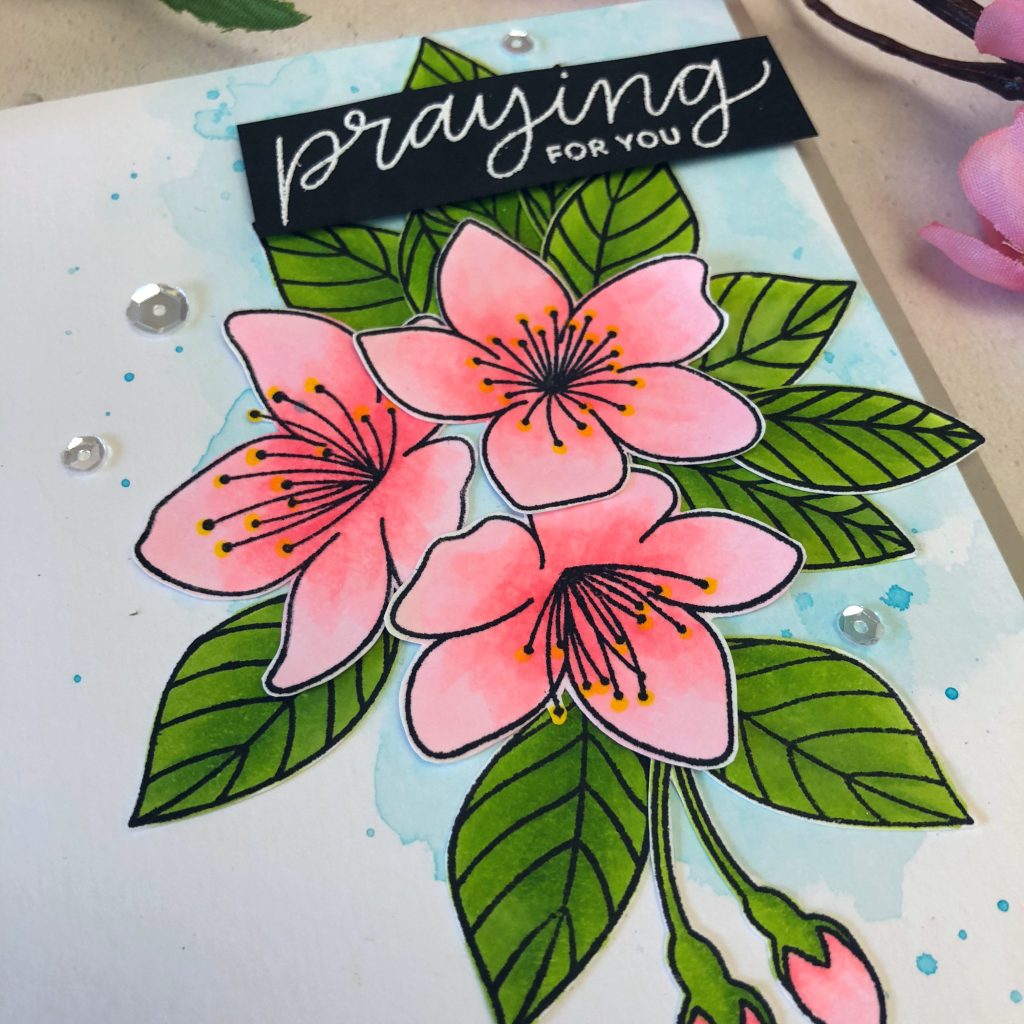
I hope you like this card. Believe or not, it took me more than 1 hour to write this blog post because wifi is so terrible where I stayed. I will be back home on Sunday. See you then!

Camping Friends Cards-Pretty Pink Posh 3 Days Sale

Hi there!

I am here sharing 3 cards I made using Pretty Pink Posh Camping Friends Stamp set. We are having 3 days sale starting from today. You could get 25% off on this stamp set and it’s coordinating dies. Don’t forget it’s free shipping if you spend $60 or more.

<Card 1>

For my first card, I started off with stamping out all images from Camping Friends Stamp set. I stamped them onto some Neenah Solar White Cardstock and colored them in with Copic Markers.  Once they were all colored I used the coordinating dies to cut them out.

I ink blended Tim Holtz distress oxide ink in Cracked Pistachio and  Picked Raspberry onto a piece of Tim Holtz Distress watercolor paper with very light pressure to build pastel colors.  I cut the frame  using the Scallop Frame Die out of a piece of white cardstock,  then I attached the frame onto the background panel with some Foam tape.

Lastly, I arranged colored images inside the frames I created using either Multi Medium Matte or Foam tape. I added some Pretty Pink Posh jewels in Spring Green to embellish the scene.

<Card 2>

I ink blended the background using Tim Holtz distress oxide ink in Tattered Rose and Worn Lipstick (upper part), Salty Ocean (Lower part) onto  a piece of Tim Holtz Distress watercolor paper . To create the grass areas and river, I hand drew the curve of the river on another watercolor paper, then hand cut it. I ink blended the background using Tim Holtz distress oxide ink in Twisted Citron and Cracked Pistachio .

After gluing background parts together, I arranged selected colored images onto the background using either Multi Medium Matte or Foam tape. For embellishments, I used Pretty Pink Posh Seed Beads in Spring Green and 3mm Sparkling Clear Sequins. I made some line details using White Gel Pen in the end.

<Card 3>

For the third card, I decide to do night time camping scene. To create the background, I used 1.5 wide watercolor brush applying two shades of watercolor paints in blue onto a piece of Tim Holtz Distress watercolor paper. I cheated a little since I am not very good at water-coloring. I ink blended the top part of panel using Tim Holtz Distress oxide ink in Black soot. I sprayed water over inked background and removed all wet spots with a piece of paper towel. When it dried, I splattered some white paint using a toothbrush to create thousands of stars. Then I Stamped stars from this stamp set with Versamark ink and embossed with white embossing powder.

I chose Pretty Pink Posh Storybook 5 Die to cut out a window from background panel I made. I adhered them onto a A2 card base using  Multi Medium Matte and  Foam tape to create dimension. After attaching all colored images, I embellished the card using Pretty Pink Posh Iridescent Mini Star Confetti and 3mm Sparrkling Clear Sequins 

<Copic Color Reference Chart>

Tent- G00, G000 /RV52, RV63/E50,E51/RV13, RV04

Bear- E000, E00, E20

Raccoon- W00, w01

Bird- G000,G00/RV52, RV63/B00, B000/Y11, Y13

Wood grain- E52, E31

Bucket- C00, C01, C03

Sun- Y11, Y13, Y17

Moon- Y00, Y13

Fire- Y11, Y13, YR12

Leaf- YG21, YG23


 You could only get  25% off for this set while supplies last. So don’t let yourself regret if you wait too long. Thank you for reading this post. Enjoy your days!

Pretty Pink Posh Design Team

I am super duper excited to announce that I am joining Pretty Pink Posh Design Team for this term (July,2018 to December,2018) . I am always addicted to their design styles and products and I dreamed that I  could be one of these talented girls on PPP Design team. My dream came true at this moment! Thank Paulina for choosing me so I could have a stage to perform. And I also thank everyone who is there supporting me and giving me all feedback and encouragements! To celebrate this new design team announcement, Pretty Pink Posh is giving away $100 Gift Certificate to our online store if you head to This Blog post.  To celebrate this exciting moment, I made this card below to be thankful that I could work with all girls on PPP Design Team!

To begin with, I ink blended Tim Holtz distress oxide ink in Lucky Clover, Salty Ocean and Wilted Violet on to a piece of Tim Holtz distress watercolor paper. I sprayed water randomly splattered onto inked background from a spray mist bottle. While I was waiting for the background to air dry. I stamped the sentiment “I thank my lucky stars for a friend like you” from Pretty Pink Posh Thoughtful Greetings Stamp set using black dye ink.

I colored all selected images from Pretty Pink Posh Sea Friends Stamp set using Copic markers. I chose some of them for the background along with a few Pretty Pink Posh Jewels in Pansy Purple.

To create the shaker window, I first die cut the frame using Pretty Pink Posh Scallop Oval die out of A2 sized Neenah Solar white cardstock 110lbs as top of the window. Then I glued a piece of acetate paper underneath of it to create see through window. I poured Pretty Pink Posh Jewels in Spring Green, Pansy Purple and Aquamarine with 3mm Sparkling Clear Sequins on the top of background, then I closed it up by attaching the top panel onto it with help of  Foam tape.

In the end, I attached the rest of images using either Multi Medium Matte or Foam tape around window. I added a few Pretty Pink Posh Jewels in Sea Glass around Dolphin and Whale tale to create water splashes.

I cannot wait to share more projects with you using Pretty Pink Posh products. Hope to be your inspiration in the future!!!


Cherry blossoms card

Happy Saturday!

I am starting to pack everything for tomorrow’s long flight back home. After being in the car for more than 17 hours from New mexico to California last month, it should be not too bad for me. I completely enjoyed every single meal I had but I am so scared to know my current weight is. I guess I will just need to keep hypnotizing myself I didn’t gain too much to lose. Nothing is better than home town foods. Right?!

To begin with this card, I Copic colored all images from Pretty Pink Posh Cherry blossoms Stamp set and set aside. Then I started to create the background. I chose a piece of Tim Holtz Distress watercolor paper since it is whiter than most of other watercolor papers.  I used ink from Zig clean color real brush marker in Cobalt Blue#031 to mix with watercolor and randomly applied onto the background. After the first layer dried, I applied another layer. Then I made the concentrate the mixture to splatter some droplets onto the background by tapping on a brush handle.

I played the arrangement of the floral a little until I am happy with it. I took a photo as reference first, then I adhered them one by one followed my reference using Multi Medium Matte. I added Pretty Pink Posh 3mm Sparkling clear sequins and 4mm Sparkling clear sequins around my centerpiece. At Last, I stamped the sentiment from Pretty Pink Posh Everyday Greetings Stamp set onto a piece of black cardstock using Versamark embossing ink, then I poured WOW! embossing powder in bright white. After cutting it into rectangle shape, I attached the sentiment stripe using a piece of Foam Tape.

For Copic color References:

Flowers: RV00, RV21, RV23, Y08

Leaves: YG03, YG17

And that’s it! I hope you will have a wonderful day. I will be seeing you guys when I arrive at home!

You’re an inspiration to me

Hi Crafty!

I am coming home in two days. Time flies by. I had great time here with my family and I am dying to come home to try all crafting supplies I bought here in China. There are alcohol markers, different brands of watercolor paints and brushes, and…You Name it!

This is a very simple card. In order to make it look not so simple. I followed my daughter’s suggestion to make it rainbow background. Alright, it did not turn out what rainbow she wanted it to be but it is close enough. I ink blended Tim Holtz Distress oxide ink in Squeezed Lemonade, Fossilized Amber and Worn Lipstick onto a piece of Tim Holtz Distress Watercolor paper . I mixed a little ink from Worn lipstick with water, then I picked it up with a round watercolor brush. I lightly tapped on the handle to create some droplets onto the background.

I colored Koala images with Copic markers from Pretty Pink Posh Koala Friends Stamp set and cut them with coordinating dies. .I also used foliage image from Pretty Pink Posh Bunny Friends Stamp set and cut with coordinating dies for a koala to hold onto. For the bigger leaves, I got them from Pretty Pink Posh Pretty Petunias Stamp set to match. I arranged them on the top of the panel using Multi Medium Matte and Foam tapes for dimensions. At last, I stamped sentiment from Pretty Pink Posh Encouraging Greetings Stamp set.

Here are Copic coloring references for this card:

Koala Bears

Bodies: W00, W1

Ears and Cheeks: RV00, R20

Leaves: YG21, YG23

Thanks for stopping by, I hope I inspired you a little for your next project!

Thank you card with cherry blossoms

Happy 4th of July!

Today I am showing a project I did using Pretty Pink Posh Cherry blossoms Stamp set and simple self created background.

First of all, I colored all images with copic markers, then I hand fussy cut them and set aside. Your life would be much easier if you use it’s coordinating dies.

For Copic color References:

Flowers: RV00, RV21, RV23, Y08

Leaves: YG21, YG03

To create the background, I pulled out my all time favorite — Tim Holtz Distress watercolor paper . First,  I used ink from Zig clean color real brush marker in Cobalt Blue#031 to mix with watercolor. Second, I used a 1 inch flat watercolor brush applied the watercolor mixture onto the paper free handed with zero stress. Last, I made the concentrate the mixture to splatter some droplets onto the background by tapping on a brush handle.

I adhered all images onto the background panel using Multi Medium Matte. Then I stamped sentiment from Pretty Pink Posh Thoughtful Greetings Stamp set with Versafine ink in Black. I embellished the card by adding some Pretty Pink Posh Jewels in Sparkling Clear around the floral.

Thanks for reading this post. Have a great day!!!

Sending smiles from Koala friends

Happy Monday! I am sending you smiles across the miles from China!

It’s been raining all week last week since we arrived in China. I hope the weather will get a little better. Positively thinking, at least it’s not as hot as it usually is at this time of year. My parents and us are going to a photo studio tomorrow for a special photo shoot session to keep our memory. I cannot wait to see how they could make us look like stars.

This card above is a See through window card in my language. It makes people who receives this card feel more interested when they open it as well. To begin, I colored most of images with Copic markers from Pretty Pink Posh Koala Friends Stamp set and cut them with coordinating dies. I also used foliage images from Pretty Pink Posh Bunny Friends Stamp set and cut with coordinating dies as scene building supplements.

I cut the open window on the top part of a A2 white card base using Pretty Pink Posh Stitched Diamonds die and set aside. I grabbed a piece of Tim Holtz Distress Watercolor paper to create background. I did ink blending technique by using Tim Holtz Distress Oxide in Squeezed Lemonade, Twisted Citron, and Cracked pistachio. Then I attached this background onto side of the A2 card. After find the center by closing top of the card, I stamped sentiment with Memento ink in Tuxedo Black on the background.

I adhered all colored images to selected areas using Multi Medium Matte, and I added Pretty Pink Posh Jewels in Spring Green and Shamrock as embellishments.

Here are Copic coloring references for this card:

Koala Bears

Bodies: W00, W1

Ears and Cheeks: RV00, R20

Tree Trunk: E31, E34

Leaves: YG21, YG23

I hope everyone is going to have a great day. Hey remember, you have only 4 days to go before weekend! I will see you again in couple days!

You make life fun

Hello everyone!

Did you purchase this lovely stamp set called Darling Dragonflies from Pretty Pink Posh? It is a mini stamp set with good price point and unlimited potential. Let me talk about how I made this stamp into a cute card below to tease you a little.

To begin, I colored all images with Copic markers and cut them with coordinating dies. Then I set them aside to use it later.

I ink blended with Tim Holtz Distress oxide ink in Wilted Violet and Twisted Citron onto Tim Holtz Distress watercolor paper to create the background. I cut two parts out of piece of white cardstock and I adhered them on the top of the background using Foam tape. That way I created color contrast.

I started to arrange all images onto the panel using Multi Medium Matte and Foam tape. I also added some Pretty Pink Posh 3mm Sparkling clear sequins and 4mm Sparkling clear sequins. At last, I stamped the sentiment on the bottom of card using Memento ink in Tuxedo Black.

Here you go. A simple but cute card is here. Now tell me a reason not to love this stamp set!

Praying for you

Hi there!

Today is the day I am heading to China for my two weeks trip. It’s been five years since I went back to visit my family. My mom is turning 60 and she is going to have a huge birthday party. I know I gotta be there celebrating with her. I made 8 cards ahead of time so I could show you one by one while I am out of states. It’s like I’ve never been gone!

I am here showing a card featuring Pretty Pink Posh Wild rose stamp set. To begin with, I colored all images with watercolor paints and hand fussy cut them.

To create the shaker window, I die cut the frame using  Pretty Pink Posh Scallop Oval Frame die out of Neenah Solar white cardstock 110lbs 6 times and glued 5 of them together using Multi Medium Matte to create the base of frame. Then I stacked a piece of acetate paper on the top of this base and close it up with another piece of die cut frame. I chose two kinds of sequins as free movements for this shaker card. One is Pretty Pink Posh 3mm Sparkling Clear sequins and another one is Pretty Pink Posh Jewels in Pansy Purple.

For the background of this shaker window,I ink blended Tim Holtz distress oxide ink in Wilted Violet on to a piece of Tim Holtz distress watercolor paper.

I grabbed a piece of white card stock to cut it slightly smaller than A2 size, then I rounded four corners with a quarter corner chopper. I adhered it onto A2 card base after I splattered some black paint on the top of it.

In the end, I adhered the window onto the card panel and stamp the sentiment “Praying for you” from Pretty Pink Posh Everyday Greetings Stamp set. I embellished the card with some more Pretty Pink Posh Jewels in Pansy Purple.

I hope you all have a wonderful day and I will be back soon!