Write Your Own Fairy Tale -MFT 2018 Card Design Superstar: Clean & Simple Genius

Hello Everyone,

I made this card to enter My Favorite Things 2018 Card Design Superstar Contest: Clean & Simple. I am a person who cannot stop adding elements onto my cards. This is definitely a big challenge for me to try pure simple style.  A quote says, ” Accept challenges so you can feel the exhilaration of victory”. So here I am and good luck to myself!


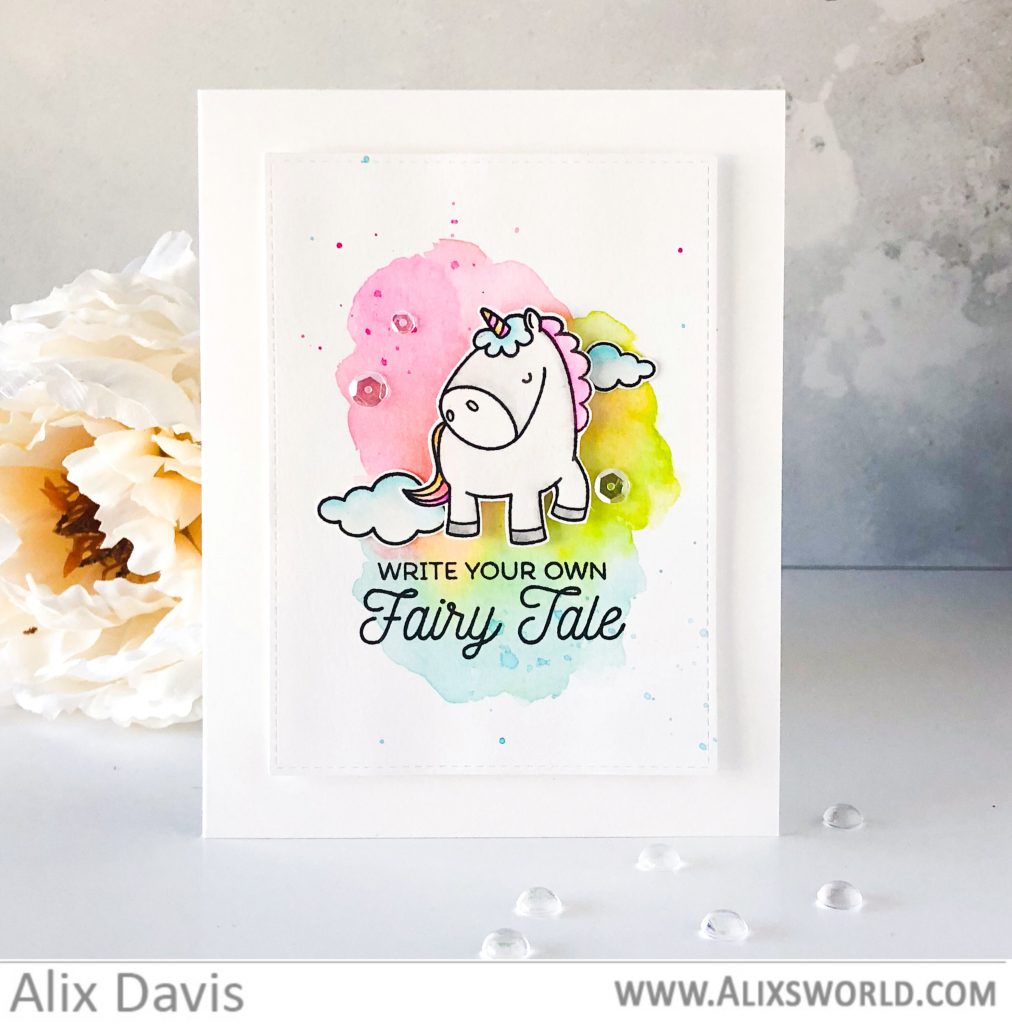
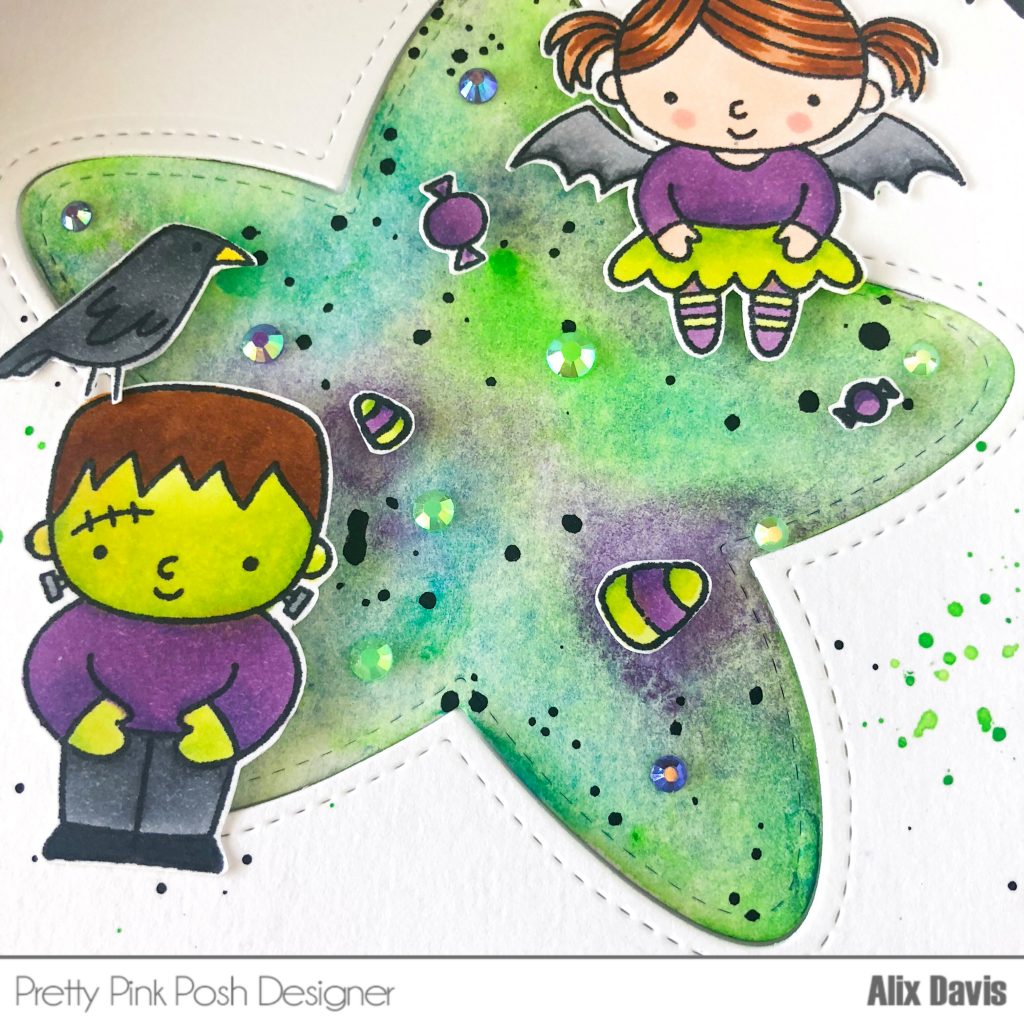
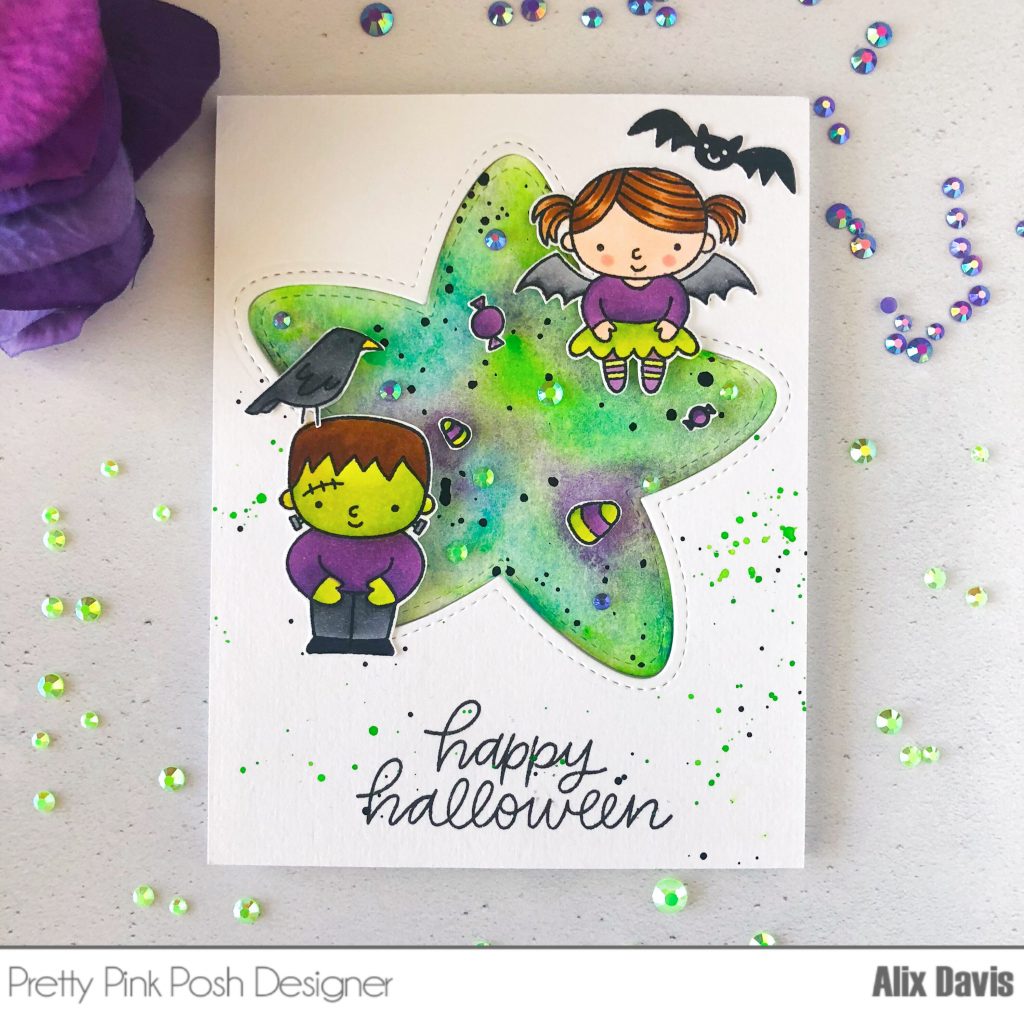
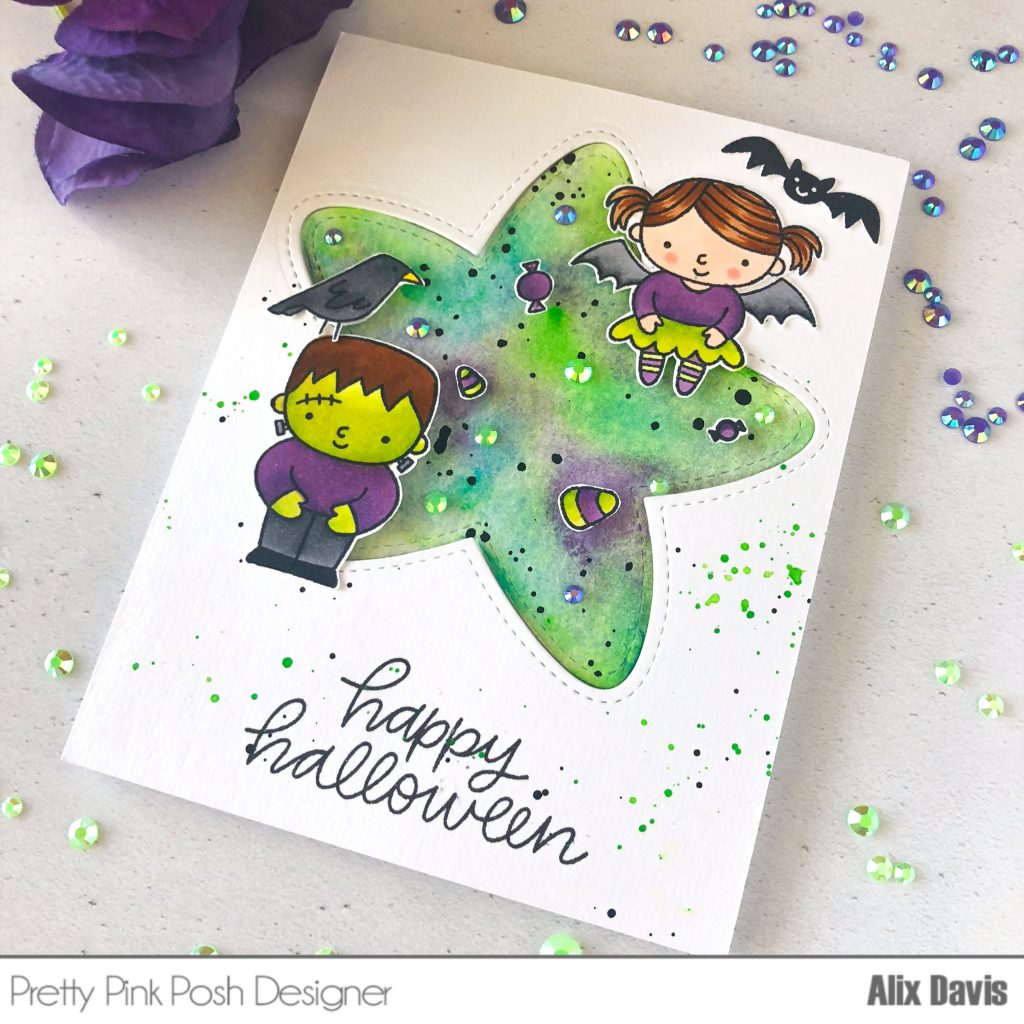
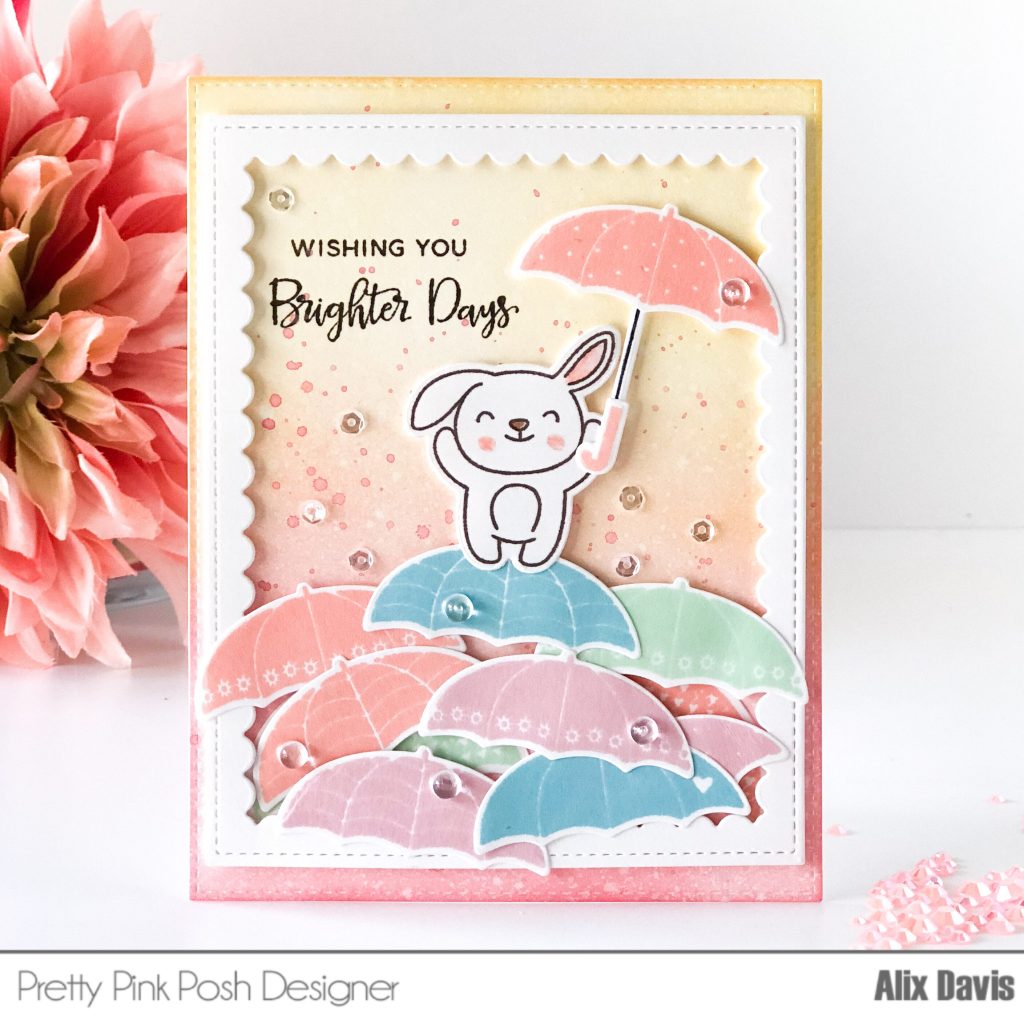
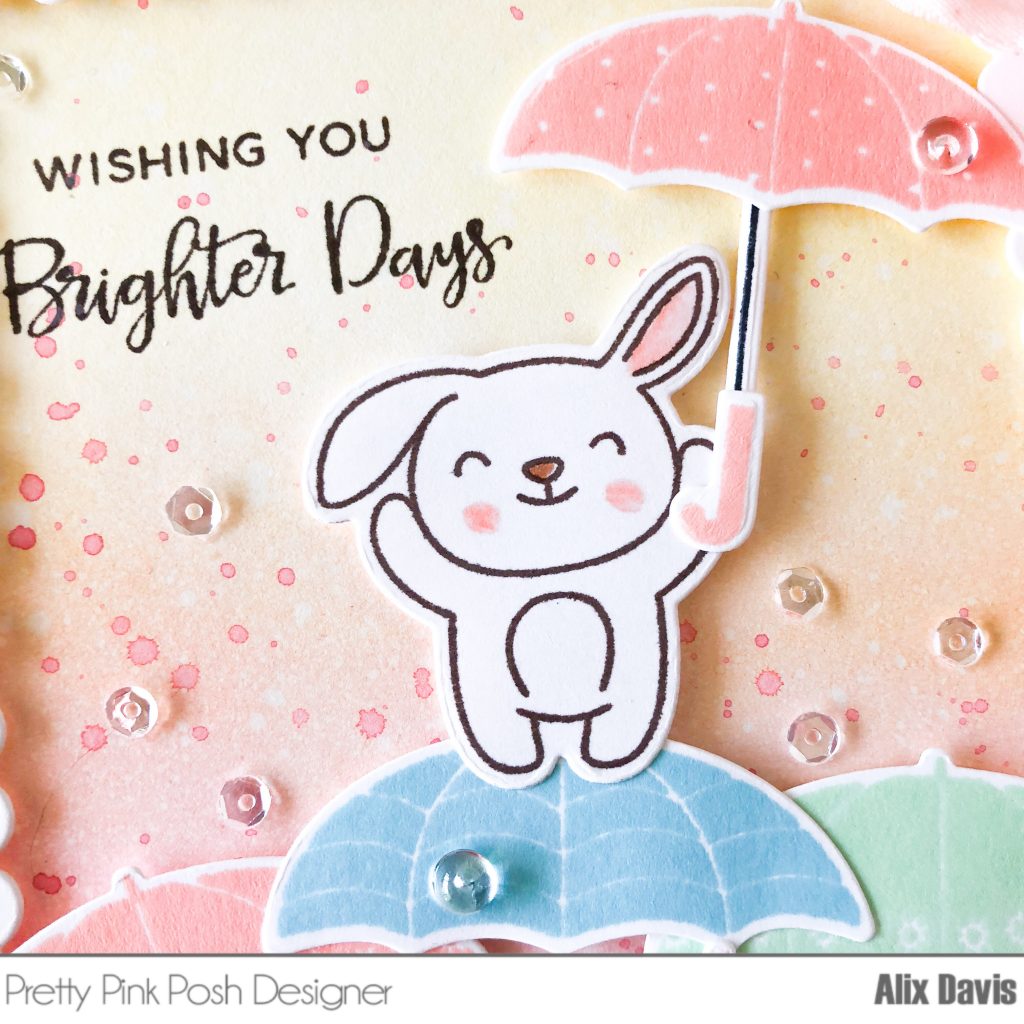
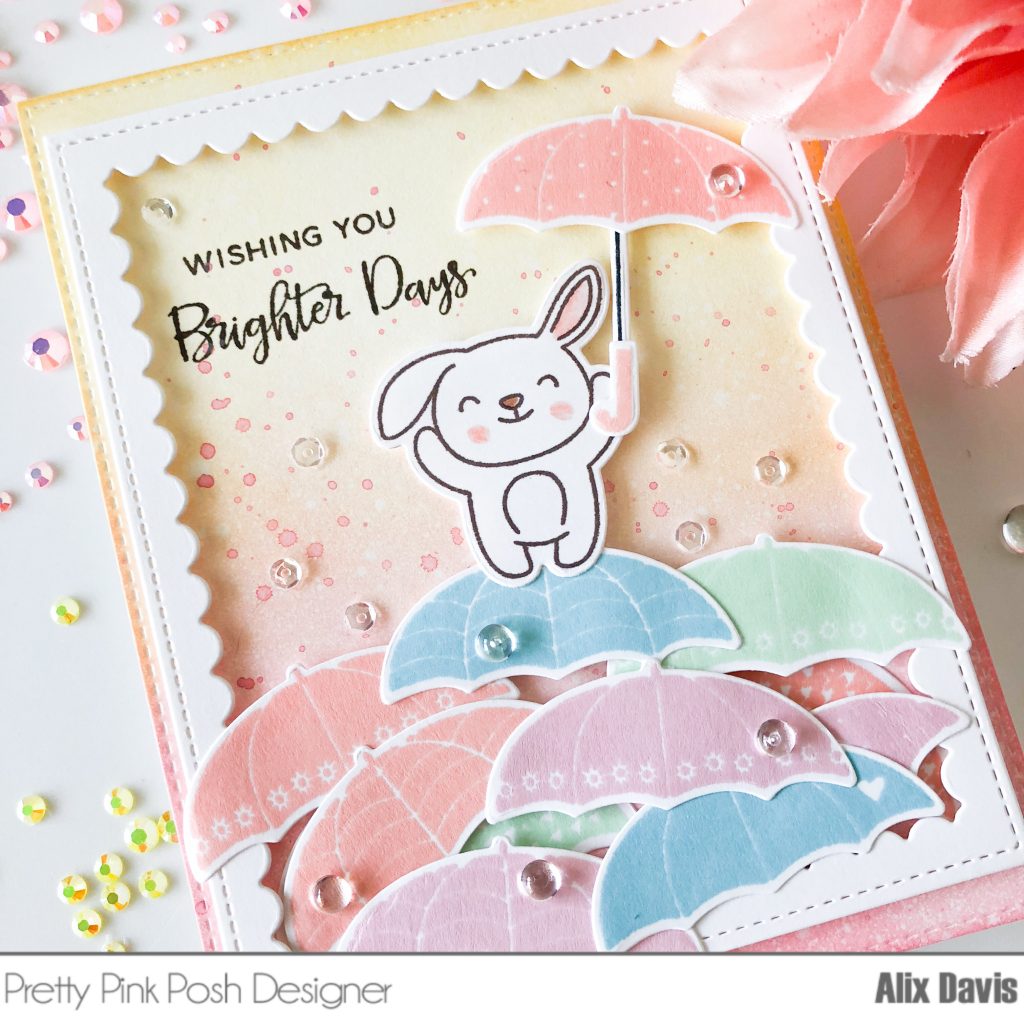
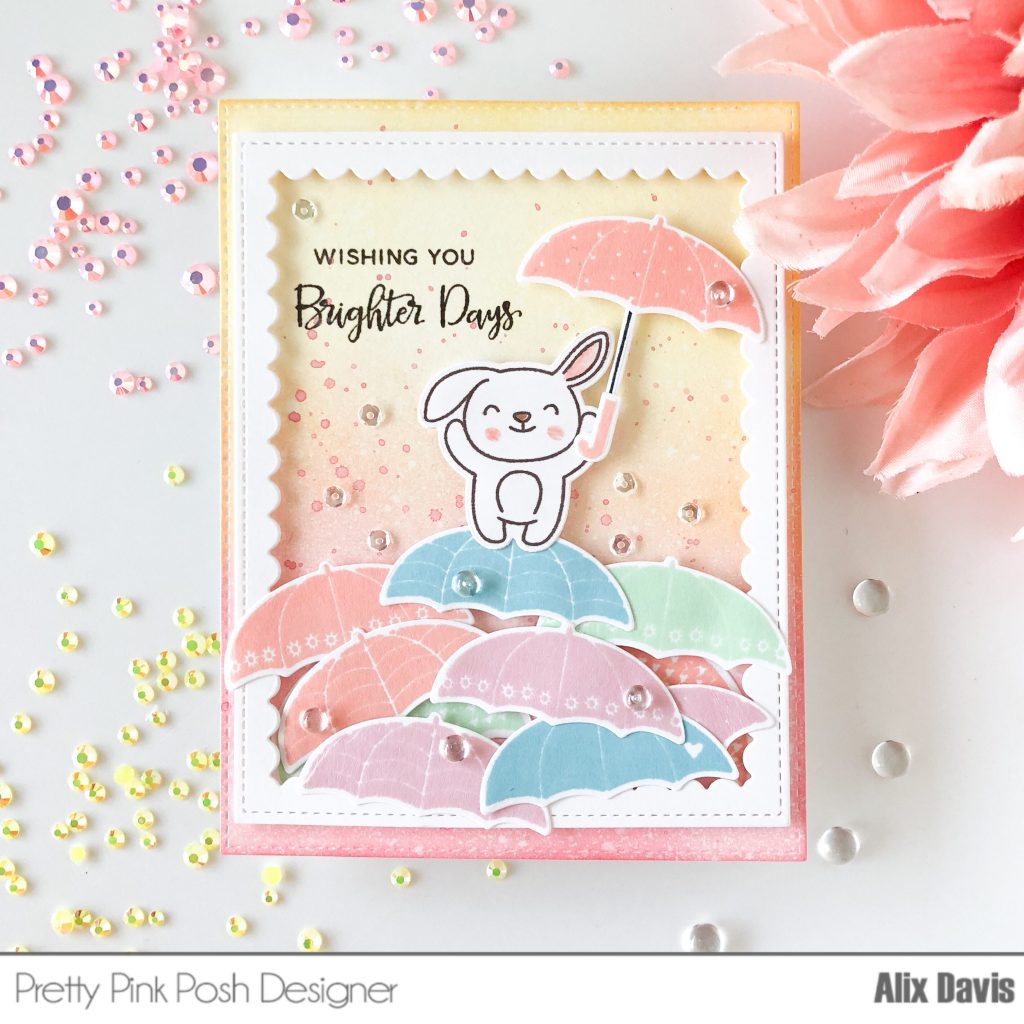
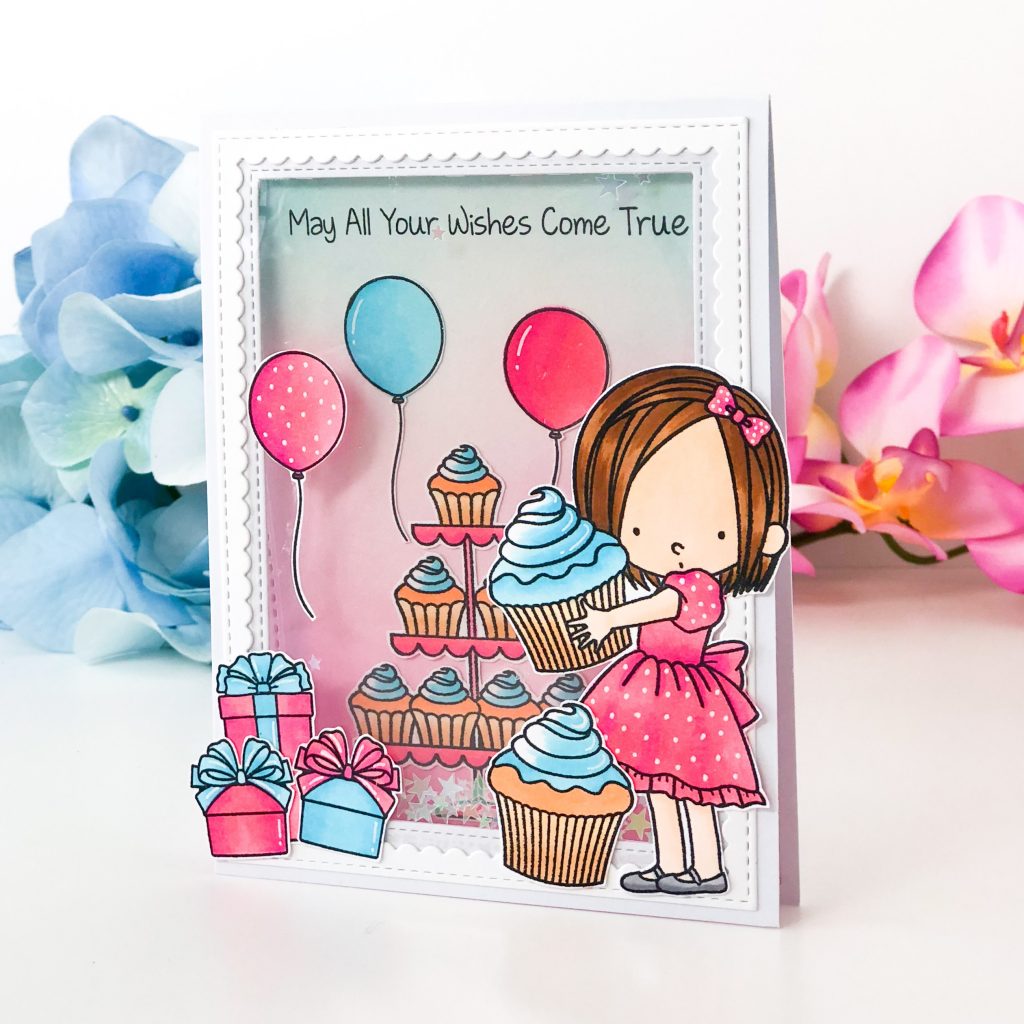
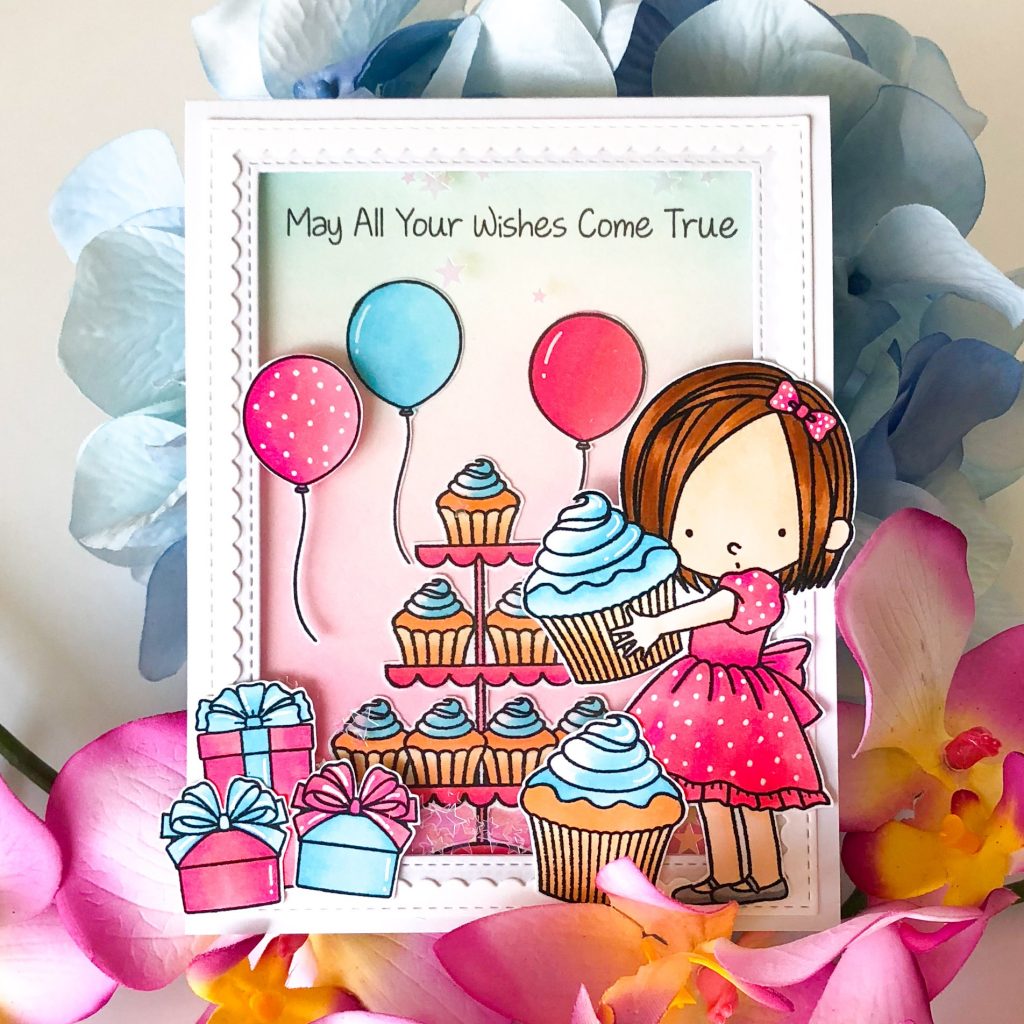
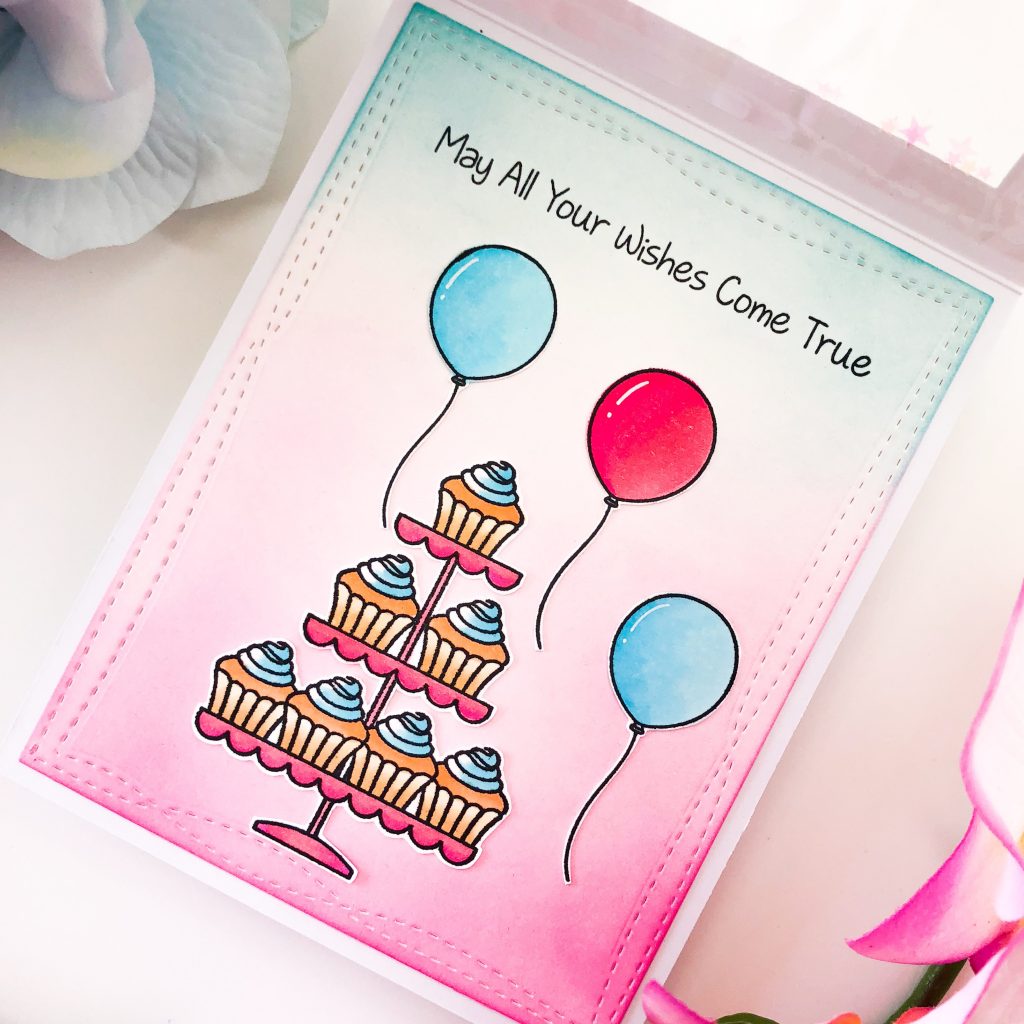
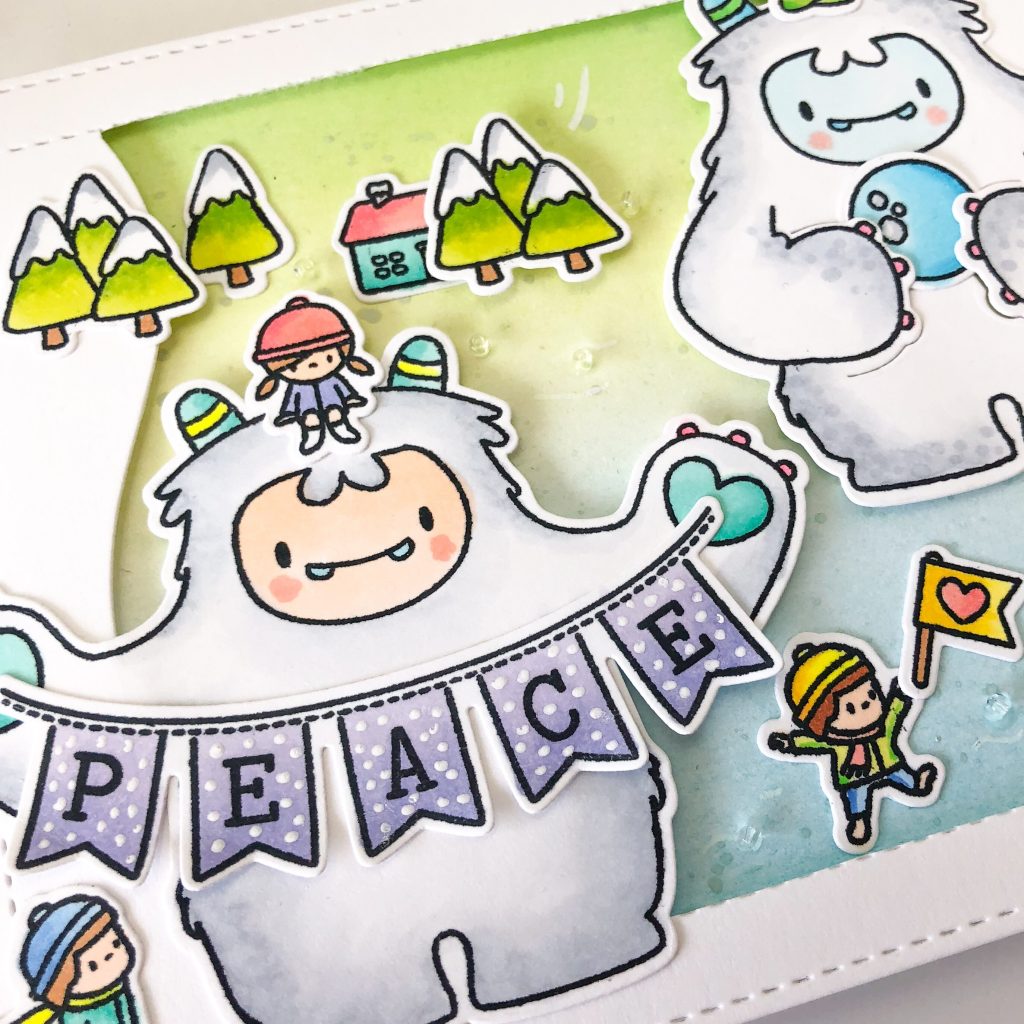
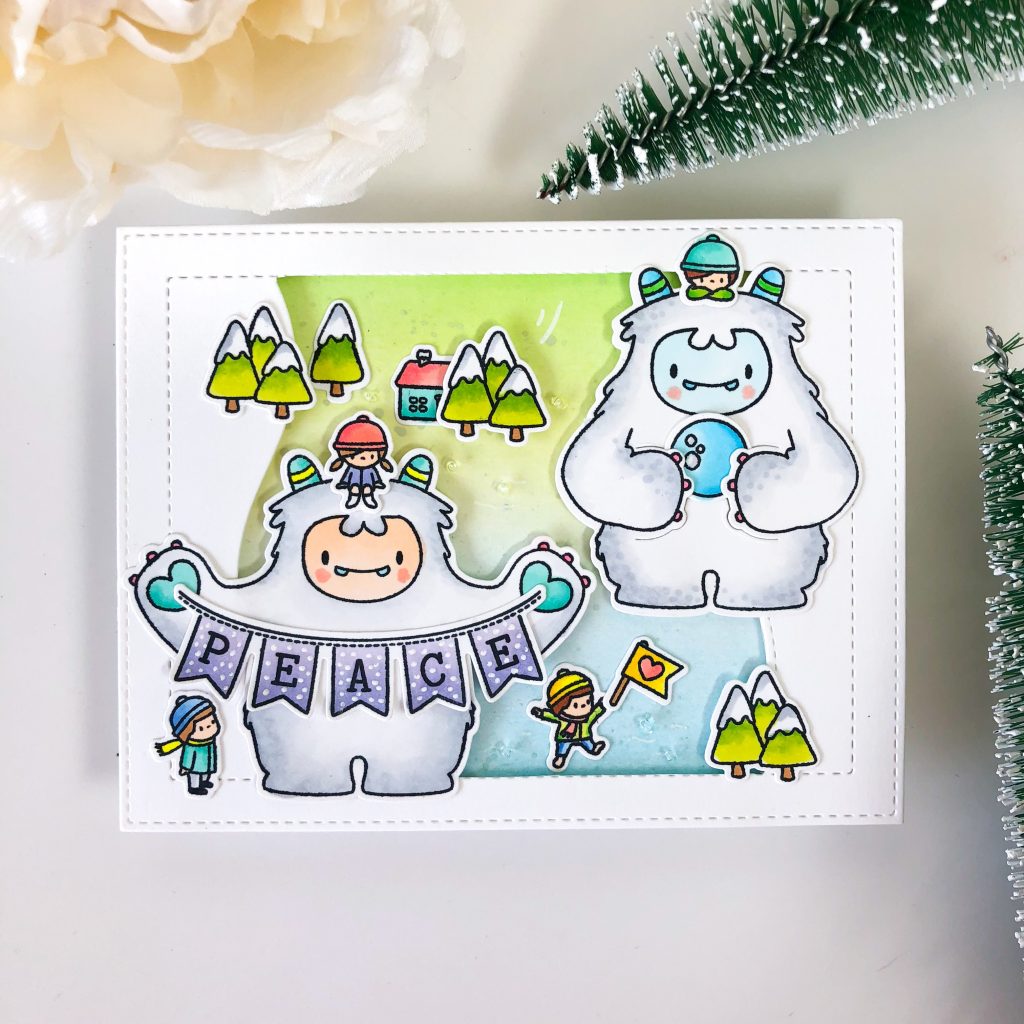
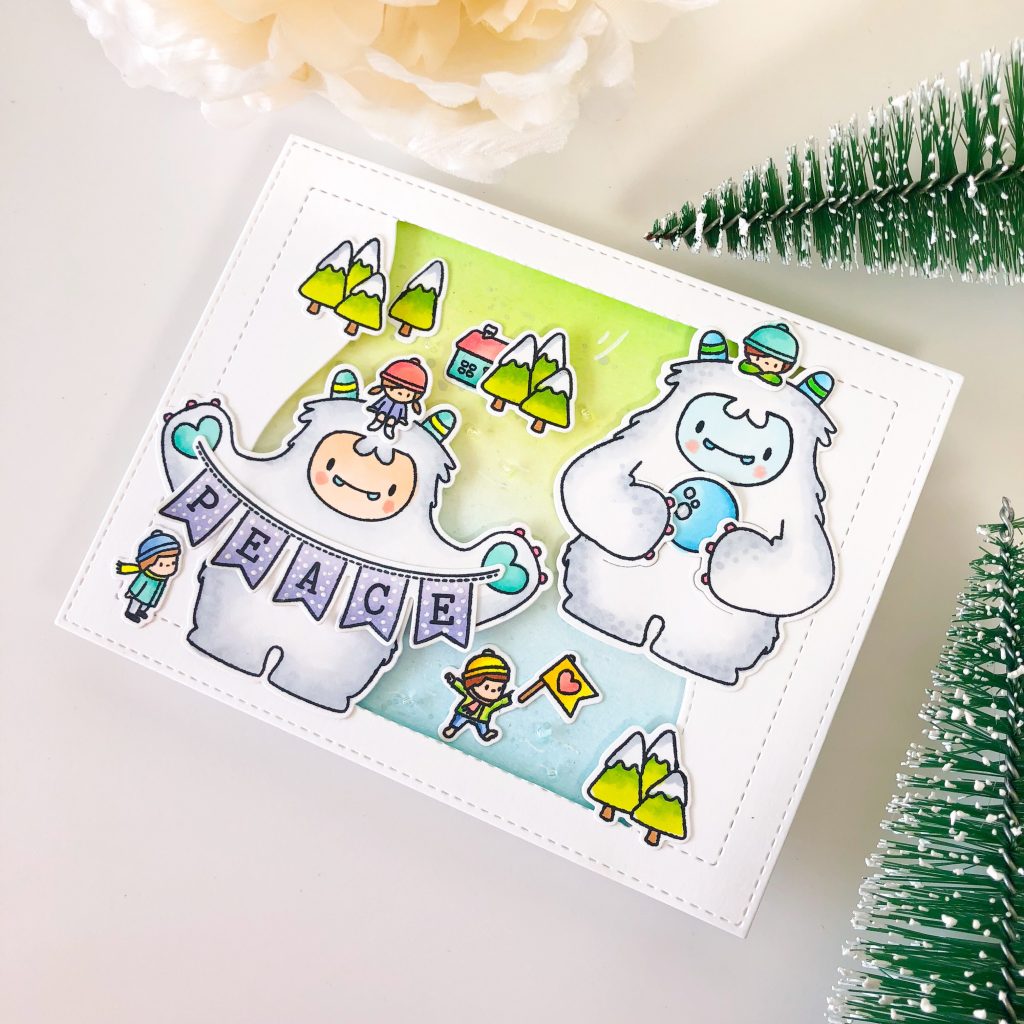
To begin with, I die cut a rectangle frame using My Favorite Things Inside & Out Stitched Rectangle STAX from a piece of watercolor paper. I selected Tim Holtz Distress ink in Picked Raspberry, Squeezed Lemonade, Twisted Cirtron, Abandoned Coral and Salty Ocean and applied them using watercolor brush onto the watercolor panel to achieve rainbow colored background. Then I splattered inks to make it a little “Fancier”.

I stamped selected images from My Favorite Things Magical Unicorns Stamp set onto a piece Brustol smooth paper using Versafine Onyx Black ink and hand fussy cut them with my scissors. I attached all images using glue and foam tape and I stamped sentiment underneath. I added 3 Sequins as embellishments.

To color my images, I used Zig Clean Color brush in 036 Light Blue, 052 Bright Yellow, 091 Light Gray, 023 Scarlet Red, and 082 Purple.

Thanks for stopping by. Good luck to you if you are participating this challenge as well. Have a great day!

You’re My Favorite Acorn- Isabel Cristina Stamps

Happy Sunday!

Even though it is end of August, I noticed all craft stores are getting Fall/Winter Decors already. I love this Digital Stamp from Isabel Cristina Stamps to make my first Fall Card.

First of all, I downloaded this digi stamp and printed them onto a piece of Neenah Solar White 110 lbs Card stock using my at home inkjet printer and hand fussy cut them. I colored them with copic markers and set aside.

I ink blended with Tim Holtz Distress Ink in Fossilized Amber and Carved Pumpkin on a piece of Tim Holtz distress watercolor paper to create the fall background. Then I cut the frame using Lawn Fawn Stitched hillside backdrop: Landscape and birch trees using Lawn Fawn Birch Trees Die. I attached the frame and trees on the top of background and arranged all colored images using Multi Medium Matte and Foam tape.

I hope you’ve enjoyed this project today.  Thank you so much for stopping by and I hope you have a wonderful day!

You Spice my life

Oh Friday, Who doesn’t love Friday? Happy Friday!

A card was simply made by me today to share. Let’s get to the point directly. Shall we? To begin my card today, I started off with stamping out my images My Favorite Things Recipe for Happiness  Stamp set , I used Memento Tuxedo Black ink stamped on Neenah Solar White 110lbs Cardstock. Then I colored them with Copic markers and hand fussy cut them.

Now all my pieces were cut I used the rectangle panel from Die-namics Single Stitch Line Rectangle Frames and cut it from some watercolor paper and ink blended with Tim Holtz Oxide ink in Salty Ocean for upper portion. Then I cut bottom portion out of another watercolor paper from My Favorite Things Paris Skyline die (Retired, but you could find similar die like this one My Favorite Things New York Skyline) and ink blended with Tim Holtz Oxide ink in Fossilized Amber and Picked Raspberry.

I attached colored images and die cut with Multi Medium Matte and Foam tape to the background panel, and I stamped sentiment using Verafine Oynx Black ink (This ink is intensive black so the sentiment pops up easily out of the scene) At last, I embellished the card using Pretty Pink Posh Seed Beads in Daffodil and 4mm Sparkling Clear Sequins.

I hope you all enjoy your Friday and longest weekend you could possibly have!!!

You are my best friend

Good morning!

I  was going to enter Simon Says Stamp challenge with this card but I missed the deadline. I somehow remembered it is Wednesday Challenge and it turned out to be Monday Challenge. Oh well, I still had fun playing with all my goodies.

To make this card, I decided to build a scene talking about two best friends are heading out together on the first day of school. I picked 6 stamp sets from Pretty Pink Posh to achieve this scene. Yes You didn’t hear it wrong, I used Six stamp sets. LOL.  I chose School Friends Stamp set and it’s coordinating Dies for the girls, the apple and the backpack, Bunny Friends Stamp set and it’s coordinating dies for the flowers, Camping Friends Stamp Set and it’s coordinating dies for the birdies and the tree stump, Rainy days and Rainy Days Additions Stamp sets and their coordinating dies for the Sun and the clouds. and Playful puppies Stamp set for the sentiment.

I stamped Clouds using Altenew dye ink in Sea Breeze and colored other selected images using copic markers. I ink blended Tim Holtz Distress Oxide ink in Twisted Citron and Squeezed Lemonade onto a piece of watercolor paper. I cut the fence using Pretty Pink Posh Picket Fence Die. The following arrangement was pretty easy. I used Multi Medium Matte and Foam Tape attached all elements onto the prepared background. At last I stamped the sentiment with Memento ink in Tuxedo Black.

My daughter has been back to school for two weeks. She is doing very well. I hope all of you have a great day and all of your kids are having great time in school as well!

You’re the Best- Pretty Pink Posh 3 Days Sale

Hello Friday!

I am here showing you a card I made using Pretty Pink Posh Birdie friends Stamp set and it’s coordinating dies. Both of them are going to have 25% off for following 3 days. Don’t forget you get free shipping if you spend $60 or more.

I first ink blended the background with Tim Holtz Distress Oxide ink in Seedless Preserves directly onto an A2 card base. Then I cut the frame using Pretty Pink Posh Scallop Frames out of a piece of purple cardstock. I added Foam Tape underneath the frame and attached it onto background panel to create a 3D Shaker window. Before I closed up the window, I added Pretty Pink Posh 6mm Sparkling Clear Sequins, 4mm Sparkling Clear Sequins and Seed Beads in Blush.

I copic colored all images out of  Pretty Pink Posh Birdie friends Stamp set and cut them with  coordinating dies. Then I attached them onto the front of shaker window.  Here is a tip from me, I cut lots of leaves at one time so I would have any shortage of them to create the flow of my scene. It worked pretty well.

This sale will last until 19th or while supplies last. Don’t wait too long to jump in or you’ll regret! Have a nice weekend!

You are One of the ingredients in My recipe for happiness

Hello my friends!

Have you ever enjoyed coloring images but never made them into a card? I am one of these people. I decided to pull them out and make them “alive” to let more people enjoy my creations.

I colored all images using My Favorite Things Recipe for Happiness Stamp set long long time ago during Kathy Racoosin‘s The Daily Marker 30 Days Challenge.

To prepare the background, I cut the panel out of Die-namics Single Stitch Line Rectangle Frames, then I ink blended with Tim Holtz Distress oxide ink in Worn Lipstick and Tattered Rose. I splattered clear water over the panel and quickly dried it with a piece of paper towel to create some color effect.

I cut the window with Die-namic window die (Retired Product, but you can go for this wonderful  Classic Window Die) 3 times out of Neenah Solar White 110 lbs and stuck them one on each top with Multi Medium matte. I ink blended negative parts of this window with Tim Holtz Distress oxide ink in Cracked Pistachio and attached it along with the window frame onto the panel. Of course, the chef in red needed to get inside the window ahead of time.

I arranged the rest of images using Multi Medium Matte and Foam tape. I stamped the sentiment from this set onto lower portion of the panel using Versafine ink in Onyx Black. It takes longer time for the sentiment to dry since it is the characteristic of pigment ink so I used heat tool to speed up the process. At last, I added a little Pretty Pink Posh Iridecent Heart Confetti as embellishments.

This card is perfect to give to anyone you love on Valentine’s day or anytime you feel like to. I hope you like it!

Happy Halloween- Pretty Pink Posh Overstock Sale

Happy Weekend!

Pretty Pink Posh is gearing up for upcoming holiday releases and need to make room for new products. Visit HERE for a great selection of products that are on sale for a limited time, while supplies last! I quickly made this card to promote this sale using stamp sets that are featured in this  OVERSTOCK SALE

First of all, I cut a star window using Pretty Pink Posh Stitched Stars Die out of Tim Holtz Distress watercolor paper.  Then I created a bright galaxy background using Daniel Smith watercolor paint in Cobalt Violet Deep, Cobalt Teal Blue and Phthalo Yellow Green.  I splattered Daniel smith watercolor paint in Phthalo Yellow Green and Lunar Black over the whole panel to create some interests. Once everything was dried, I added Foam tape underneath front panel and attached it onto A2 card.

I stamped images from Pretty Pink Posh Trick or Treat Friends and Halloween Friends stamp sets using Memento ink in Tuxedo Black onto a piece of Neenah Solar white 80lbs Card stock  and hand fussy cut them out. I copic colored them and arranged them onto the card panel using Multi Medium Matte and Foam tape.

<Copic Colors Reference>

Girl 

Hair: E33, E35

Face: E000, E00, E20

Dress: V15, V17, YG21, YG23

Bat wings: N2, N4, N6

Boy

Hair: E35, E47

Face: YG21, YG23

Shirt: V15, V17

Pants: N4, N6

Shoes: N8

Bird: N2, N4

You all know I love anything sparkling, I added Pretty Pink Posh Jewels in Amethyst and Spring Green inside of Star window. At last, I stamped the sentiment that comes with Trick or Treat Friends stamp set using Versafine Black ink because its the blackest ink I could find to pop out of my splatters.,

This sale is going to last until August 13th which is coming Monday. The price is unbeatable for Pretty Pink Posh products in history. Have fun and I will see you soon!

Wishing you Brighter Days

Happy Friday!

Raining day doesn’t need to be cloudy and depressing. I like to image myself being in the rain and feeling bright! Do you?!

To make this card, I first stamped Clouds and Umbrella images from Pretty Pink Posh Rainy Days Stamp set and Rainy Days Additions Stamp set and cut them with coordinating dies. For ink colors, I used Altenew dye ink in Sea Breeze, Minty Mint, Pink Diamond and Pink Pearl. I also stamped and copic colored bunny image from Pretty Pink Posh Bunny Friends Stamp Set and cut it with coordinating die.

To make the background, I ink blended with Tim Holtz Distress oxide in Fossilized Amber and Worn Lipstick onto a piece of Tim Holtz Distress watercolor paper, then splattered the water mixture of these two ink color by tapping the watercolor brush handle, and set aside to dry.

I die cut the frame using Pretty Pink Posh Scallop Frames Dies in smaller size out of a piece of Neenah Solar white 80lbs cardstock. I added the Foam tape underneath the frame and attached the frame on the top of background panel.

I arranged prepared images onto my background using Multi Medium Matte and Foam tapes, and I stamped the sentiment from Rain Days Stamp set using Memento ink in Rich Coco. For embellishments, I  added Pretty Pink Posh 4mm Clear droplets for rain effects and 4mm Sparkling clear sequins for creating reflections of rain drops from sun light.

Here I am sharing one of my favorite quotes with you. “Some days you just have to create your own sunshine!” Life is wonderful because it gives you up and down. Don’t be sad for unnecessary things because it doesn’t worth you to spend any seconds for it. So let’s find our own Sunshine!

May all your wishes come true

Good Morning!

Life always gets busier and busier nowadays, surprisingly even during my vacation. I was cleaning up my craft room. One of my favorite stamp set from My Favorite Things  called Sweet BD wishses (a retired stamp set) popped up in front of me. Why didn’t I use it more often? I found myself always reach for something new and left some of best behind. To stamps, or to life as well.

Images from this set are fairly large so I have no problem to fill up an A2 card easily. I colored images with copic markers and hand fussy cut them with my trusty scissor and set aside.

I grabbed an A2 folded card and cut the front panel using My favorite things Inside & Out Stitched Rectangle Stax die to create an open window. I wanted to create a shaker card with no dimension so it would be easier to mail (The post office lady charge me nearly $2.30 for sending a card with foam tapes because she said it considered as package since it couldn’t go through their machine) I decided to sandwiched the front open window with two pieces of acetate paper. I added some Pretty Pink Posh Iridescent Mini Star and 1/4″ Iridescent Star before I closed up the window. I also cute a border frame using My favorite things Stitched Rectangle Scallop Frame die out of Neenah Solar white 110lbs cardstock and adhered it to the front panel.

Since everything is see through, I need to build a scene inside of this card. I cut a panel using My favorite things Wonky Stitched Rectangle Stax die out of a piece of watercolor paper. Then I ink blended the background using Tim holtz distress oxide ink in Pickled Raspberry and Peacock Feather. I stamped the sentiment that comes with this stamp set to the top of this background panel using Memento ink in Tuxedo Black.

In the end, I arranged all images on to the front of card and background panel using Multi Medium Matte. Here you go. A birthday card was made and it’s super cute!

Peace from Yeti – Mama Elephant Guest Designer Call

Hello Hello!

I made this card to enter Mama Elephant‘s first guest designer call for their star studded anniversary celebration Stampede blog hop. I am always being a Mama Elephant fan because they have the cutest stamps ever to play with. Since lots of people has been doing Christmas card in August. I decided to follow this trend a little bit.

To make this card, I ink blended using Tim Holtz Distress oxide in Twisted Citron, Cracked Pistachio and Mermaid Lagoon onto a piece of Tim Holtz Distress watercolor paper. Then I splattered white watercolor paint by tapping watercolor brush handle and set this background aside to dry.

I die cut top frame out of Mama Elephant Hillside Cover Die from a piece of Neenah Solar white 110lbs cardstock. To create open window, I cut the center of this die cut with my scissors. After adding foam tape underneath, I attached the top frame onto the prepared background.

I colored all images from Mama Elephant Me and My Yeti Stamp set and Sentiments From Yeti Stamp set with copic markets and die cut them with coordinating dies (Me and My Yeti / Yeti Banner) I arranged them onto the panel using Multi Medium Matte and Foam tape. At last, I used white gel pen to create some details and added Pretty Pink Posh Sparkling Clear Seed Beads as embellishments.

Now I am holding my breath and hoping I could be picked as one of their Special Guest Designer on August 8th. Good Luck to myself!!!