Warm Holiday Hugs-Mama Elephant

Good Monday morning!

I’ve been doing lots of fussy cutting over the weekend. I figured it’s time to make a card out of them. I have a somewhat not so good habit. I like to color lots of images and left them behind in the end. I ended up having quite a collections of colored images sitting in a corner waiting to be put on a card.

Today I used Mama Elephant Little Elf Agenda Stamp set mainly to create this card. I stamped them with Memento Tuxedo Black ink and colored with Copic markers. Since I did not purchase the coordinating dies, I fussy cut them with my scissors. They are small images that are not required lots of shading, so my coloring process was fairly quick. I also stay with three main colors which are red, green and blue to keep it clean and simple.

To create the background,  I die cut the background panel using a frame die from Mama Elephant Sew Easy Creative Cuts, then created 3 circular windows using different sized circle dies from Sew Easy Creative Cuts. I ink blended the panel with Tim Holtz Distress Oxide ink in Twisted Citron and the circles in Candied Apple. I raised the panel with Foam tape to create dimensions and stamped sentiment “warm holiday hugs” from Mama Elephant Scripty Xmas Stamp set. I selected some colored images to decorate the card panel and added Pretty Pink Posh Seed Beads in Sprint Green to finish.

Hope you will have a great week! See you very soon!

Have Magical Holiday- Mama Elephant

Happy Friday!

I usually work three days  a week. I was so expecting to wake up naturally today since it’s my day off. But no! My body clock woke me up pretty early in the morning. Instead of being depressing, I decided to make a card out of Mama Elephant stamps I got couple weeks ago.

I have a very simple concept for making this card since I have these adorable snowmen images. I die cut the background panel using Mama Elephant All Prettied Up Creative Cuts out of a piece of watercolor paper. Then I ink blended it with Tim Holtz Distress oxide ink in Peacock feathers and splattered water drops over it to create for spotting effect pretending we are in a snowy day. An idea came up in my mind with no clue, I want all snowmen came out of a box. Without thinking if it is logical to do it, I go ahead cutting a box using a die from Mama Elephant All prettied Up Creative Cuts and inked lightly with Tim Holtz Distress oxide ink in Candied apple.

I copic colored selected images from Mama Elephant Little Snowman Agenda Stamp set and hand fussy cut them to prepare. I assembled all prepared pieces with Multi Medium Matte and Foam tapes. I stamped sentiment from Mama Elephant Scripty Xmas Stamp set using VersaMark embossing ink pad and heated embossed with white embossing powder. There is a tiny regret. I would use black sentiment instead if I have a second chance. That way the sentiment pops up easily on this panel. This is ready to go after I attached the panel onto an A sized fold card base.

I have more new cards coming up soon with all my new purchases. Stay Tuned!

Autumn Greetings- Pretty Pink Posh

Good morning everyone,

Since I am completely into pink scene lately, so I make another pink fall scene card. I combined Pretty Pink Posh New and old goodies to create what I want to show you.

I trim a piece of light pink cardstock into A2 sized card panel and sprinkled gold paint over, then I set it aside to dry. I cut 4 different shapes of tags using Pretty Pink Posh Fall Tags Dies and ink blended them with Tim Holtz Distress oxide ink in Aged Mahogany, Abandoned Coral, Mowed lawn and Carved Pumpkin. To make them pop up a little, I added foam tape underneath as adhesive.

Now it’s decorating time. I copic colored images from my all time favorite stamp – Pretty Pink Posh Woodland Critters Stamp set.  I also colored leaf, berry and mushroom images from Pretty Pink Posh Autumn Wreath Stamp set using Kuretake Zig clean real brush markers an die cut them with coordinating dies. I arranged them around all tags I prepared.

At last,  I stamped  “Autumn Greetings” sentiment and embellished the background with Pretty Pink Posh 6mm Sparkling Clear Sequins and 4mm Sparkling Clear Sequins.

A great quote  I would like to share with you,

“Winter is an etching, spring a watercolor, summer an oil painting and autumn a mosaic of them all.”

– Stanley Horowitz

Thanks in Fall- Pretty Pink Posh

Happy Monday!

I have been wanting to use this Pretty Pink Posh stamp and die from September release for a while but I also wanted to make a not so your typical card. Finally I came up with this idea to make it simple but more interesting.

First of all, I cut Bristol smooth paper into an A2 size. I positioned Pretty Pink Posh Thanks Leaf Shaker die in the center of panel and ran it through my cutting machine. I removed the inner part of this die cut and saved it for later use. I grabbed another piece of Bristol smooth paper and stamped image from Pretty Pink Posh Fall Scene Stamp set with Versafine Onyx Black ink. I also stamped partial image from this stamp set to the lower right corner of panel by masking unwanted portion with a piece of Post-it paper.


I colored images with my recent favorite coloring tool- Kuretake Zig Clean color real brush pen and added some dots to the background as well. I raised the front panel using Foam Strips to create dimension. I embellished fall leaf outline with Pretty Pink Posh Jewels in Marigold. At last, I colored “thanks” die cut from earlier cutting to black and adhered it with Multi Medium Matte. Ta-da! My card is here for you!

I hope you like this card. I will see you around soon! xoxo

Thankful For You -Pretty Pink Posh

Happy Monday!

I hope you all had a great weekend. I went to San Francisco on Saturday to meet up with my cousin and his family who is visiting U.S. for the very first time. It was so fun to listen to his impressions of U.S.  We talked and laughed like no tomorrow. It’s always a pleasure to catch up with family.

Today I am showing how I made a non traditional fall card with my favorite color – Pink. I  I cut a piece of Bristol smooth paper into A2 size panel and ink blended Tim Holtz Distress oxide ink in Picked Raspberry and Spiced Marmalade. Then I mixed ink with water and splattered over top surface of panel by tapping a watercolor brush. while I Let it set to dry,  I colored images from Pretty Pink Posh Pumpkin Patch Critters Stamp set and I die cut them using Coordinating Dies.

I die cut the Fence out of Pretty Pink Posh Picket Fence die, and I adhered it onto the background panel using Foam stripes. I also die cut the sentiment from Pretty Pink Posh Thankful for you Script Die and inked with Tim Holtz Distress oxide ink in Picked Raspberry and Spiced Marmalade. I arranged colored images around the fence and added Pretty Pink Posh Jewels in Marigold to finish.

No one says you cannot use different colors to present fall. Use your imagination and surprise yourself! See you next time!

Sending Lots of Love – Pretty Pink Posh

Hi there,

Hope you all had a good week so far. It’s been a busy week for me. I signed up a watercolor class which requires drawing (My huge weakest). I was in a Love and Hate situation with this class. I guess I could only go forward since I paid in full with no chance of refund. When I was rested, I still crave lots of card making. Today I am going to show you a card with some cute kittens from Pretty Pink Posh.

To begin with this card, I cut a piece of Bristol smooth paper into A2 size panel and ink blended Tim Holtz Distress oxide ink in Picked Raspberry. Then I mixed ink with water and splattered over top surface of panel by tapping a watercolor brush. while I Let it set to dry,  I colored images from Pretty Pink Posh Cuddly cat stamp set with copic markers and white gel pen to decorate a little, then I die cut them using Coordinating Dies.

I cut the die cut piece using Pretty Pink Posh Tic Tac Toe Die and I adhered it with some Foam strips. I arranged all colored images with Foam tape into Tic Tac Toe map (It is fun like I was being a kid playing game again) I stamped sentiment from Pretty Pink Posh Everyday Greetings Stamp set using Memento ink in Tuxedo black and finished the card with some Pretty Pink Posh Jewels in Pink Blush.

Thanks for stopping by today. Btw to remind you all, Pretty Pink Posh is having 20% off for all Floral stamps right. Great time to grab some!

STAMPtember 2018 & Pretty Pink Posh Collaboration- Pansies

Hello Crafters!
Pretty Pink Posh is releasing a stamp set called Pansies exclusively for Simon Says Stamp Stamptember Event. This stamp set is limited edition which means it will be gone completely when it’s sold out. So don’t regret not getting it later!

STAMPtember® Exclusive Limited Edition: Pretty Pink Posh

I made this card using Pansies Stamp set. I stamped all images using Verafine ink in Tuxedo Black onto a piece of watercolor paper. then I colored them with my watercolor paints. Once everything was dried, I cut them out using my scissors. If you don’t feel like to cut them one by one, you could get this stamp and die set too I added Pretty Pink Posh Jewels in Marigold to pop up the center of flowers.

To prepare the background, I grabbed a piece of Tim Holtz Distress watercolor paper because it is brighter and whiter than traditional watercolor paper. I also cut the border using Pretty Pink Posh Stacked Edge Die 1 and adhered it diagonally onto the background panel. To make the flowers looking not so lonely, I splattered blue and black paints onto the background. After I arranged all flowers,  I stamped the sentiment using Pretty Pink Posh Encouraging Greeting Stamp set. At last, I scatted a few Pretty Pink Posh 4mm Sparkling Clear sequins to finish this simple card.

I hope you have some more ideas to use this stamp set. Don’t forget to grab one from Simon Says Stamp online store. Ciao!

Mama Elephant’s celebrating 6 years Anniversary Release Stampede

 
Hello and welcome to Mama Elephant’s #celebrating6years Anniversary Release Stampede! I am so honored to participate this exciting event.  The release is live and available for purchase in the Mama Elephant shop!

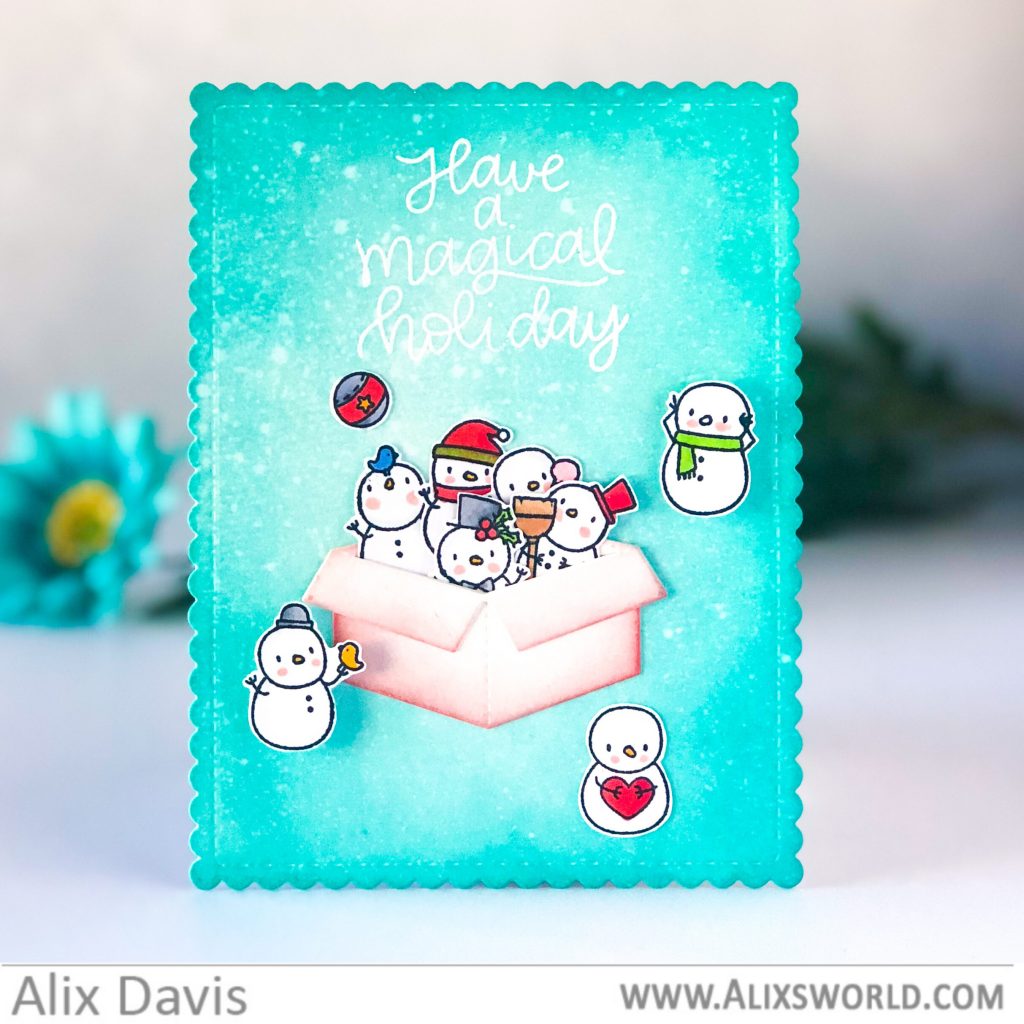
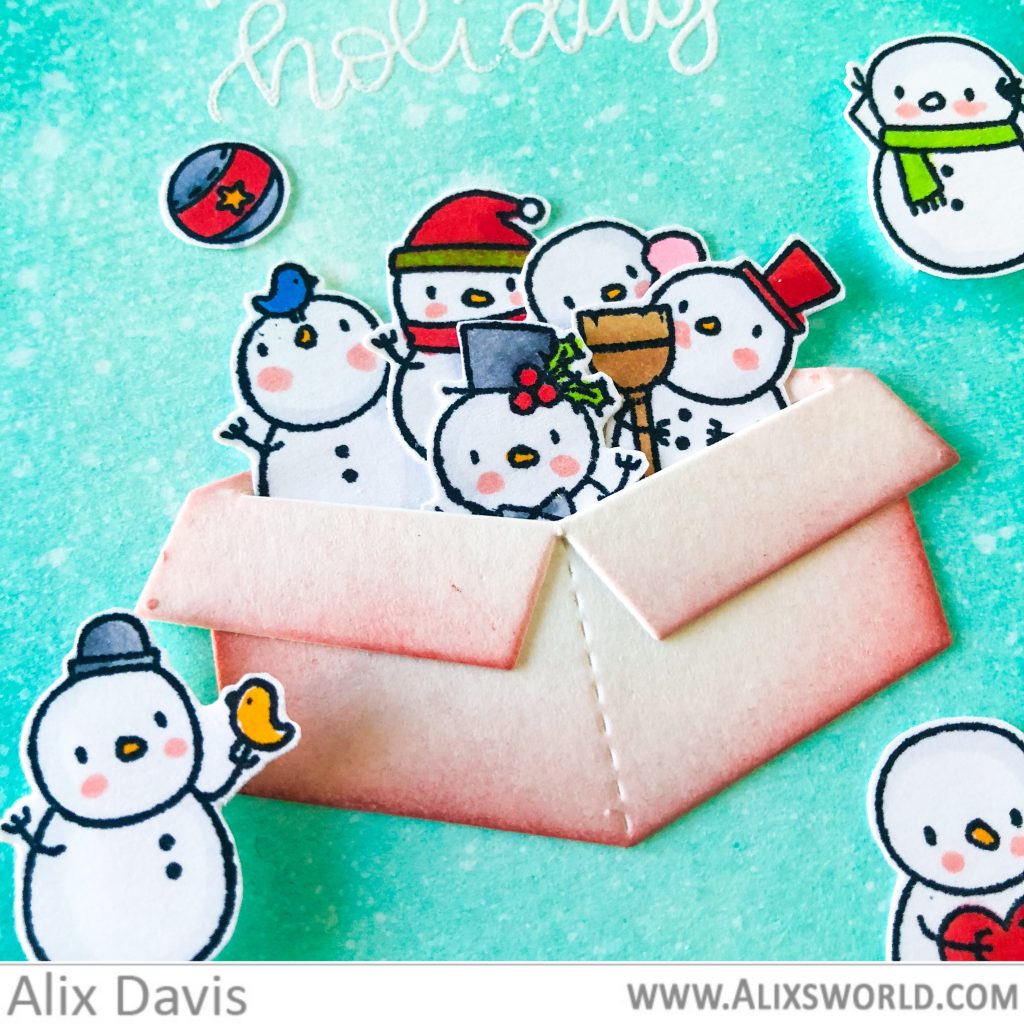
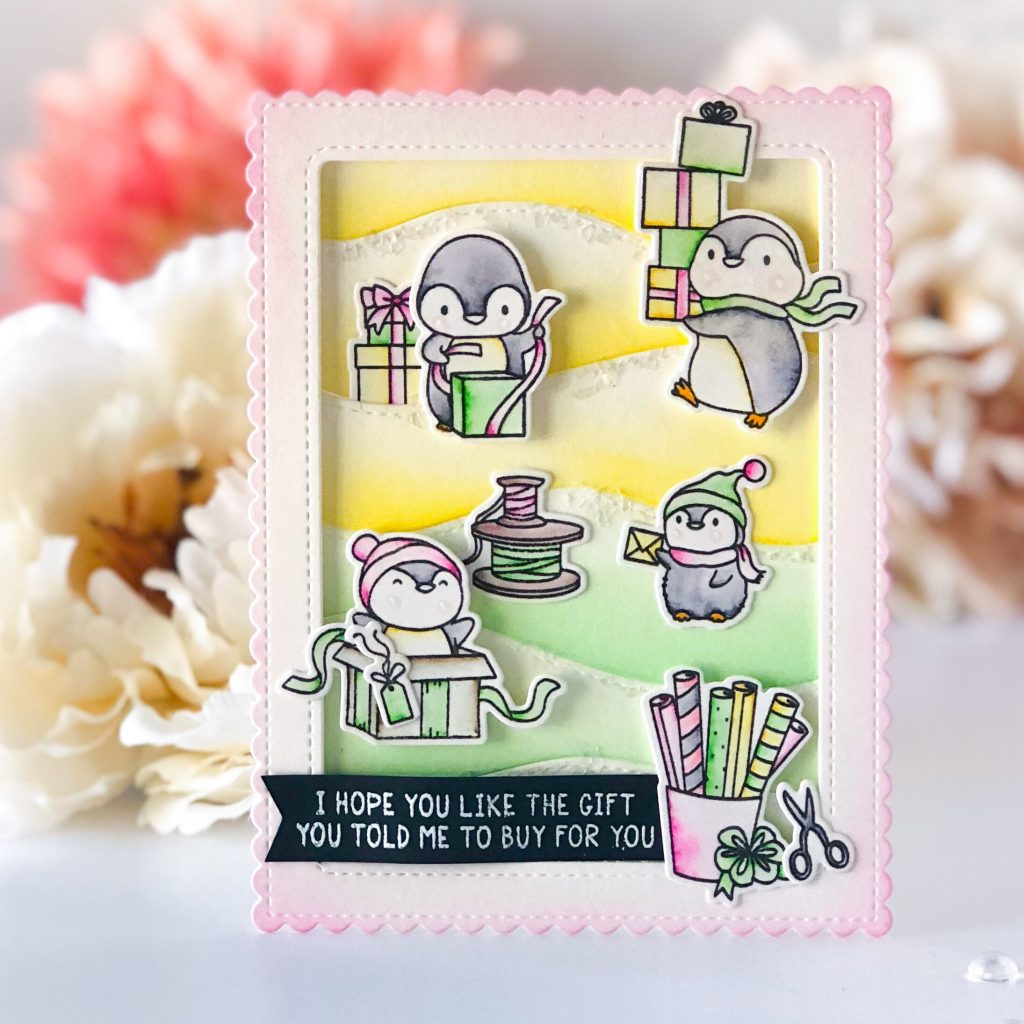
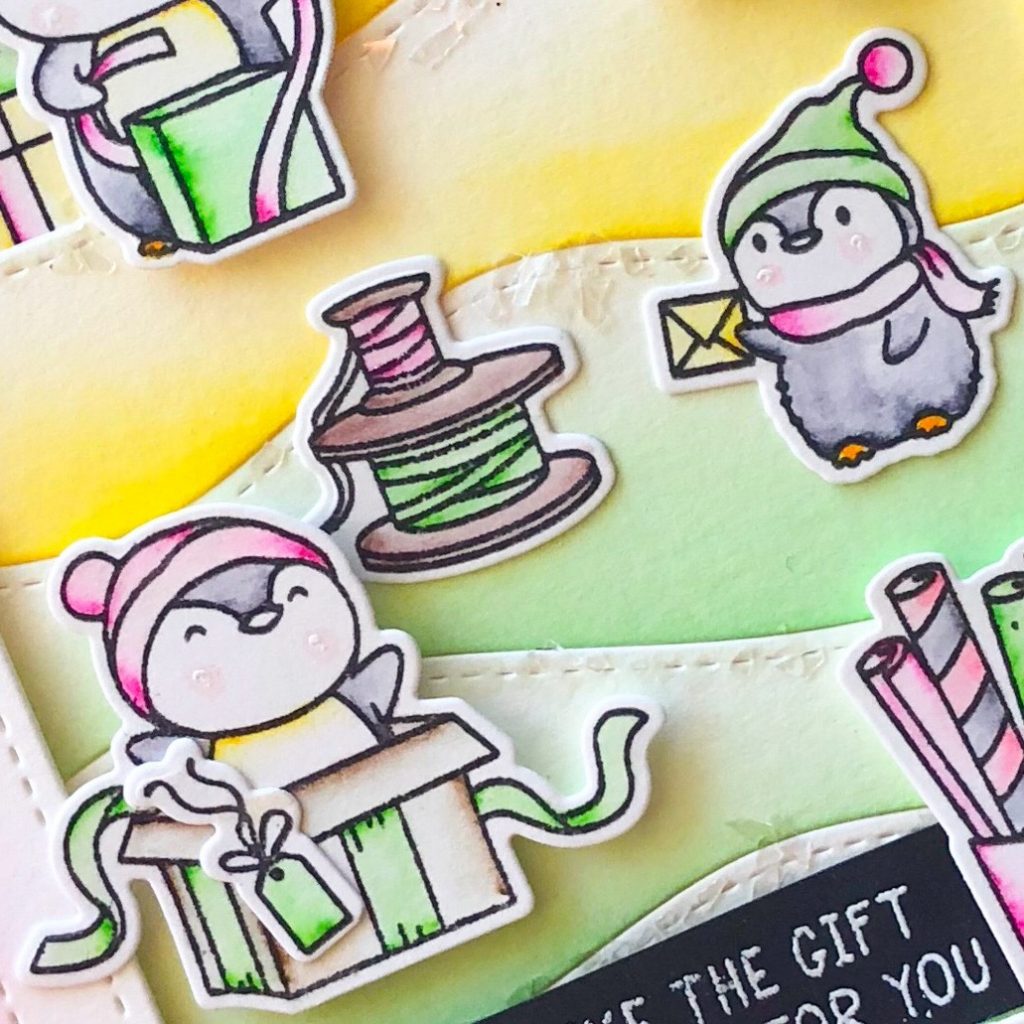
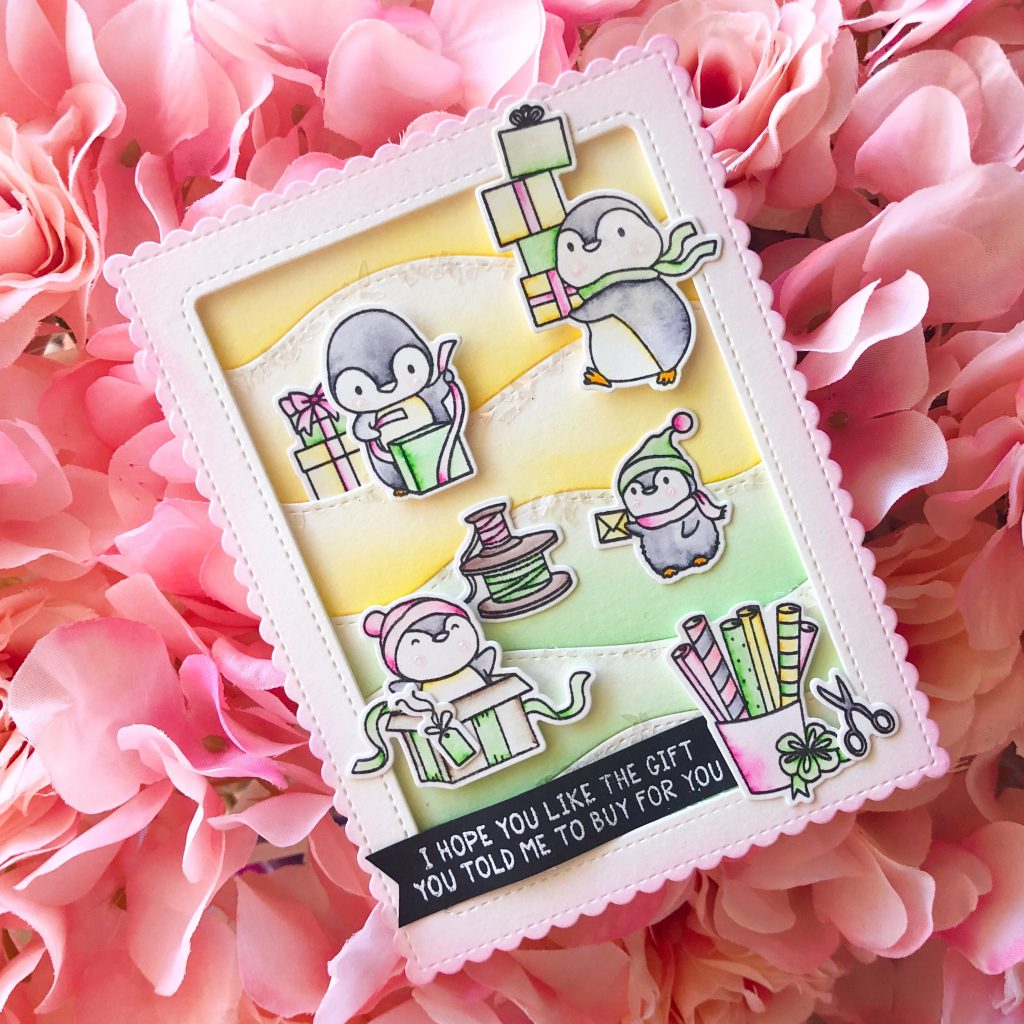
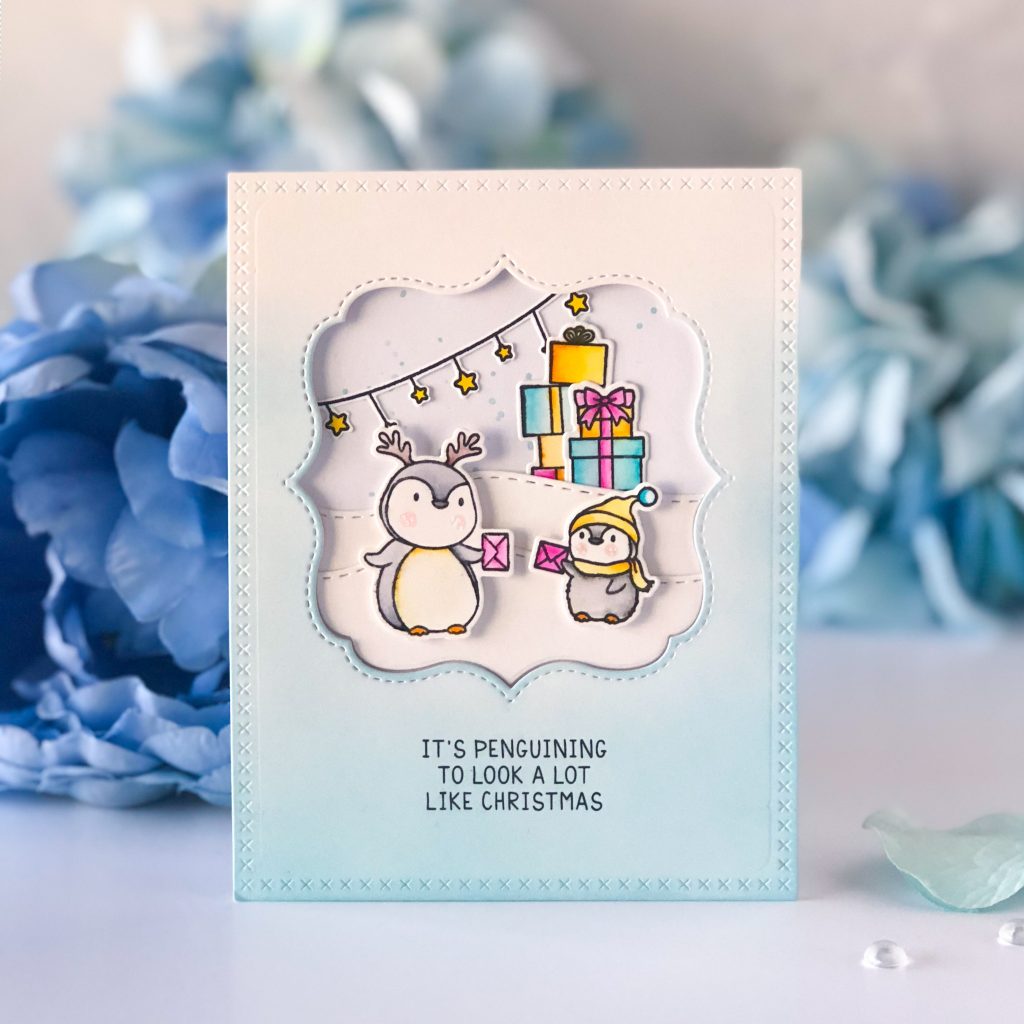
I am here showcasing Mama Elephant – Cool Penguins Stamp set. Christmas is around the far corner. It is never too early to make Christmas cards. Do you agree with me?! Wink wink……… I created two cards to share with you!
< Card 1 >
 
To begin with, I stamped all images from Mama Elephant Cool Penguins Stamp set onto Bristol Smooth paper and colored with Kuretake Zig Clean Color Brushes. Then I cut them with Mama Elephant Cool Penguins Coordinating Dies and set aside.
I started to prepare my background. First of all, I die cut an A2 panel using Mama Elephant Hill Cover-Creative Cuts and I ink blended each bottom of hill with Tim Holtz Distress Oxide ink in Squeezed Lemonade and Cracked Pistachio. on the top edges of hills, I added Multi Medium Matte and poured Vintage Glass Glitter to create snow effect. I die cut a frame using Mama Elephant Madison Avenue- Creative Cuts and lightly ink blended l with Tim Holtz Distress Oxide ink in Picked Raspberry, then I attached it onto the background with foam tapes.
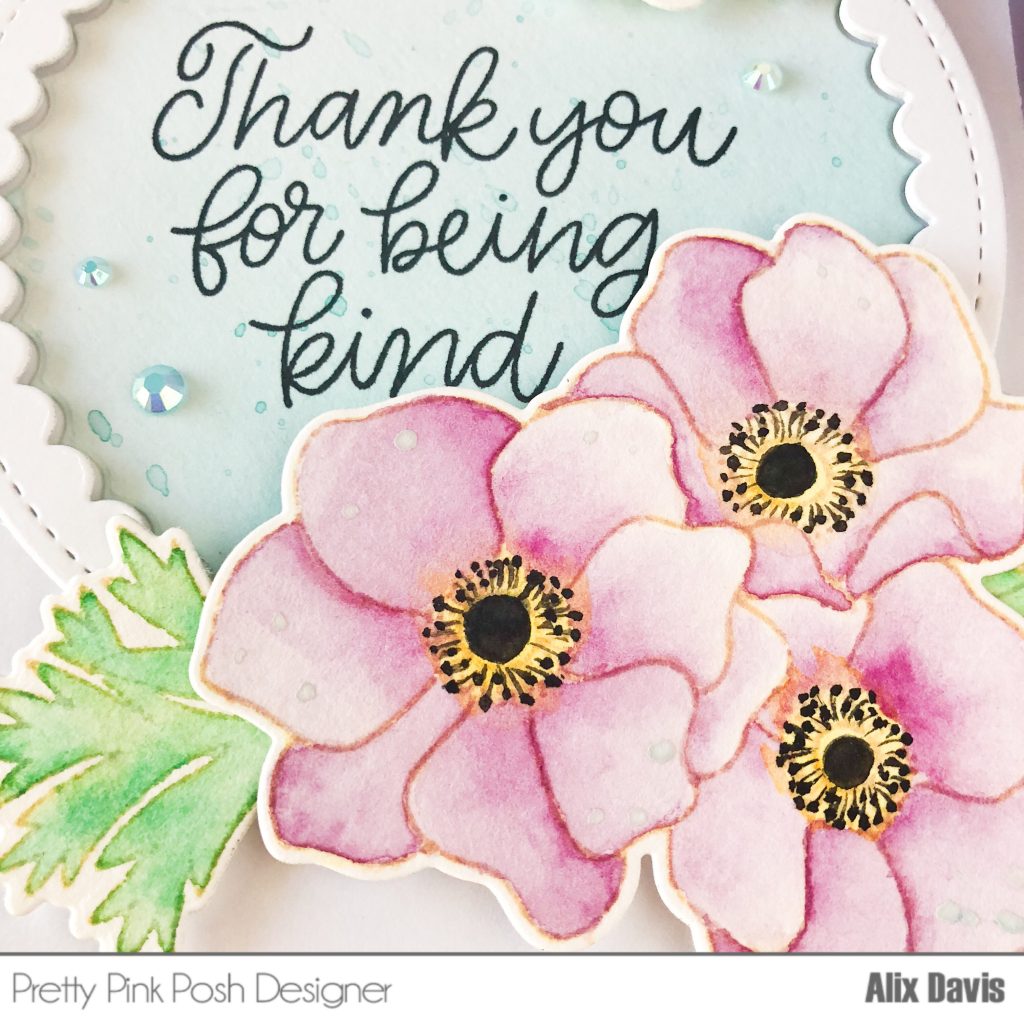
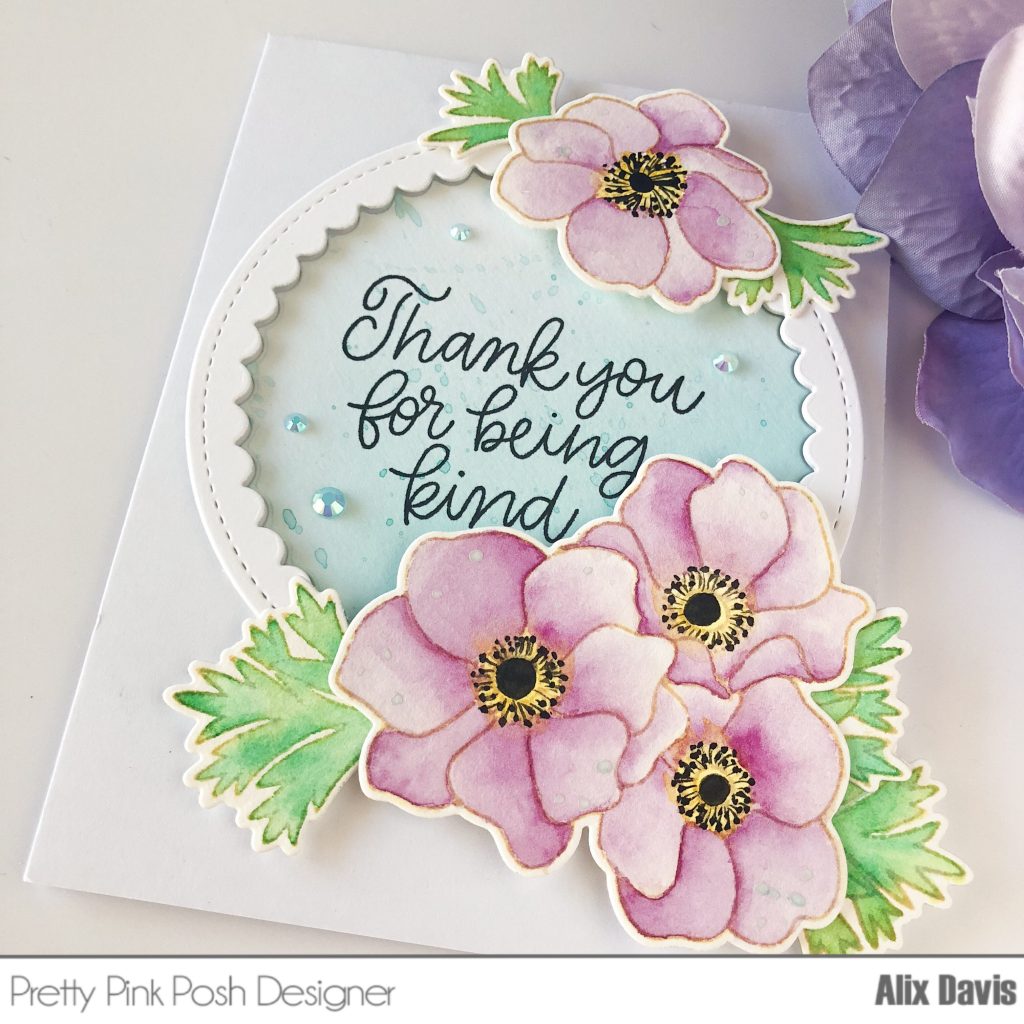
I adhered all selected images using Multi Medium Matte and foam tapes to the background panel. I stamped the sentiment onto a piece of black cardstock using VersaMark embossing ink and poured WOW! embossing powder with heat. I hand cut the fish tail ribbon and attached it with some wavy dimension to finish.
Kuretake Zig Clean Color Brushes used: 028 Pale Pink, 025 Pink, 041 Light Green, 052 Bright Yellow, 094 Gray Brown
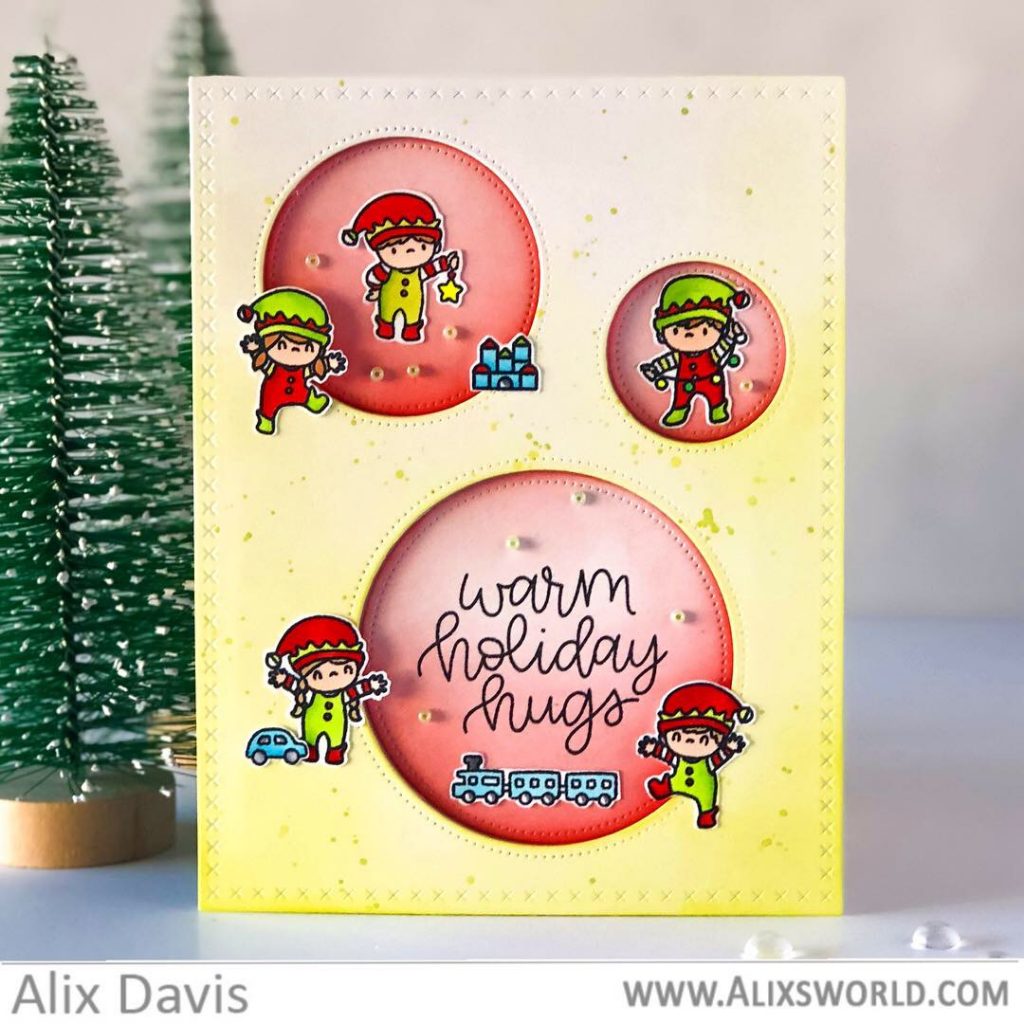
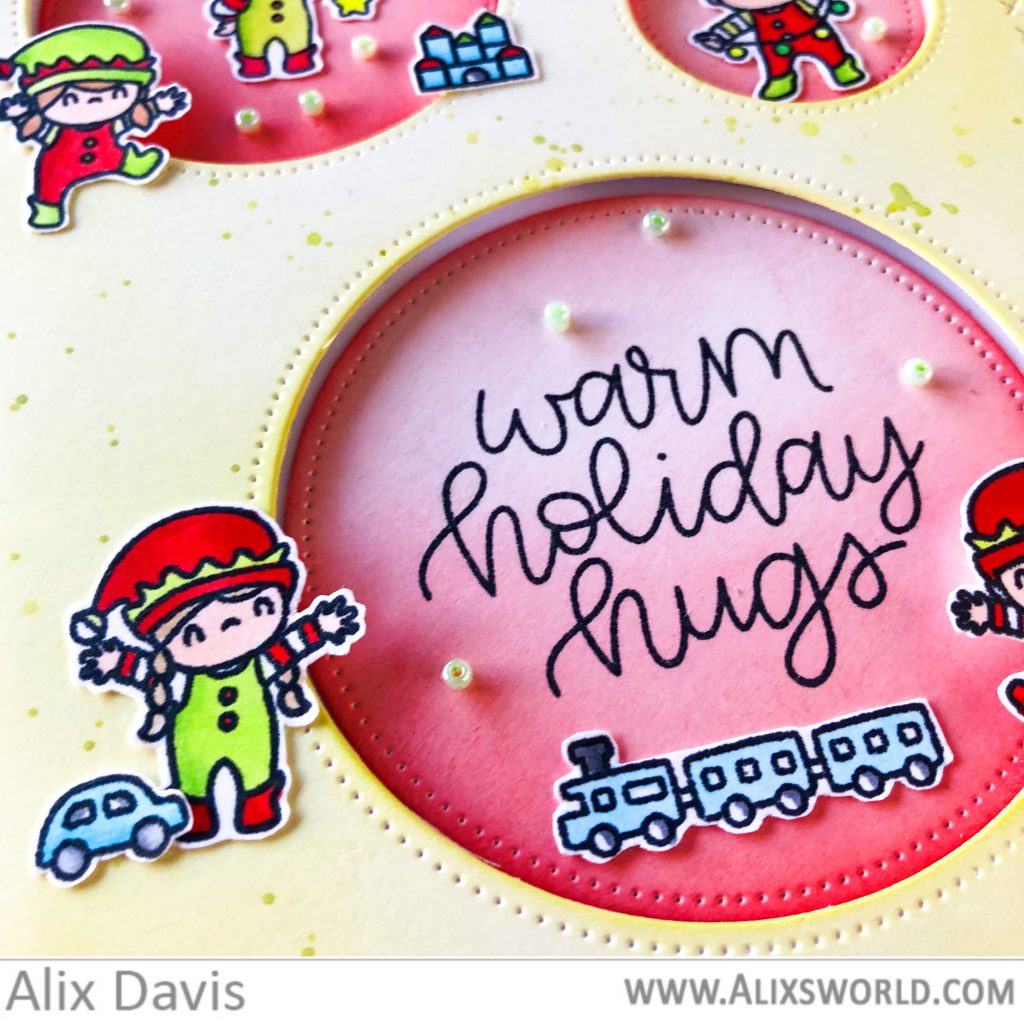
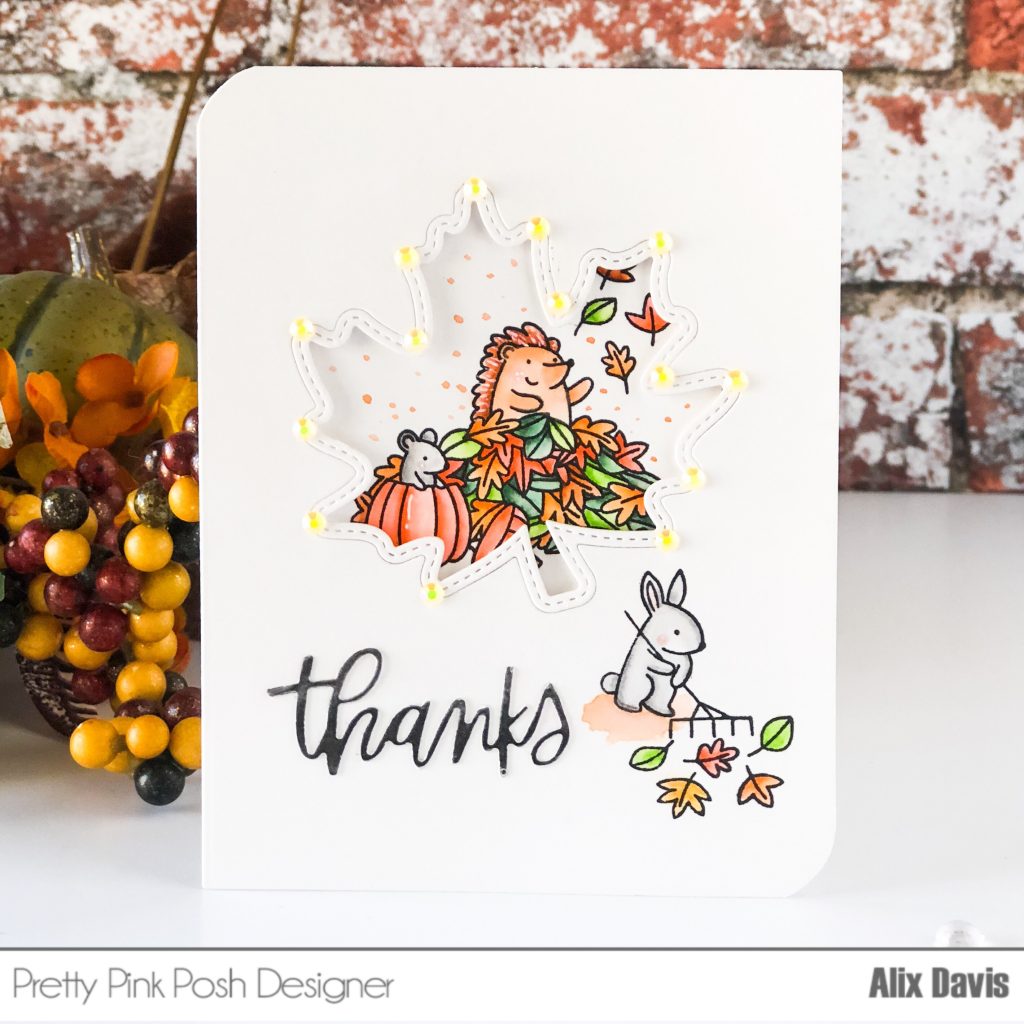
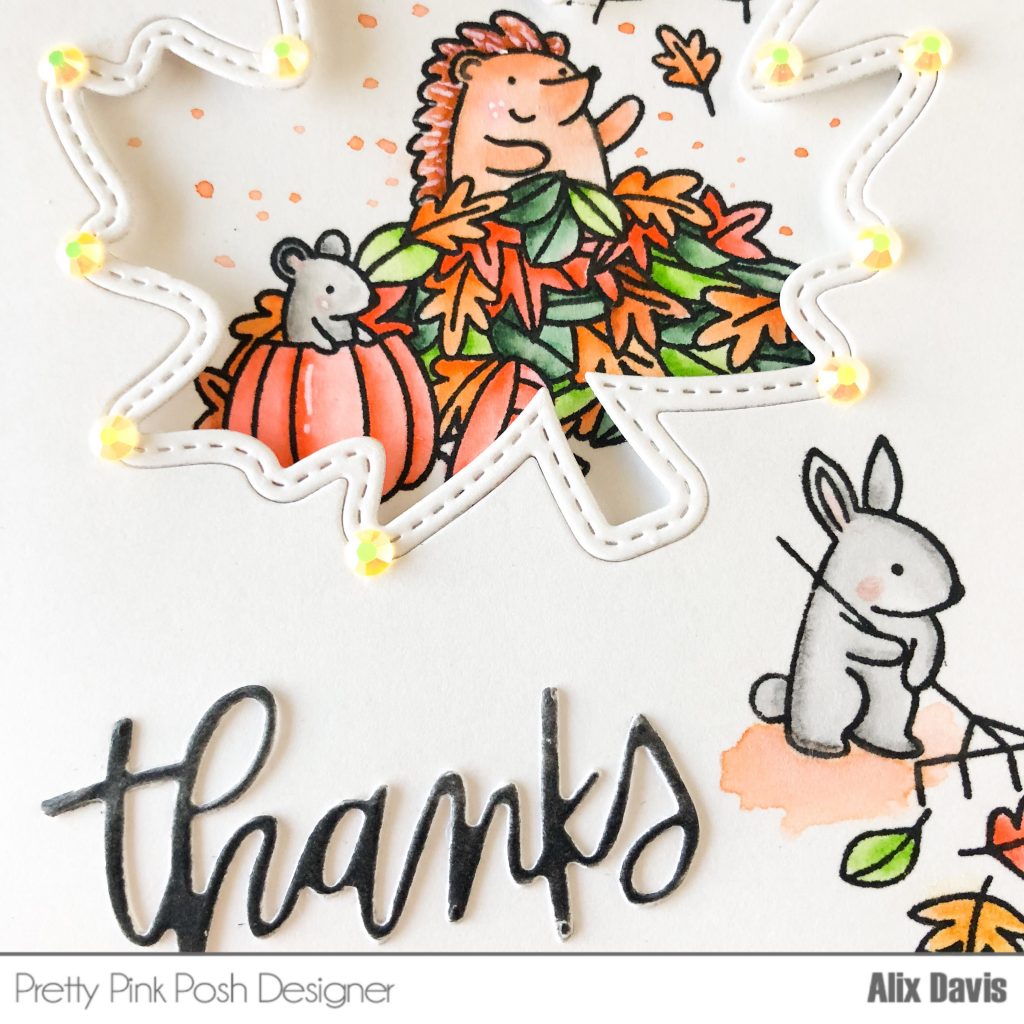
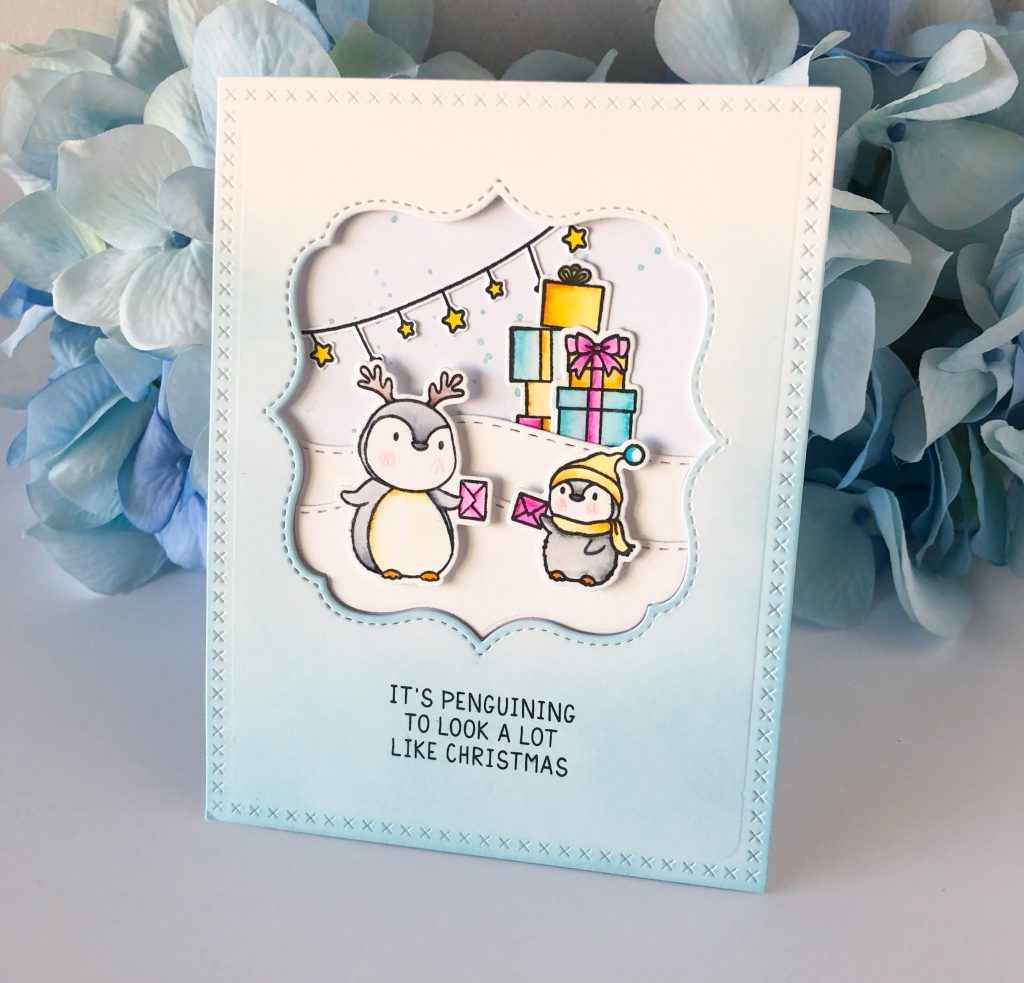
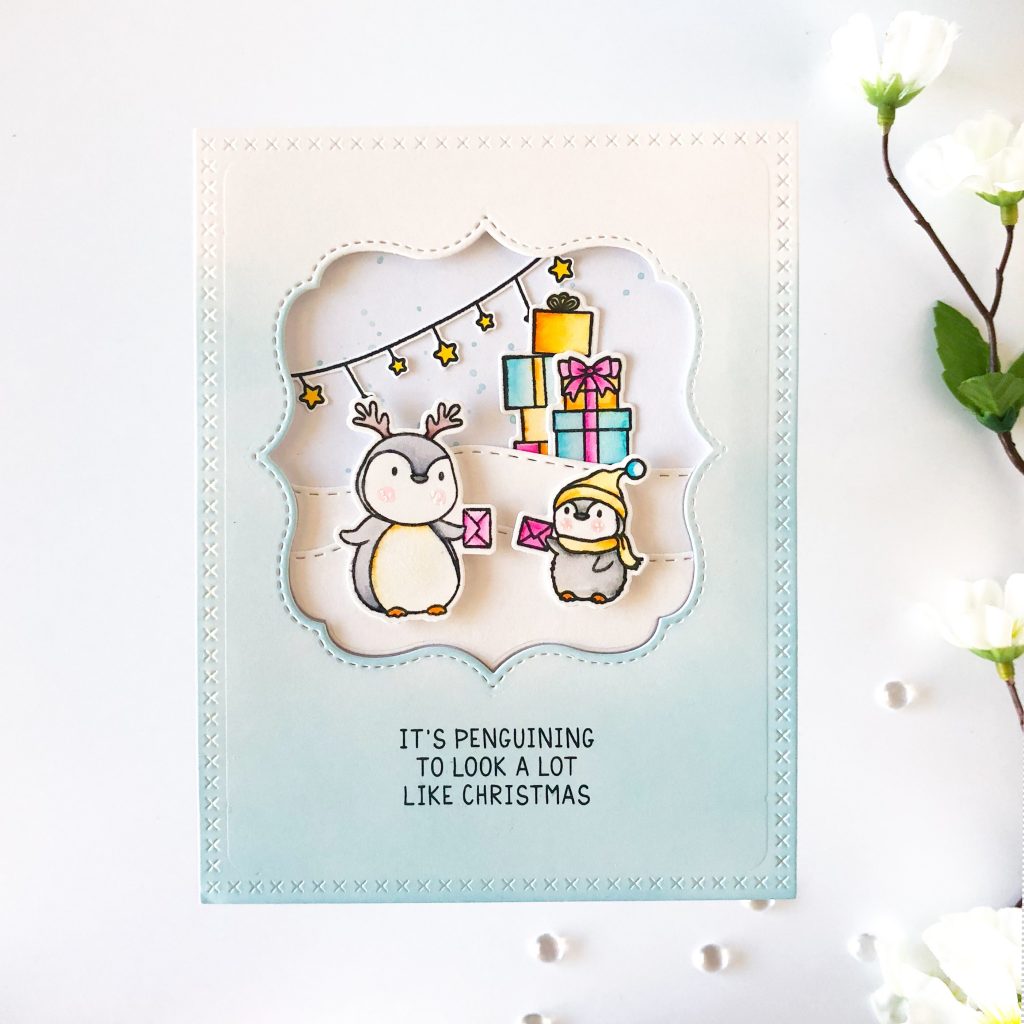
< Card 2 >
It’s perfect to create a snowy day for penguins to enjoy so I decided to go for a cooler scene. I repeated my very first step from last card making. I stamped all images from Mama Elephant Cool Penguins Stamp set onto Bristol Smooth paper and colored with Kuretake Zig Clean Color Brushes. Then I cut them with Mama Elephant Cool Penguins Coordinating Dies and set aside.
First, I cut the crossed stitched frame using a die from Mama Elephant Sew Fancy – Creative Cuts and ink blended with Tim Holtz Distress Oxide ink in Tumbled glass, then I attached it onto an A2 card panel using foam tapes.
I splattered Tumbled glass and water mixture by tapping a watercolor brush onto the background to create snow in the air. And I also cut the center window using a die from Mama Elephant Union Square – Creative Cuts. I created snowy hills by cutting the negative part of window using Mama Elephant Ocean Waves Trio – Creative Cuts.
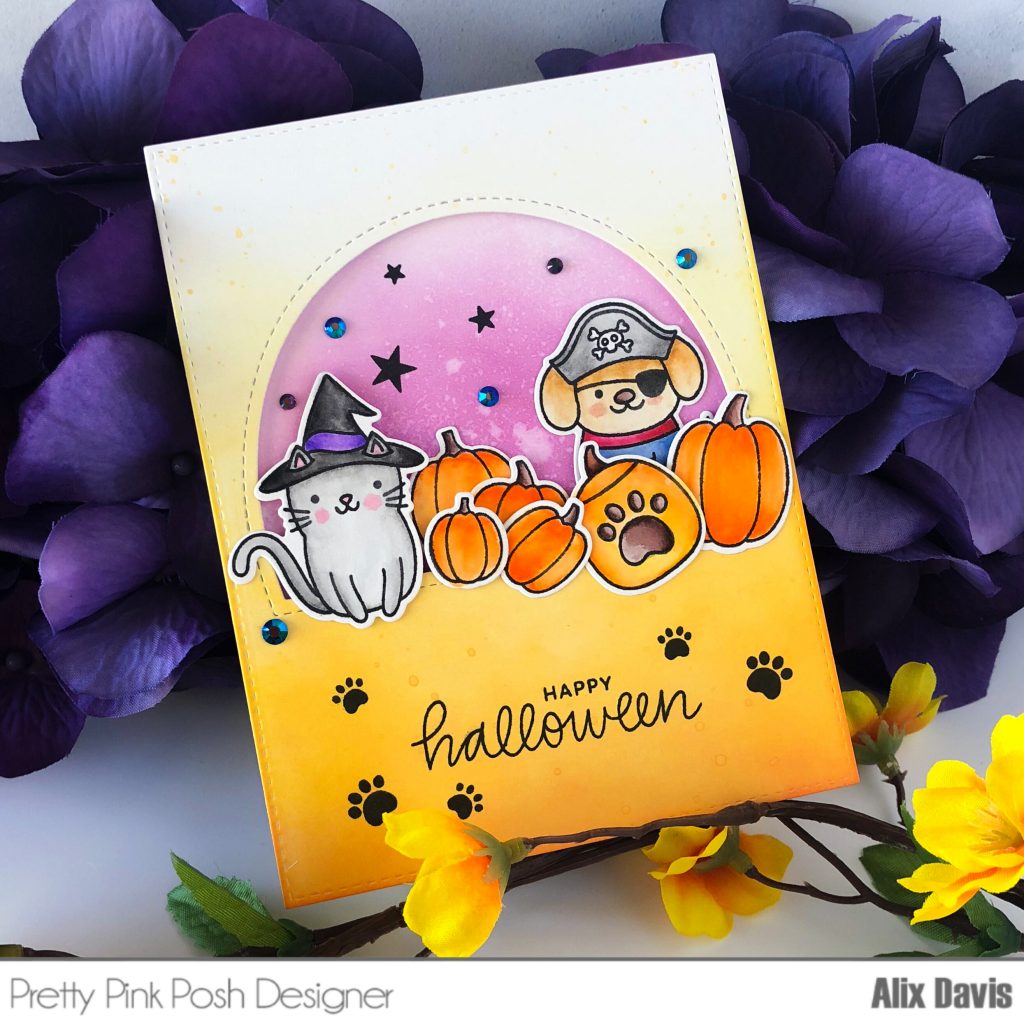
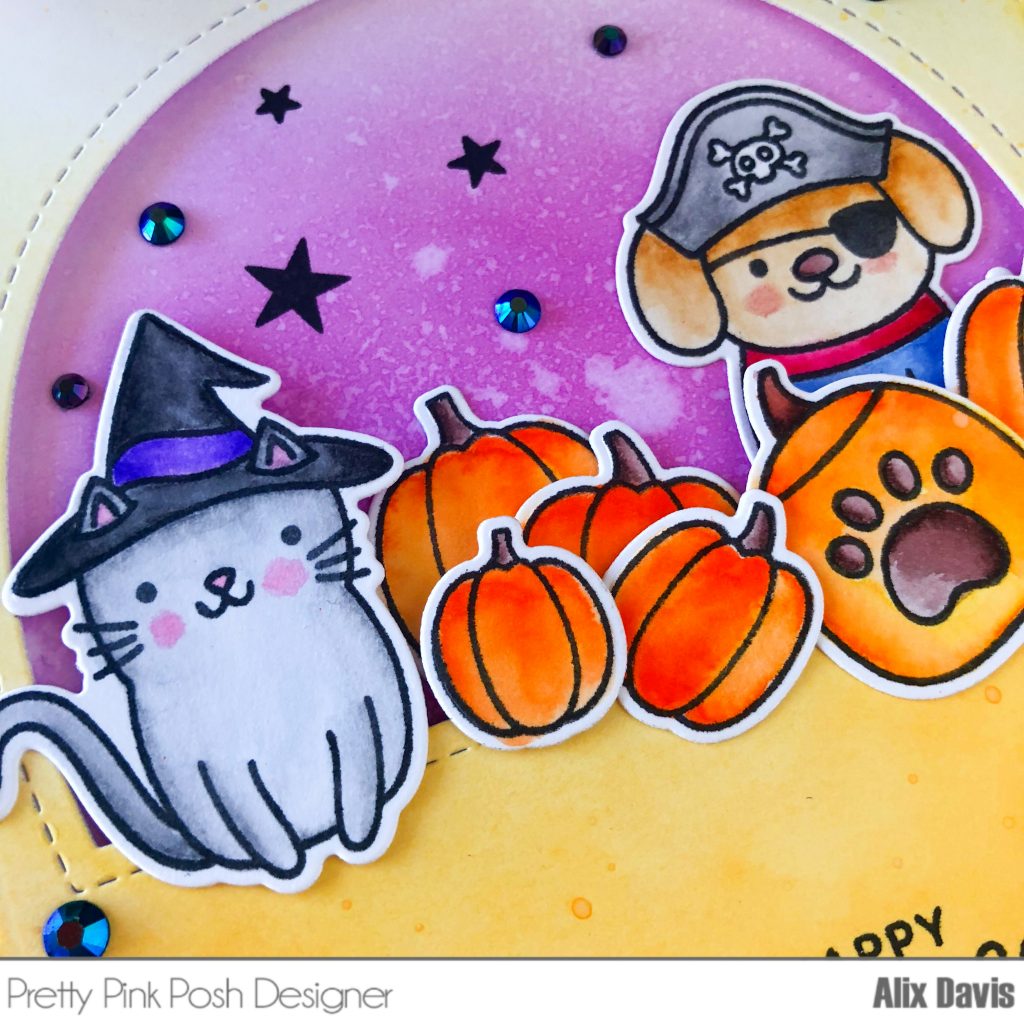
I adhered  all selected images using Multi Medium Matte and foam tapes to the background panel. I realized it was kinda empty in the window, so I picked an star light string image from Mama Elephant Merry Mantle Stamp Set. In the end, I stamped the sentiment to the lower portion of the card using Memento ink in Tuxedo Black.
Kuretake Zig Clean Color Brushes used: 028 Pale Pink, 025 Pink, 036 Light Blue, 052 Bright Yellow, 094 Gray Brown
 
To celebrate with you, here is an amazing sale and promotion and giveaway! Keep reading to the end!
 
 
From 9/15 – 9/17
10% off entire store! No code required!
 
From 9/15 – 9/30
Spend $100* – receive 1 free ‘Color Me Letters’ 4×6 stamp set.
Spend $150* – receive 1 free ‘Color Me Letters’ 4×6 stamp set and ‘Hilly THANKS’ dies.
Spend $200* – receive 1 free ‘Color Me Letters’ 4×6 stamp set, ‘Hilly THANKS’ dies, and ‘Hilly HELLO’ dies.
 
Please read all the fine print carefully! 🙂

*Subtotal amount must be met before any shipping fees/tax/customs.
Free item(s) valid only a single order/transaction.
Limit one of each free offer per order.
Orders cannot be combined. New orders only.
Limit one free offer per customer/order.
We reserve the right to cancel/modify orders.
Free offer valid 9/15-9/30 or while supplies last!
 
 
To celebrate this mega anniversary release, Mama Elephant is giving away of ten $25 ME gift certificates throughout the 3 day stampede! Winners will be chosen at random from the collective blogs in the Stampede. Winners will be announced on the last day of Stamp Highlights. You have up to 4 chances to qualify to win!
 
» 1. Leave a comment on this blog post «
» 2. Like/share Mama Elephant on Facebook: facebook.com/mamaelephant «
» 3. Follow/tweet Mama Elephant on Twitter: twitter.com/heymamaelephant «
» 4. Follow/comment on Instagram: instagram.com/mamaelephant «
 
Each action qualifies for one entry, max 4 entries per stampeder please!
 
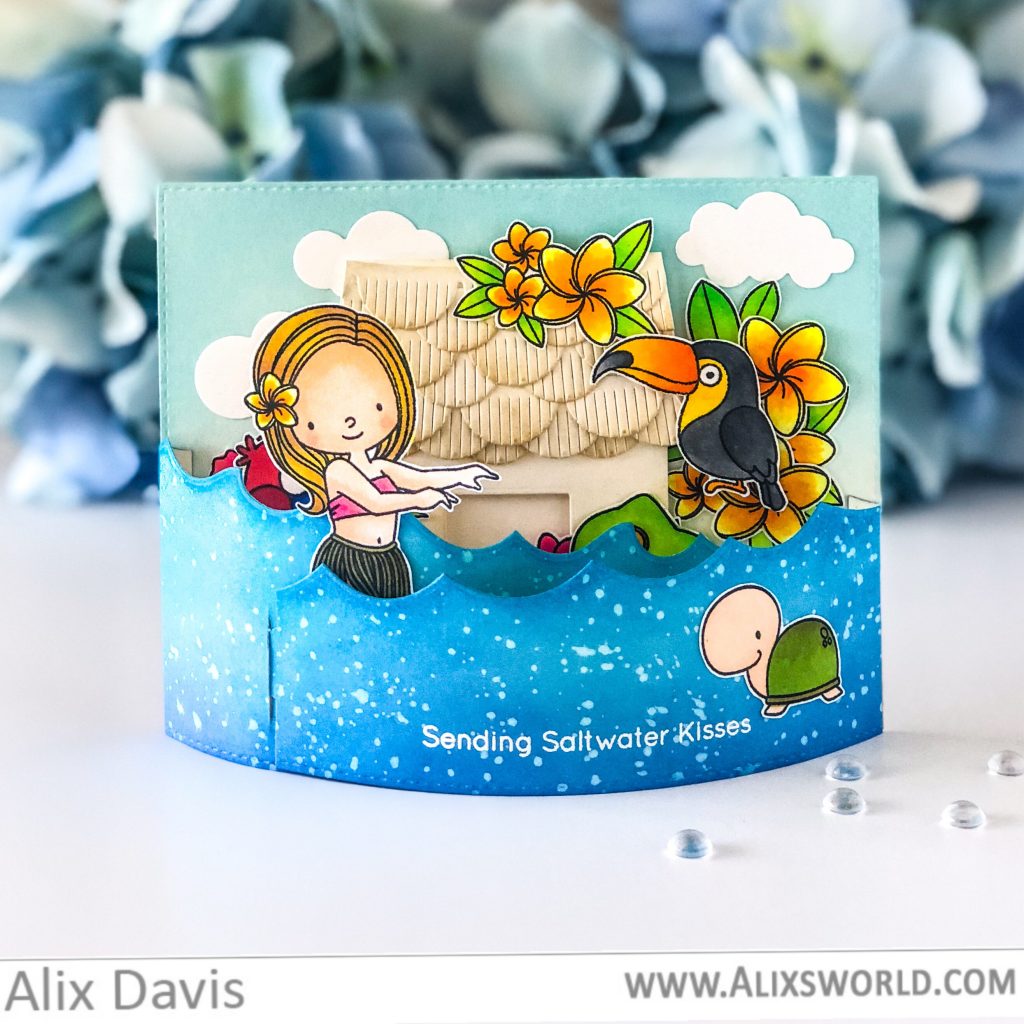
Joining on this wild ride of a stampede are lots of crafty designer friends! Please visit them to see what they did with the new goodies! 
 
And that’s a wrap to the 3 day mega stampede! Make sure you checked out Day 1 and DAY 2! Thanks all for joining us! The celebration continues all month long!

Sending Salt water Kiss – MFT 2018 Card Design Superstar: Innovation Master

Good Morning,

I  was debating if I should join everyone to participate MFT 2018 Card Design Superstar: Innovation Master Contest. After pulling out all stamps I owned, I suddenly came up with this idea. I have tried  3D Tri folded card last year so it was not too hard to figure the template.

To make this card, I needed to make a few parts to assemble. I first stamp and hand cut all images from My Favorite Things BB Polynesian Paradise Stamp set and colored with Copic Markers.

For the background, I cut an A2 panel out of piece of watercolor paper. Then I inked the upper portion using Distress oxide ink in Tumbled glass and lower portion in Gathered Twigs. I splattered Gathered Twigs with water over the lower portion as well. I die cut some clouds using My Favorite things Die-namics Puffy Clouds and place them randomly over the blue sky background. For the house, I first hand cut a simple house shape, then I also cut multiple My Favorite Things Die-namic Fringed Scallop Border. I inked them with Gathered Twigs and glued over the roof. I adhered the house and other selected images to the back panel using Multi Medium Matte and Foam tapes.

To make the front folding parts, I die cut two of front strips using My Favorite Things Die-namic Ocean Waves out of watercolor paper. Then I ink blended with Tim Holtz Oxide ink in Salty Ocean and Blueprint Sketch, I splattered water over the surface and dried with paper towel. I eye balled to cut the insert portion and opening cuts so it would create  3D curved wave portion.

I stamped sentiment onto the front using Versa Mark ink and poured white embossing powder,  dry heat to set.  I adhered the girl and turtle to the selected portion. Just like that, we got this cute 3d dimension Card for you.

The contest ends by 17th, I highly encourage everyone to try for the contests. No pressure, No improvement! Good Luck to myself and all of you!

PPP September Product Release Blog Hop + Giveaway

Welcome everyone to Pretty Pink Posh September 2018 release Blog Hop! There are so many amazing products here that I want to share with you. Pretty Pink Posh always surprises me with their stamp images, cutting dies and selection of embellishments. I am showing you two cards that I made for this Blog Hop. I know I will keep making more cards in the following days. Stay tuned!

< Card 1 >

For my first card, I did something I’ve never done before. No line coloring! I used  Winsor & Newton Cotman watercolor paints for the whole card.  I stamped images from Pretty Pink Posh Anemones Stamp set on a piece of watercolor paper using Tim Holtz distress ink in Antique Linen, Then colored them  in Purple Lake, Camboge Hue, Sap Green and Hooker’s Green Dark. I added the flower center using Payne’s Gray with a thin brush. I cut all images easily using the coordinating die.

For the background, I did ink smudge which means I mixture water and paint onto a waterproof surface and quickly added a piece of watercolor paper on top until it became the color and pattern I wanted. For the color selection, I went for Cerulean Blue Hue. I die cut the frame twice out of Pretty Pink Posh Scallop Circles Die out of Neenah Solar white 110 lbs cardstock and stacked them together to create some dimension. I attached the frame onto the background and carefully arranged all my color images around it.

At last, I stamped the sentiment from Pretty Pink Posh Simple Saying: Kind Stamp set using  Versafine Onyx black ink and embellished with Pretty Pink Posh Jewels in Sea Glass. I did put a little more time on coloring all images since this is my first time. But they say, “Practice makes Better” I cannot wait to color my next floral image soon!

< Card 2 >


My second card is cute one with Pretty Pink Posh Halloween Pals Stamp set and Pumpkin Patch Critters Stamp set. I colored all images using Kuretake Zig Clean Color Real Brush onto bristol smooth paper and die cut with their coordinating dies ( Halloween Pals / Pumpkin Patch Critters )

I ink blended with Tim Holtz Distress Oxide ink in Carved Pumpkin and Fossilized Amber onto an A2 sized Bristol Smooth Paper. Then I cut a half circle window using Pretty Pink Posh Window Frames Die. I also did ink blending for the area inside of window using Tim Holtz Distress Oxide ink in Seedless Preserve and Wilted Violet and splattered some water over it to create spotting effect.


I arranged all images onto the bottom of the window using Multi Medium Matte and Foam tapes. And I stamped sentiment along with those cute stars and paw prints using Versafine Onyx Black ink. To fill some empty spots, I added Pretty Pink Posh Jewels in Midnight Black.

There are 4 $25 gift certificates up for grabs (two winners each day). Winners will be picked randomly along the blog hop. Comments must be left by 11:59 PM PDT on 9/18/2018. Winners will be announced on the PPP blog. Now it’s time to hop with us!