Waffle Flower 2020 December Release Blog Hop

Welcome to Waffle Flower’s Slimlines & Alphabets Release day! This month, Waffle Flower is looking towards the new year with 4 stamp sets, 4 dies, 2 alpha die sets, and 4 stencils! All of the products from this month’s release are already waiting for you on the website here! To see all these new goodies in action, hop along with us! Everyone’s got some fun and creative ideas to share and get your imagination flowing!  I made 4 cards to share with you all today!

<Card 1>    

To begin with, I colored images from Happy Gnomes Stamp set with copic markers and die cut with the Matching dies. I cut my frame by using couple nesting rectangle dies from Slim Lacy Layers Die. I ink blended background with Tim Holtz distress oxide ink in worn lipstick onto a piece of watercolor paper, then I added the red frame with foam tape for dimension. I assembled all my colored images and added sentiment “merry” to the background. I added snowflakes and sequins to embellish my card in the end.

<Card 2>

I decided to create an elegant look for my second card. I die cut all laced stripes from Slim Lacy Layers Die and layered them with liquid adhesive and foam tapes over an A2 sized card base. I stamped and copic colored multiple foliage images from Summer Time Stamp set and hand fussy cut them. I arranged images to opposite corners and stamped the sentiment “Keeping you in my heart” from Tender Thoughts Stamp set onto the center of my card. At last, I added enamel dots to finish it.

 <Card3>

I have dropped my watercolor practicing for while long time. I figured it’s nice to pick up with it and do something with such a bigger and longer canvas. I stamped selected images from Summer Time Stamp set using distress ink in Antique Linen, After watercolored the images, I cut the background using Slim Lacy Layers Die to create textures. I added my sentiment by using Sentiment additions Combo.

 <Card4>

For my last card, it stayed with one layer card format. I stamped needed images from Happy Day Stamp set using Ranger Archival ink in Coffee and watercolored them. I sparkled green paints over the background to create textures. I ink blended the card using Tim Holtz oxide ink in Tumbled Glass and Twisted Citron to finish the card.

HOP WITH US!

Giveaways
For today’s hop, Waffle Flower is giving away $25 gift certificate to THREE lucky winners. You can leave a comment on this blog and along the hop by 11:59pm EDT on Wednesday November 9th, 2020 for your chances to win. Winners will be chosen at random from the comments left on any of the posts in this blog hop and will be announced on the Waffle Flower Blog on 12/11/2020.
 
There are more giveaways to enter on our Instagram! Follow us at @waffleflowercrafts so you don’t miss out! 
Specials
  • From now till December 7th, 2020, all orders over $50 placed at waffleflower.com will receive a FREE set of Fish & Chips Stamp Set (No code required; Limited 1 per customer; While supplies last).
  • A kind reminder from Waffle Flower:“We appreciate every order we receive but we also recommend at this time of uncertainties, reserve your resources and use what you have first! Stay positive and healthy!”
  • For those of you who are new to Waffle Flower, they have a Last Chance section on their website that lists many goodies for 25% off until they are gone! This would be a great place to start your collection! 

25 Days of Christmas Tags 2020 Blog Hop – Waffle Flower

Hello everyone!

I am delighted to be joining in with Tracey McNeeley’s 10th annual 25 Days Of Christmas event.  I am a practical person for the most of time.  I like to make tags because they are much smaller than our usual A2 sized card. The receivers could reuse them as a tag for their presents or use them as bookmarks. Today I would like you show you couple Christmas tags I made using Waffle Flower products.

To start with, I cut my tag bases using Stitchable Pinking Heart Die out of red cardstock papers. I attached some washi tapes on the back of the die cut in order to make the backgrounds solid but with textures. I sparkled white acrylic paints over to create snowy scene.

I copic colored the images from Fa-la-la stamp set and die cut with the Matching dies. I also cut out the sentiments from the same stamp set to match.

After assembled all pieces onto my background using liquid glue and foam tapes, I added my twines and enamel dots to finish my project today.

Thanks for stopping by and don’t forget to check out all the other tags created by Waffle Flower Design Team!


Waffle Flower 2020 November Release Blog Hop

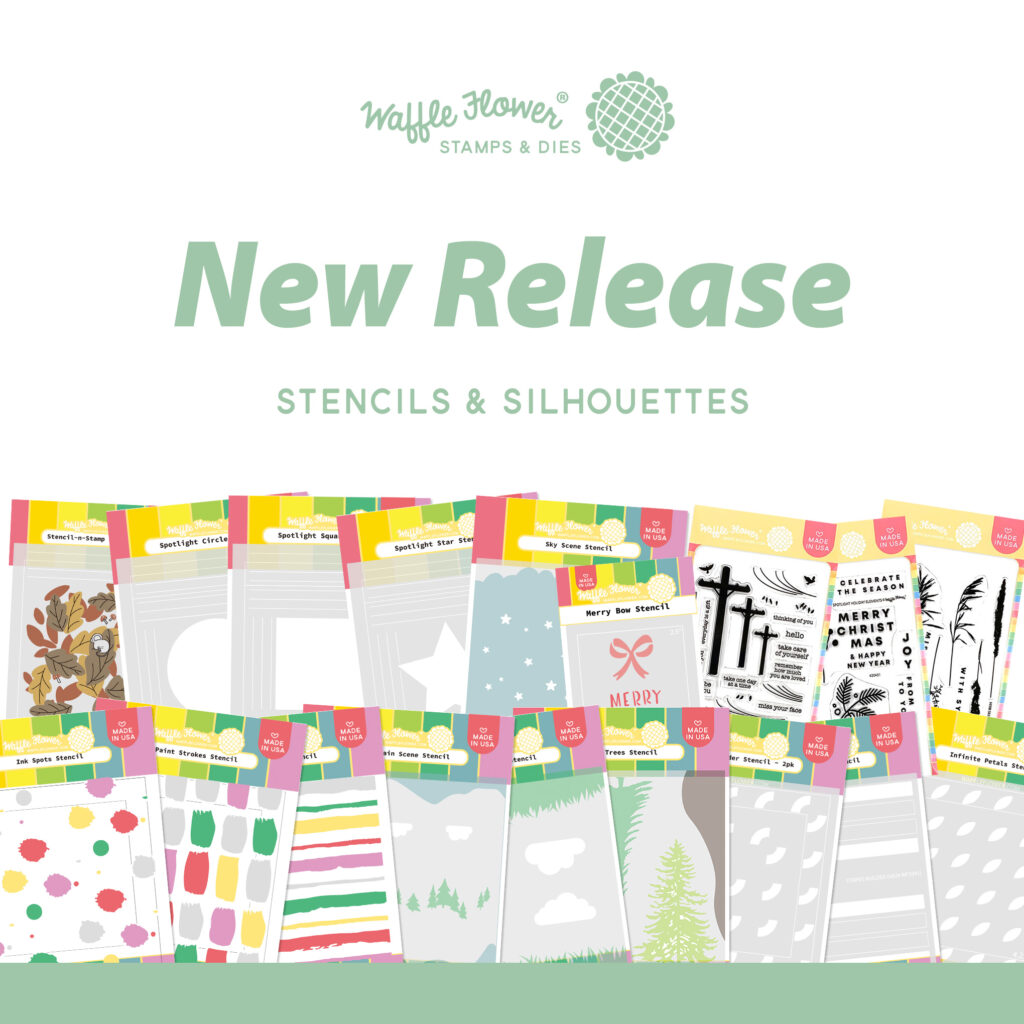
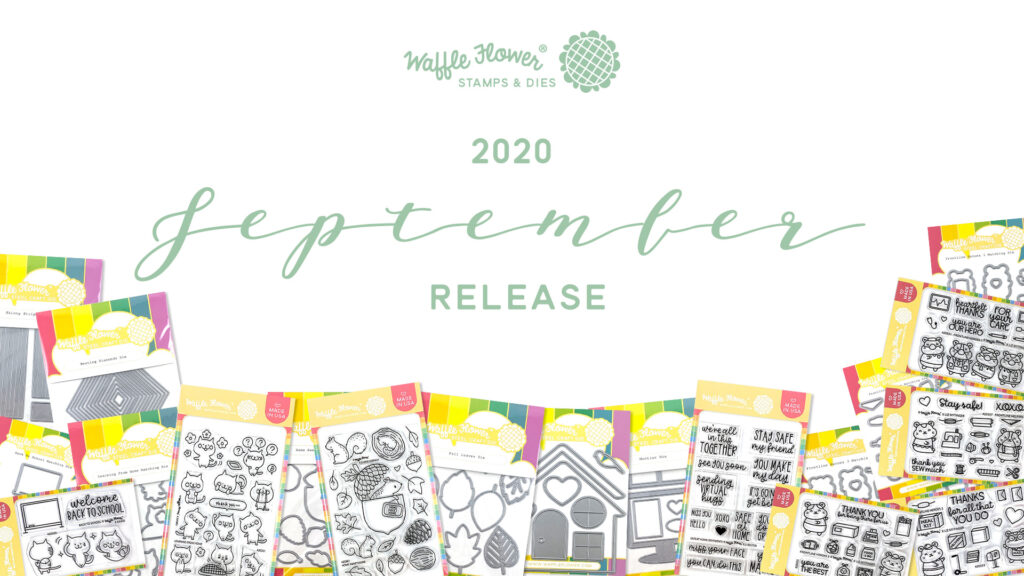
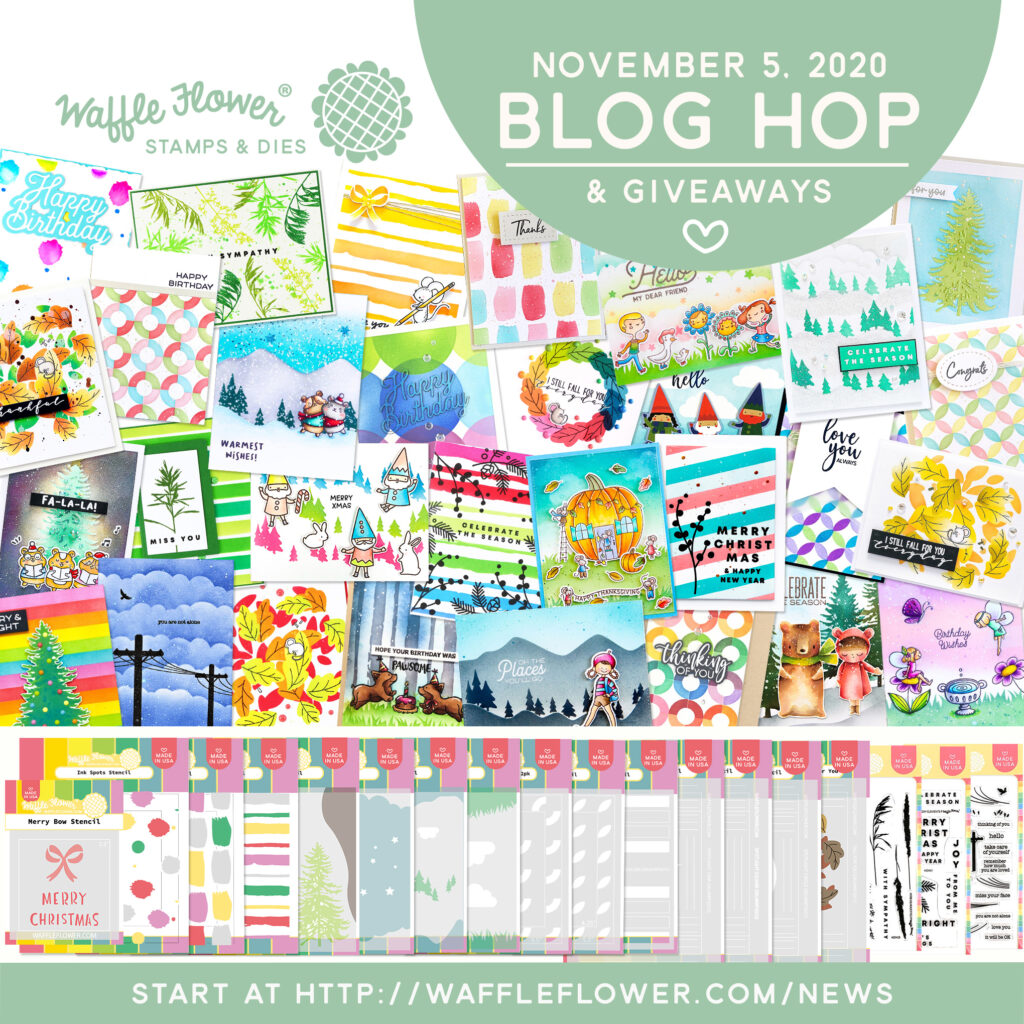
Welcome to Waffle Flower’s November 2020 Release day! Today Waffle Flower is rolling out their new release that includes 3 stamp sets, 1 stamp-n-stencil combo, and 14 stencils! All of the products from this month’s release are already waiting for you on the website here
This month’s Waffle Flower release is all about creativity boosters! For many of us, time in the craftroom is all about clearing the mind and recharging! With that goal in mind, Waffle Flower packed this release full of stencils and silhouettes designed to feed your imagination! So, take a mini-break from your holiday crafting and take a look at these new goodies! 
This month marks the first stencil release for Waffle Flower! For the artsy types, there’s the Ink Spots Stencil (stencilbundle), Paint Strokes Stencil (stencilbundle), and Inky Stripes Stencil (stencilbundle). 
If you’re more a fan of clean and geometric backgrounds, there are 3 builder stencils from cardmaker JJ Bolton: Stripes Builder Stencil (stencilbundle), Infinite Petals Stencil (stencilbundle), and Infinite Rings Builder Stencil duo (stencilbundle). For the lovers of cute and whimsical, there’s Keeway’s Grass Scene Stencil (stencilbundle), Mountain Scene Stencil (stencilbundle), and Sky Scene Stencil (stencilbundle) designed by beloved DT member and cardmaker extraordinaire Keeway Tsao. Just in time for the holidays, there are the Merry Bow Stencil (stencil) and Pine Trees (stencil). Last but not least, everyone could use the new Spotlight stencils series that includes the Spotlight Circle Stencil (stencilbundle), Spotlight Square Stencil (stencilbundle), and Spotlight Star Stencil (stencilbundle). This is just the start of the stencils line for Waffle Flower! You’ll definitely be seeing lots more stencils in future monthly releases!  
On the stamp side, the November release stamps sets all have something in common, beautiful and creative silhouettes! These silhouette sets include the classic Herb Silhouettes Stamp Set (stamp), festive Spotlight Holiday Elements Stamp Set (stamp), and unique Power Lines Stamp Set (stamp) by cardmaker JJ Bolton. 
Last on the release list this month is a new type of combo, the stencil-n-stamp. Stencils are used to create larger elements and the coordinating stamps add focal points and fine details. Waffle Flower’s first stencil-n-stamp is the adorable Fall for You by artist Cassie Loizeaux (stencil-n-stamp).
Now, Let me show you all four cards I’ve made with these fun products!
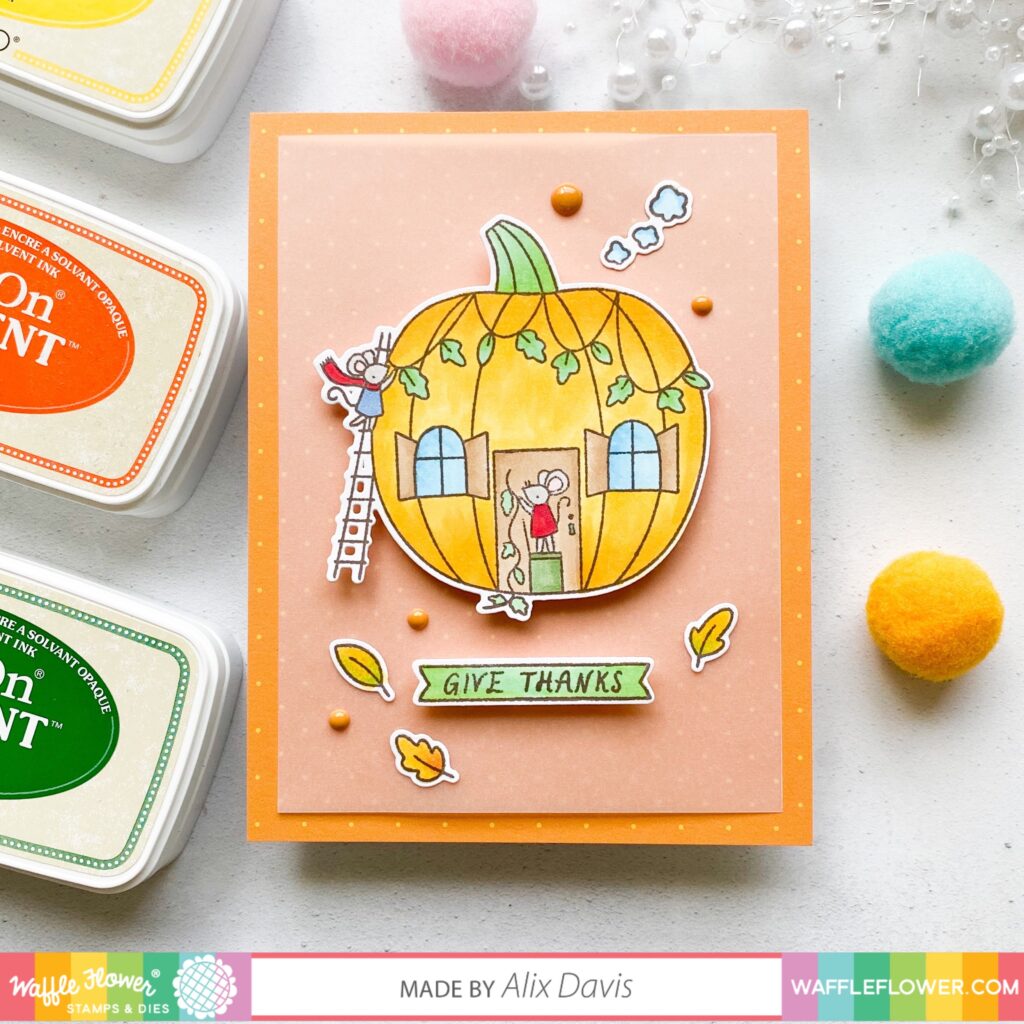
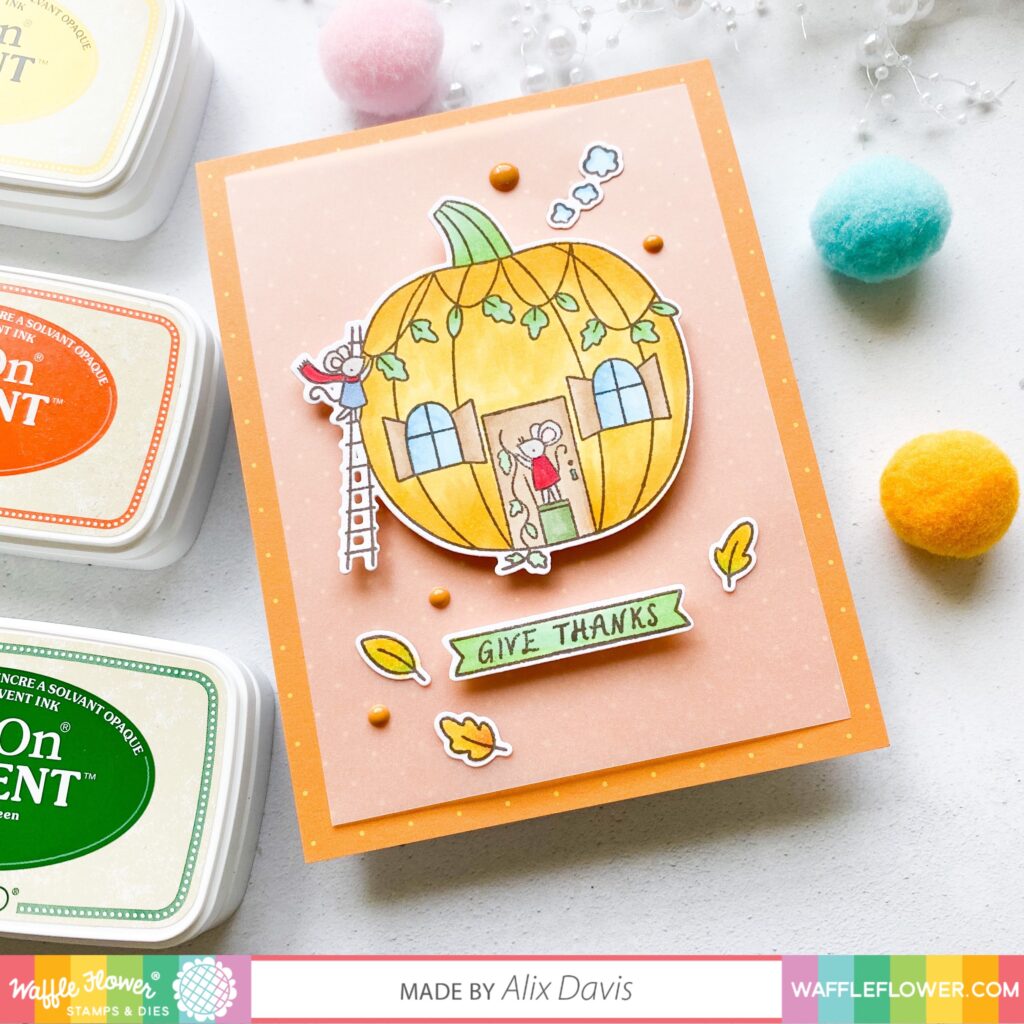
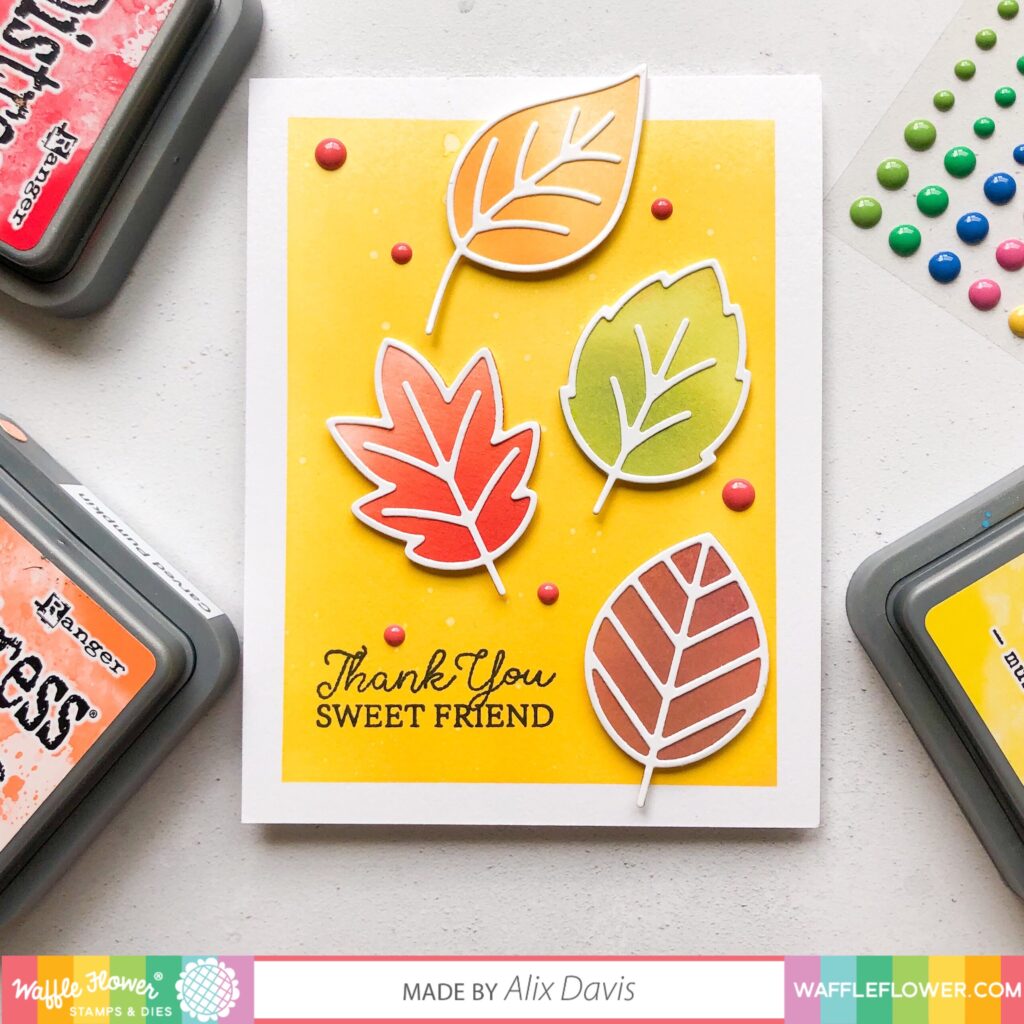
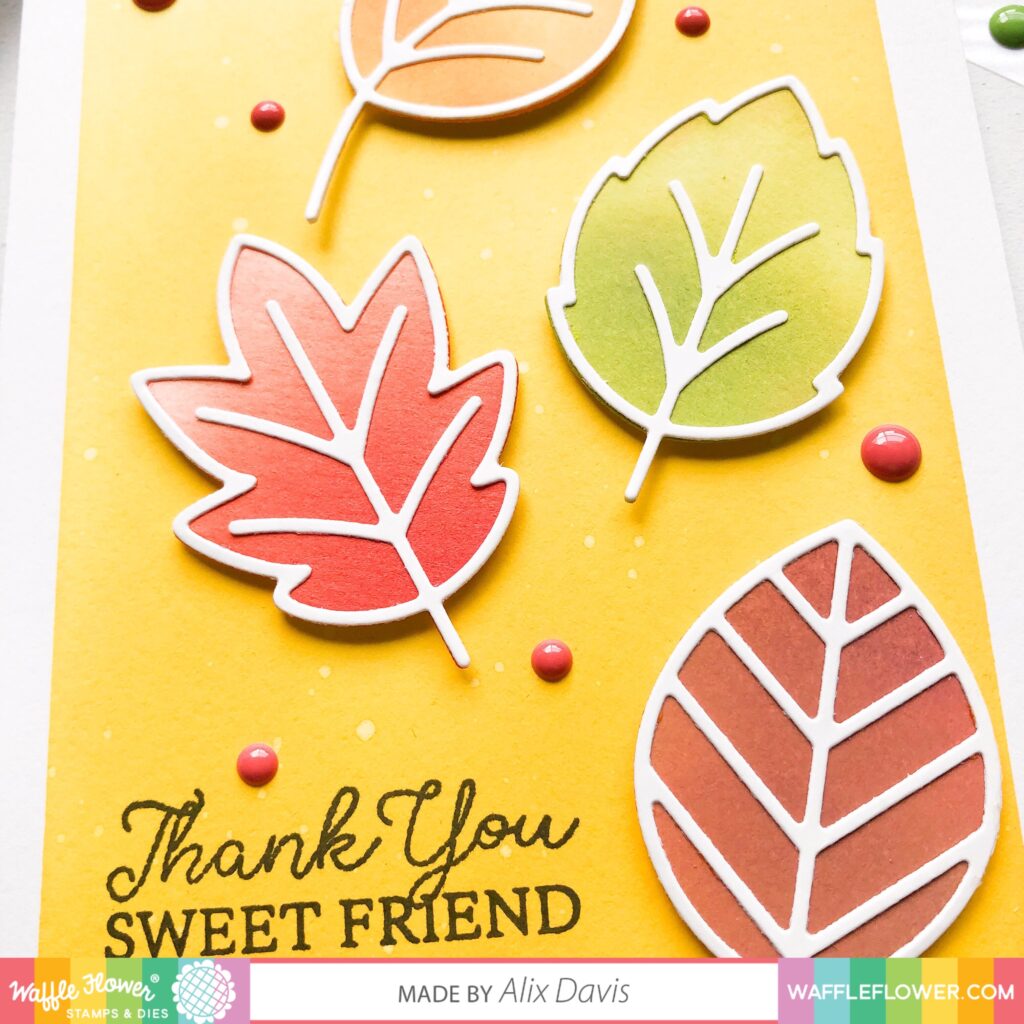
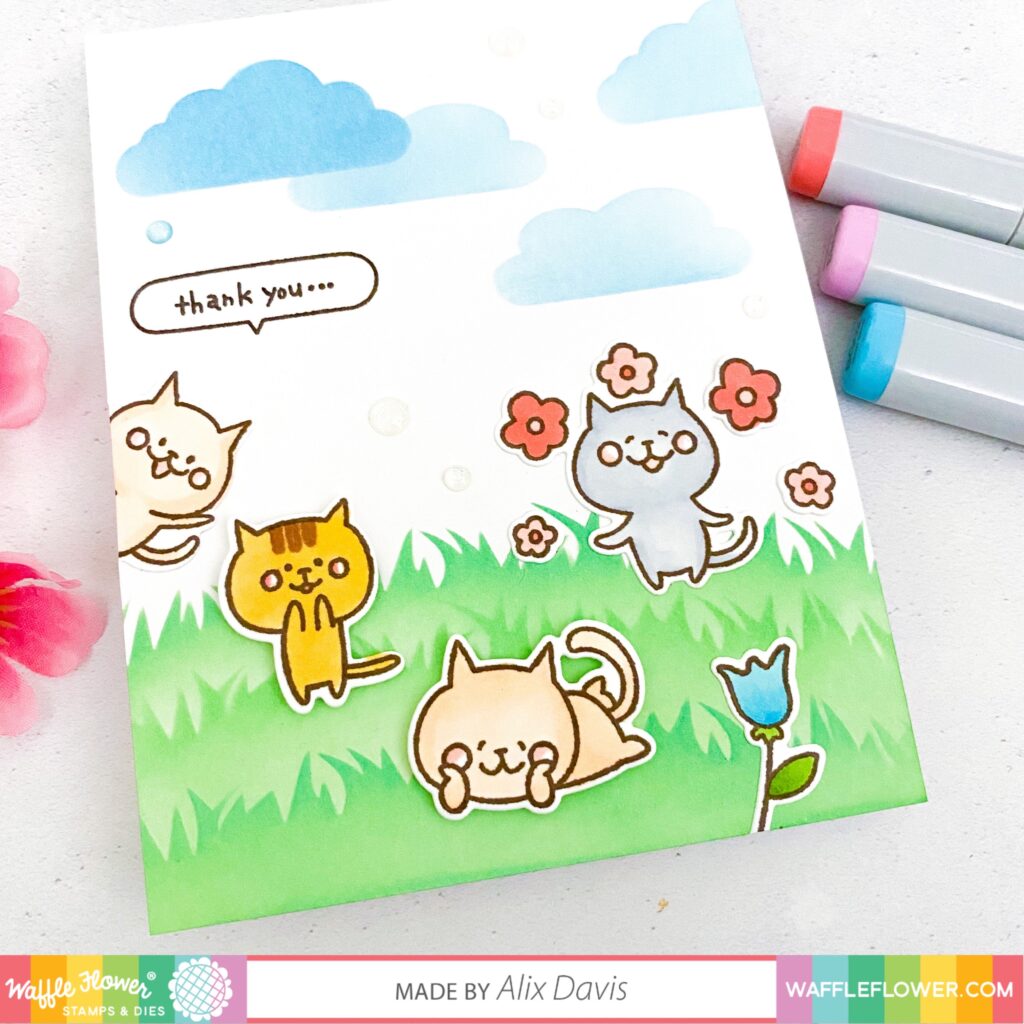
<Card 1>

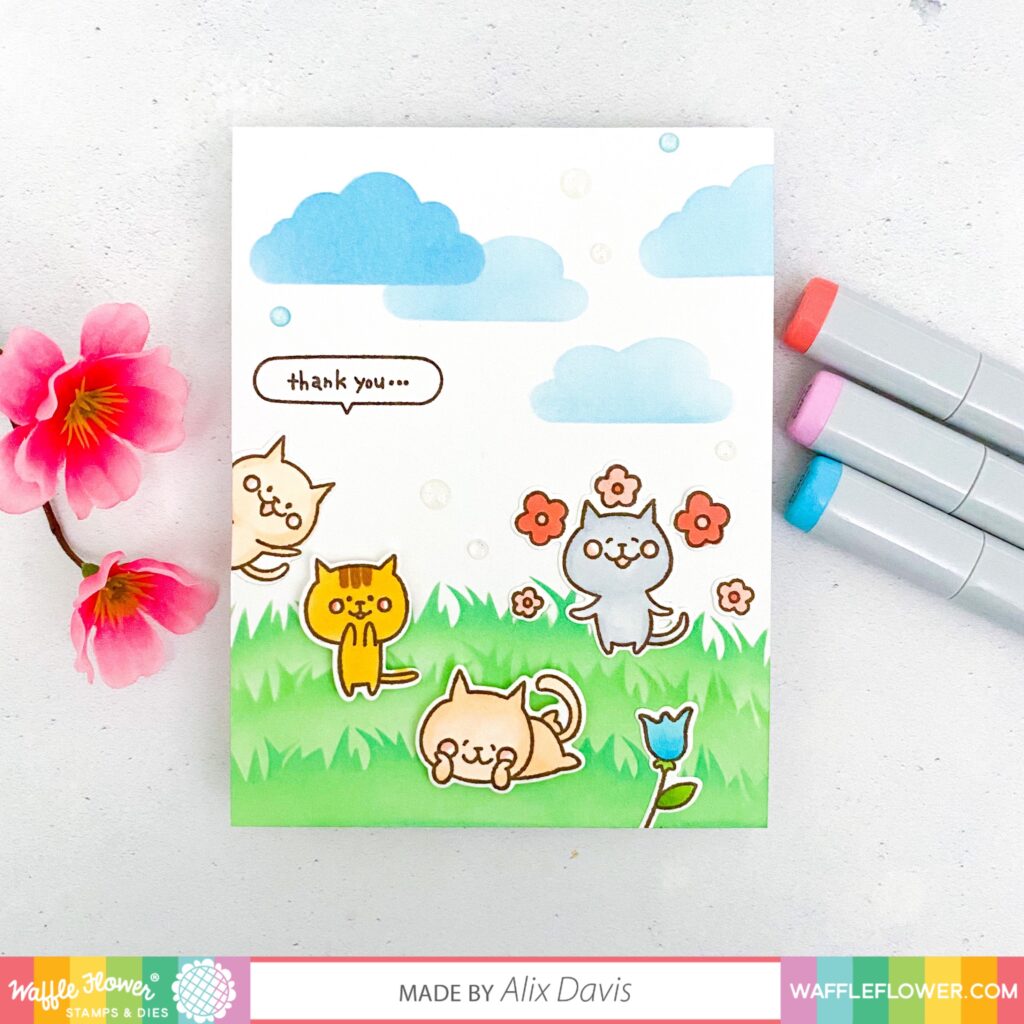
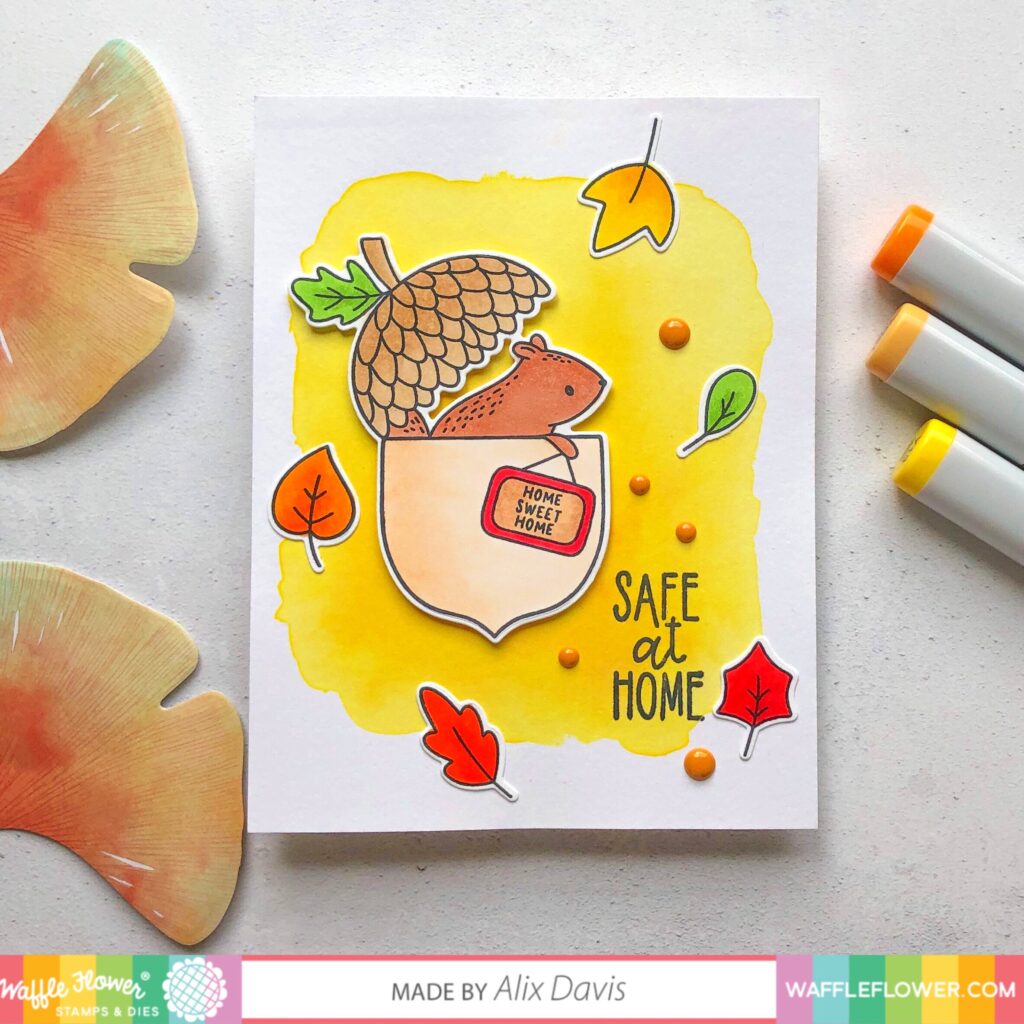
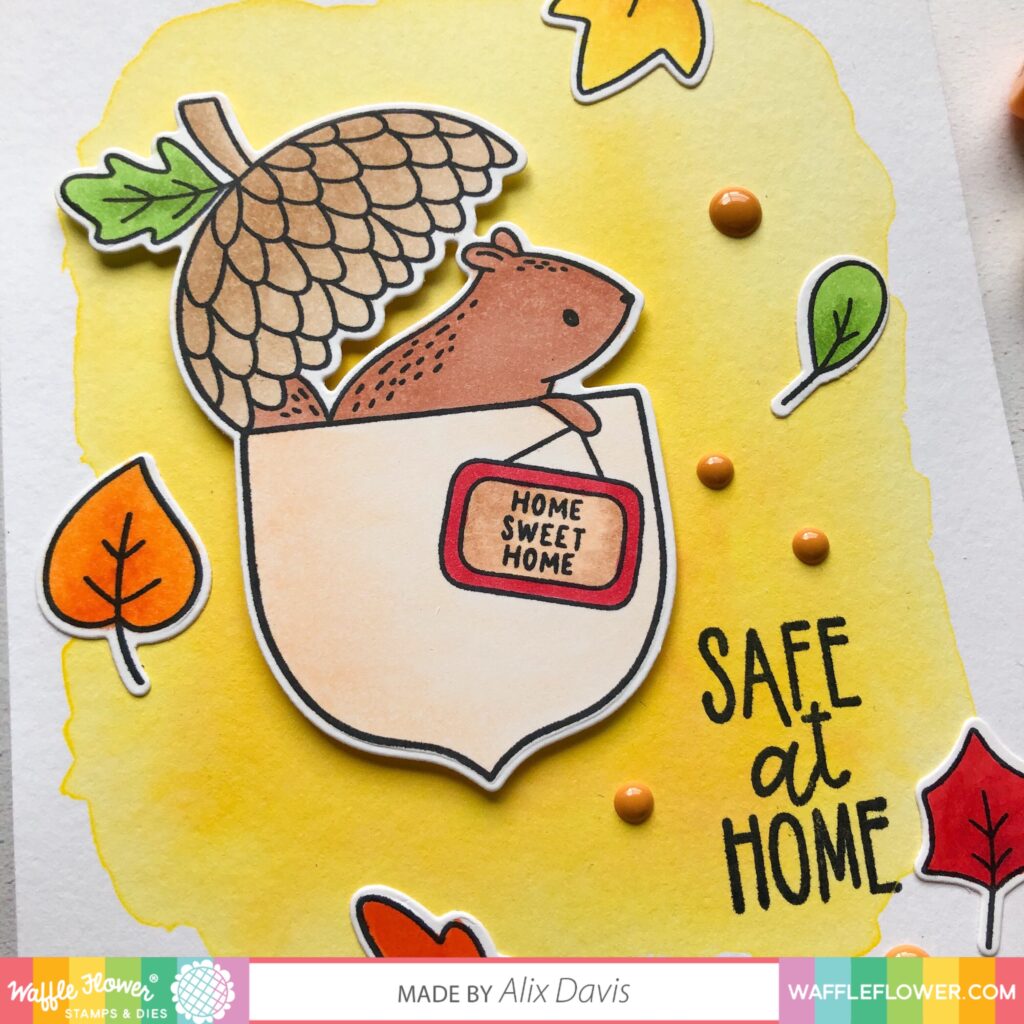
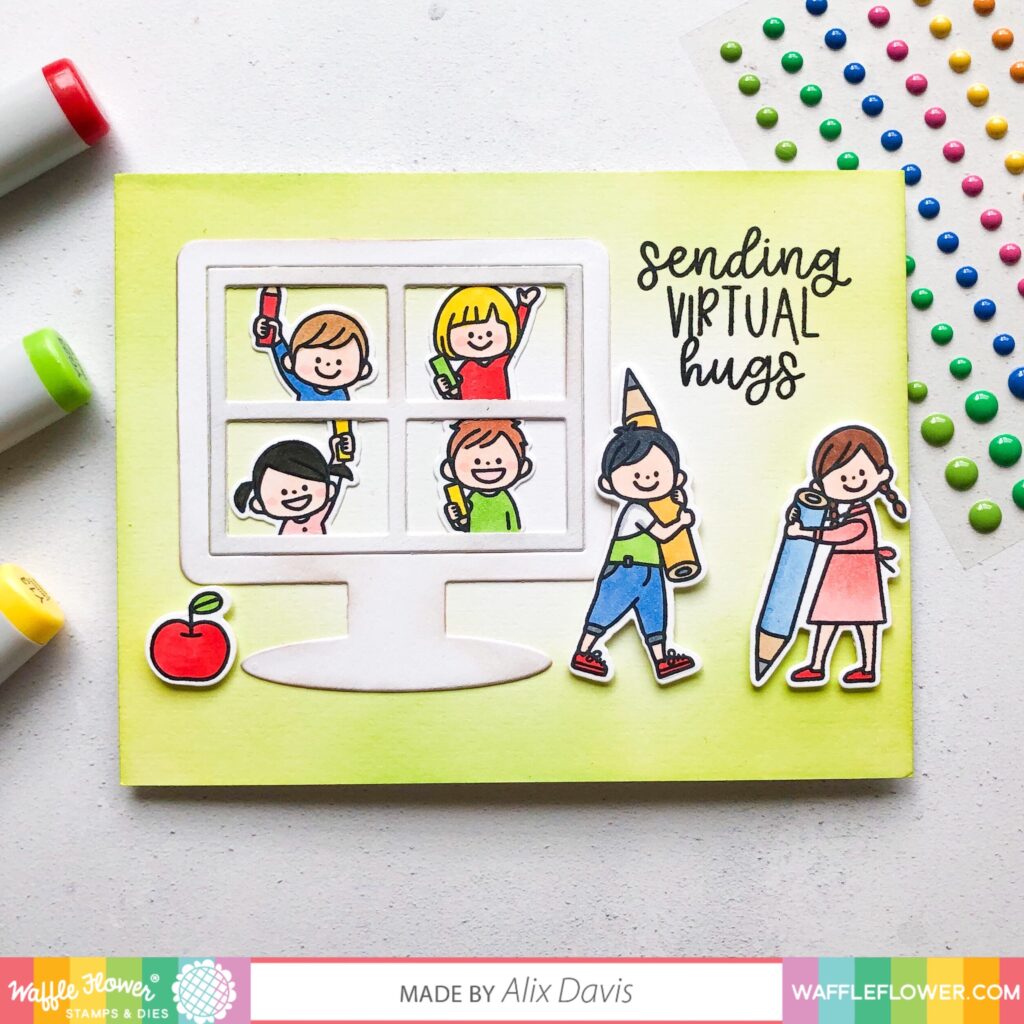
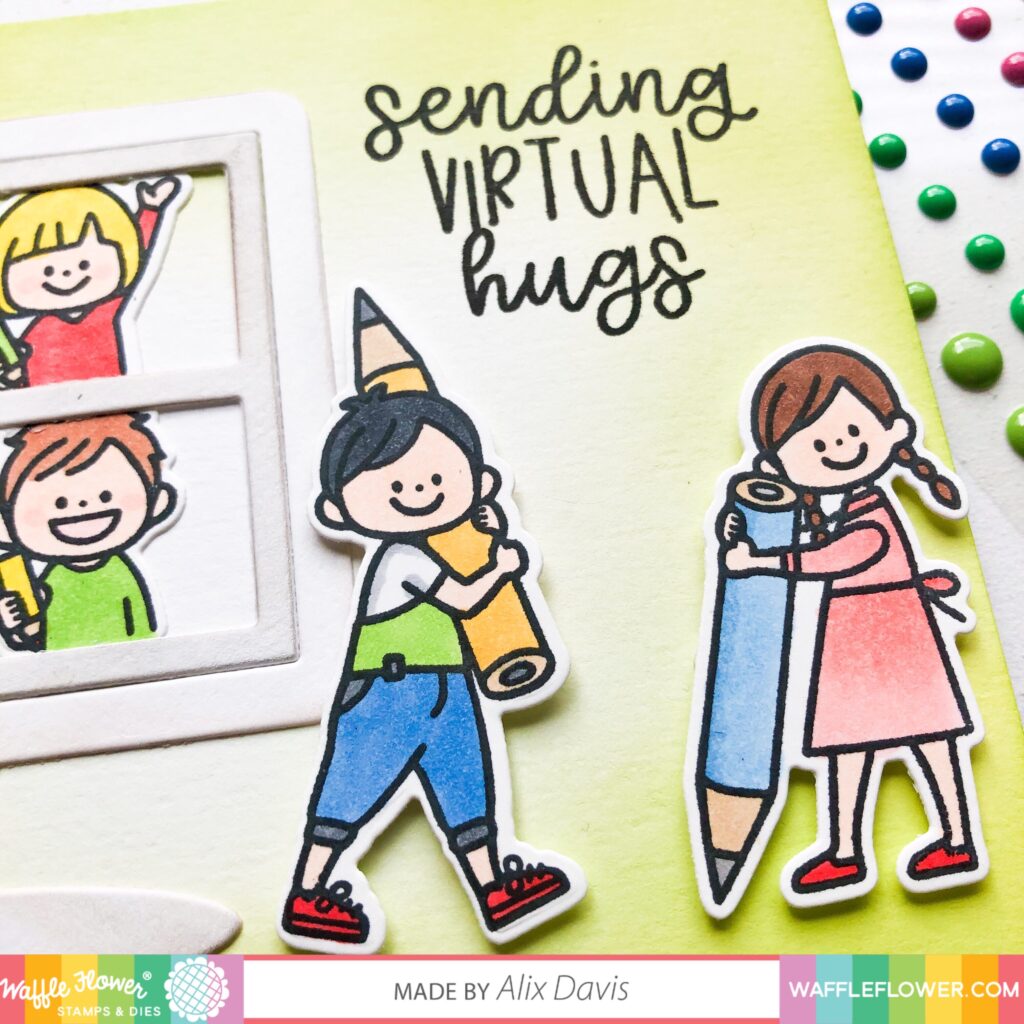
Scene building with crafting tools has been one of my favorite parts of card making. I created grasses and clouds by ink blending over Keeway’s Grass Scene Stencil with Tim Holtz Distress oxide ink in Tumbled Glass and Cracked Pistachio.

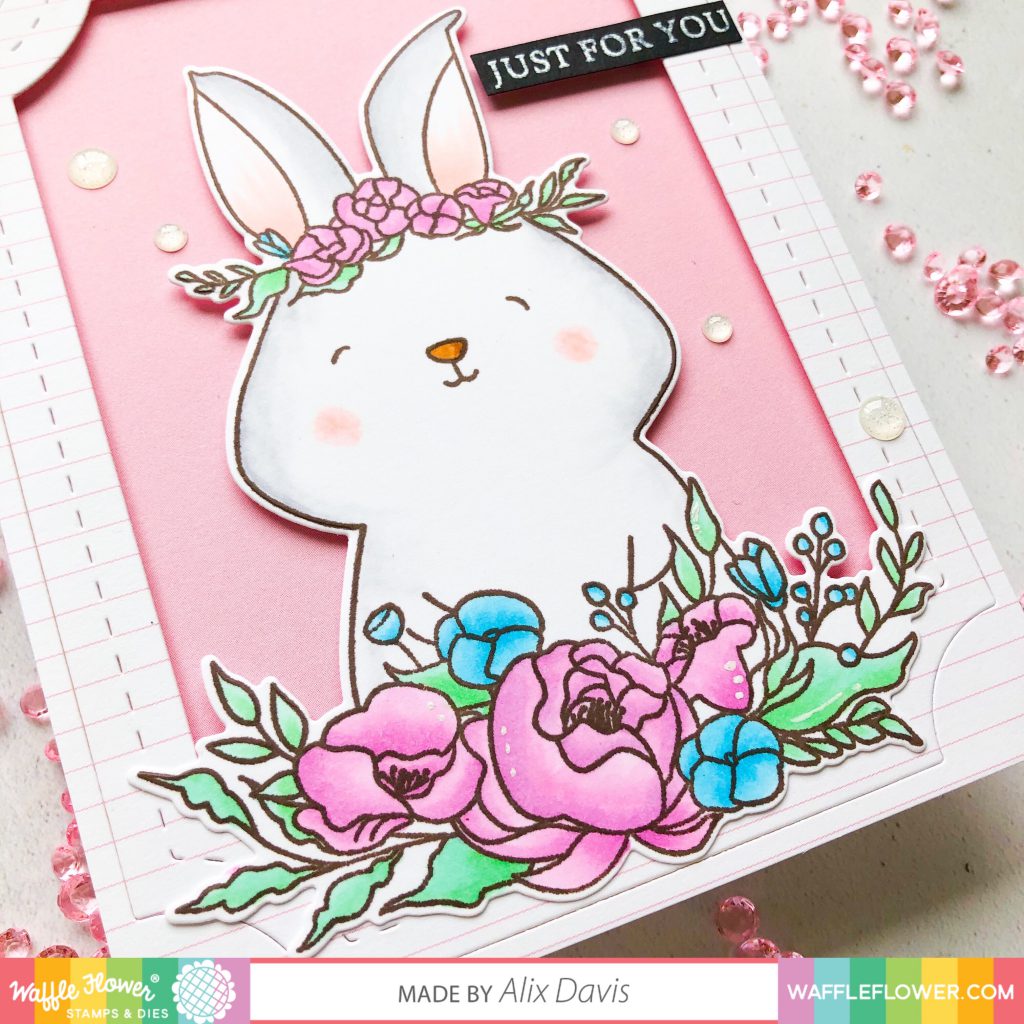
While I was waiting for inks to dry, I stamped out the images from Learning from home stamp set with Memento rich coco dye pink and colored with copic markers. I die cut them using the Matching dies and arranged them onto my A2 sized background with liquid glue and foam tapes. At last, I stamped the sentiment “Thank you..” and embellished the card with Stardust Enamel dots.
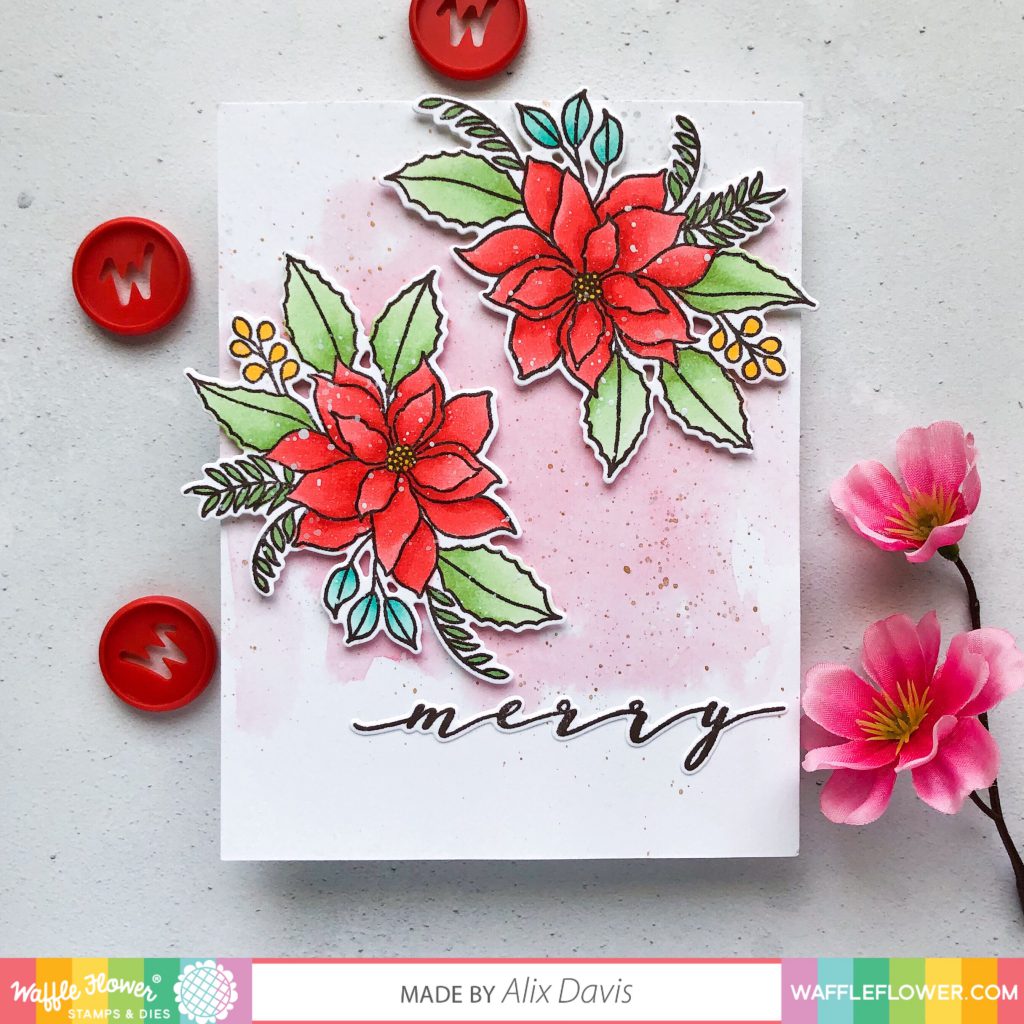
<Card 2>

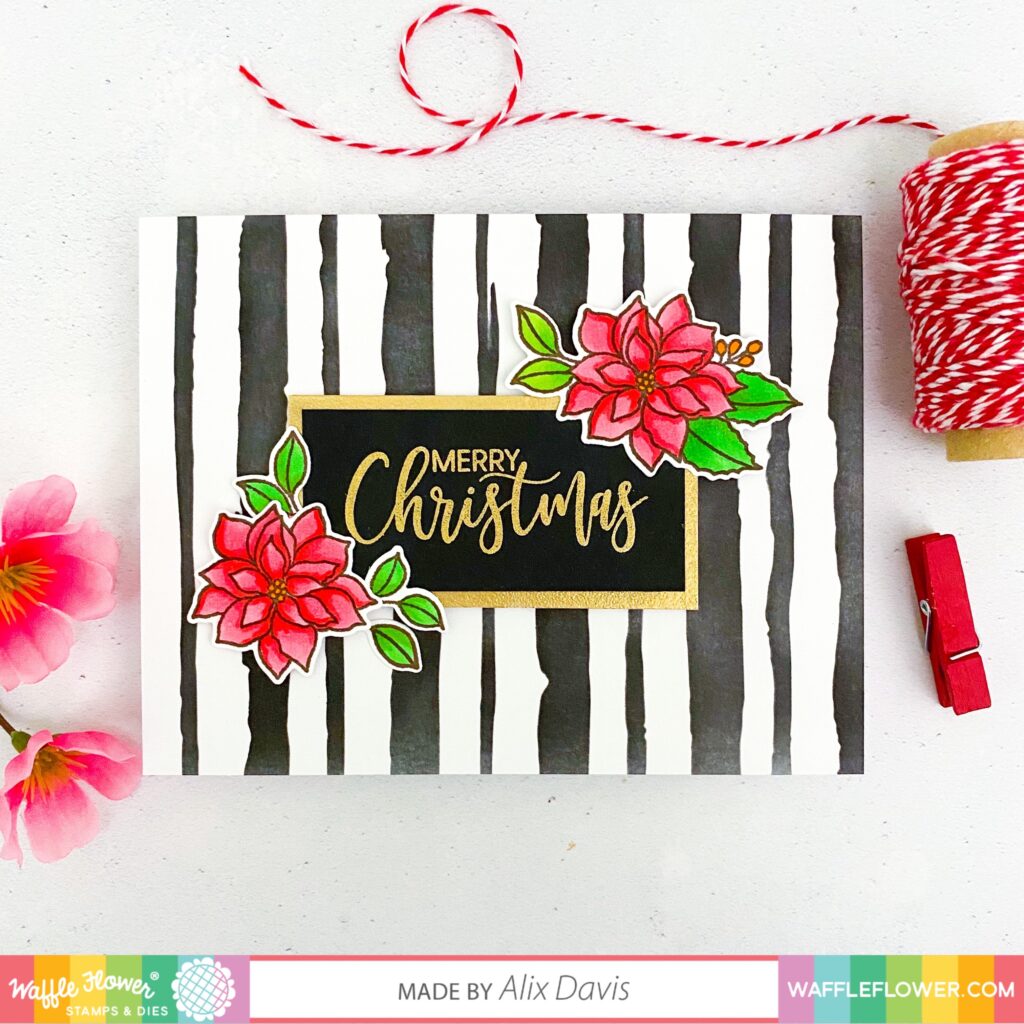
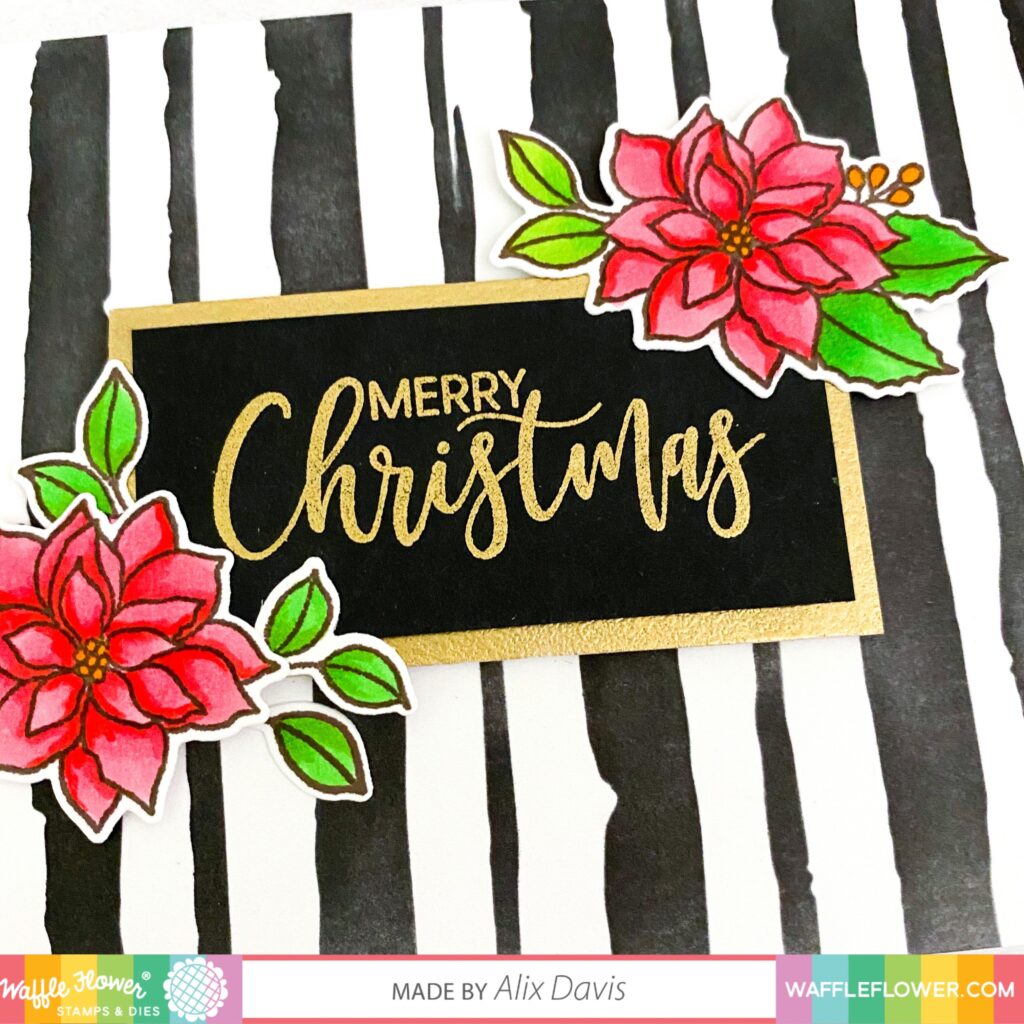
I can feel the holidays are approaching, can you?! As  you scroll down the post, you’ll notice I’ve made the rest of my cards Christmassy. To prepare my background, I laid Inky Stripes Stencil over an A2 sized card base and blended Black Soot Tim Holtz Distress ink over.

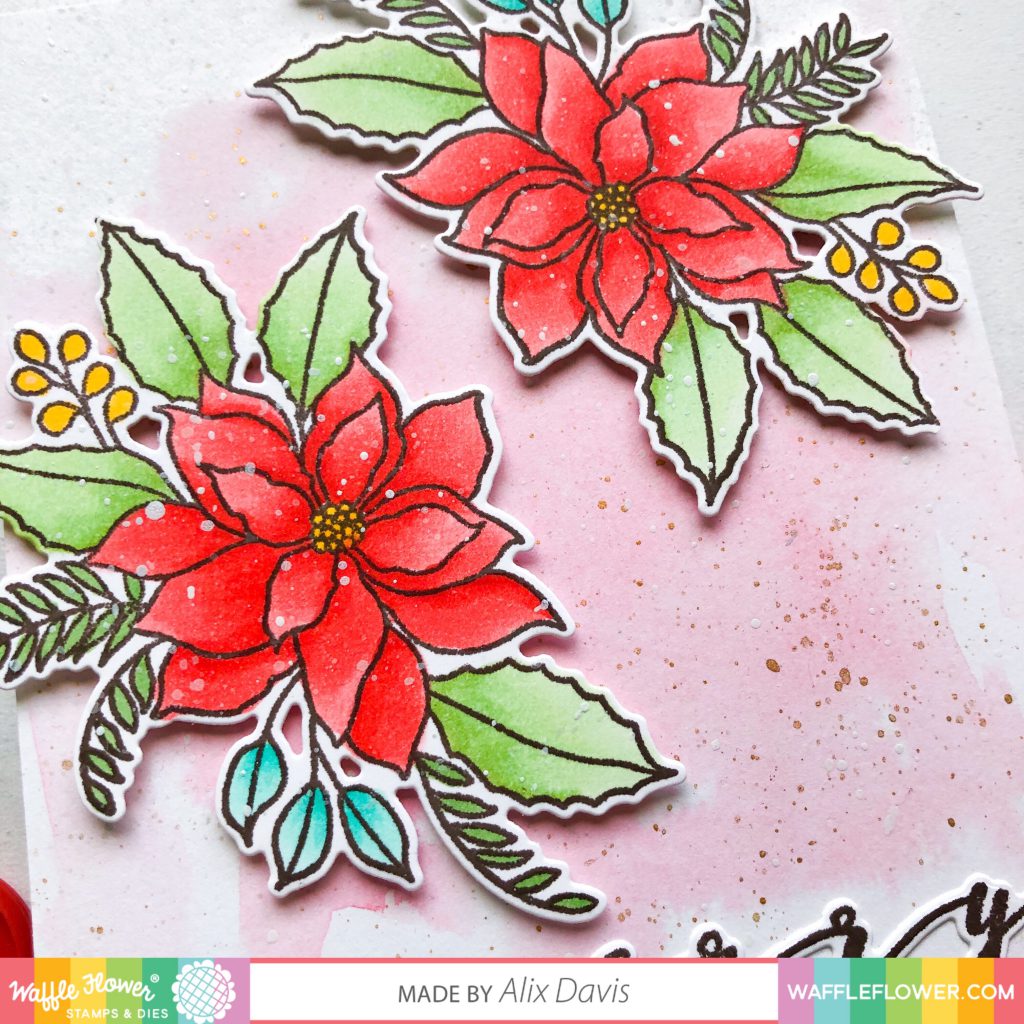
I gold embossed the sentiment from Essential Sentiments Stamp set over black card stock paper, then cut into an rectangular piece over gold embossed mat. I arranged this centerpiece using Foam tapes over the prepared background.

To decorate the sentiment piece, I stamped couple images from Poinsettia Stamp set and die cut with the matching dies. I copic colored them and placed onto two corners of the centerpiece.
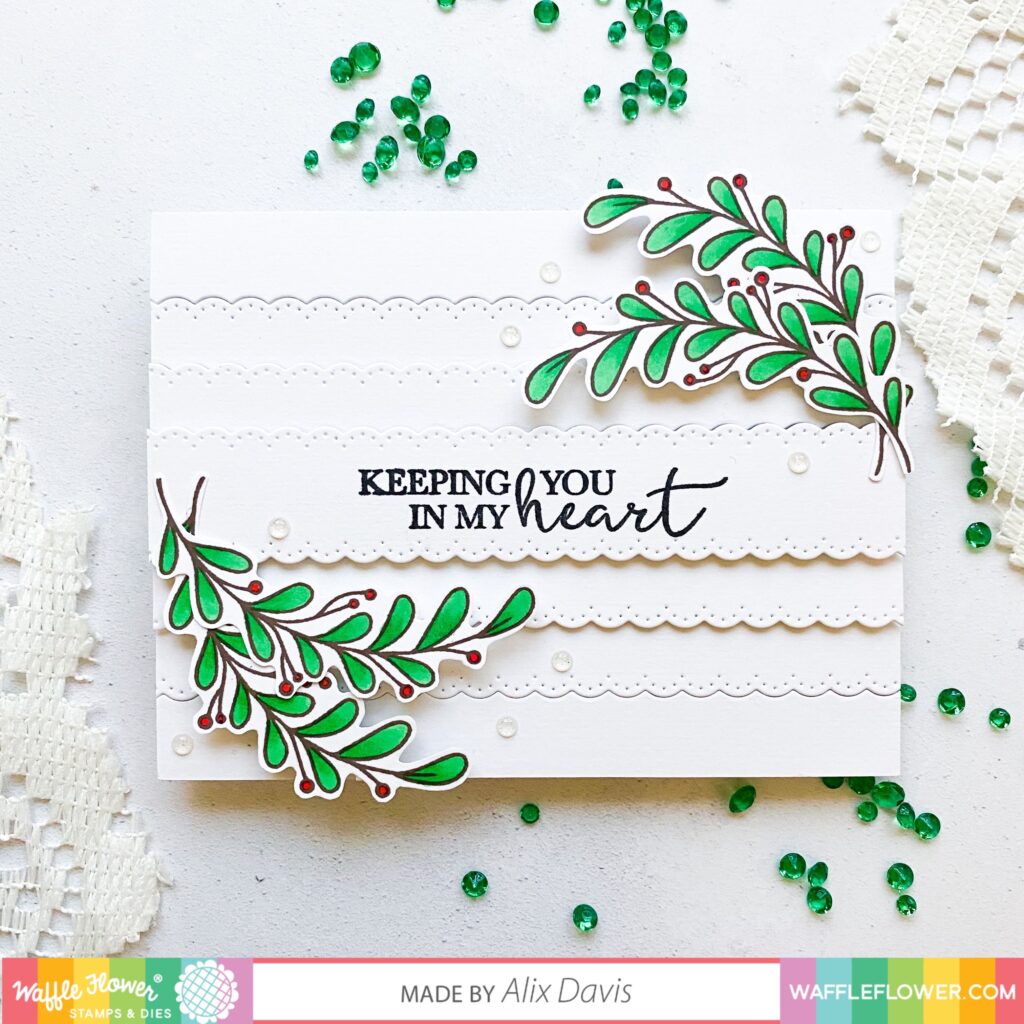
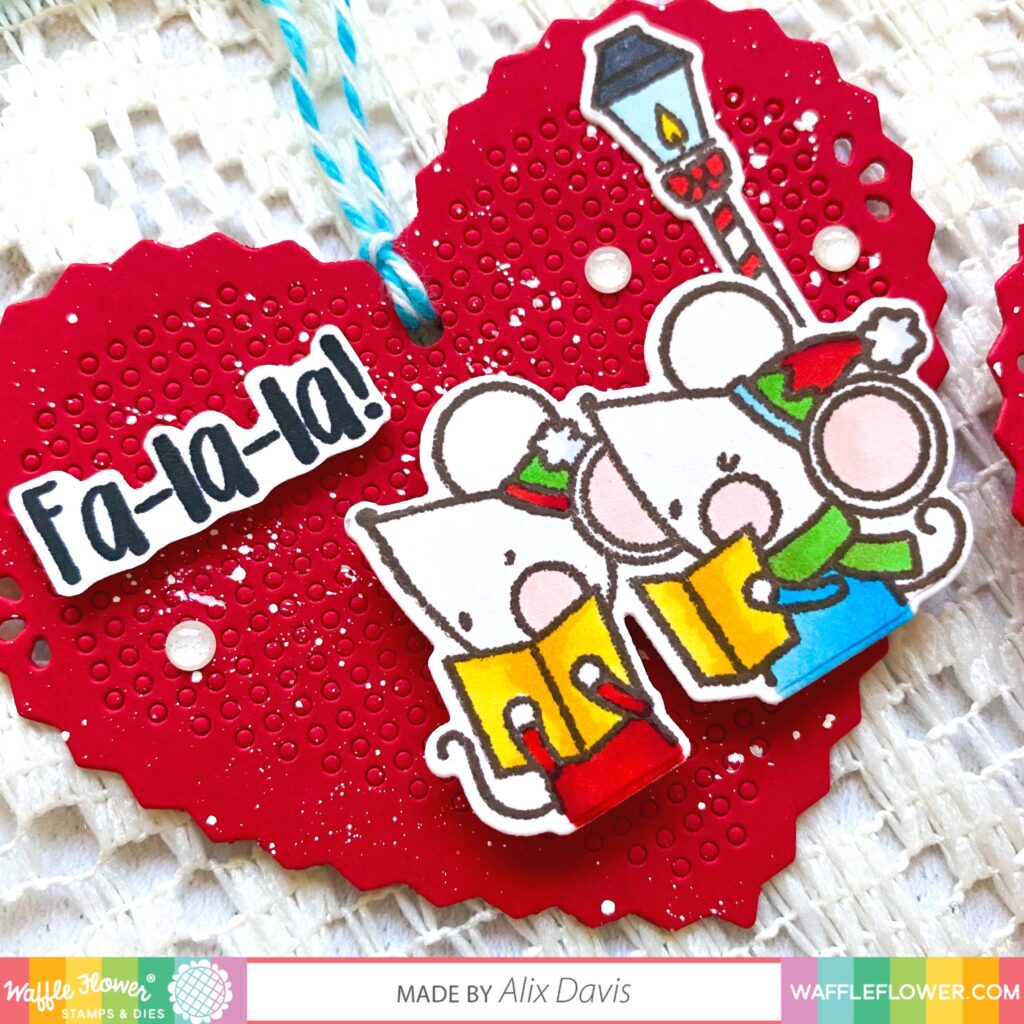
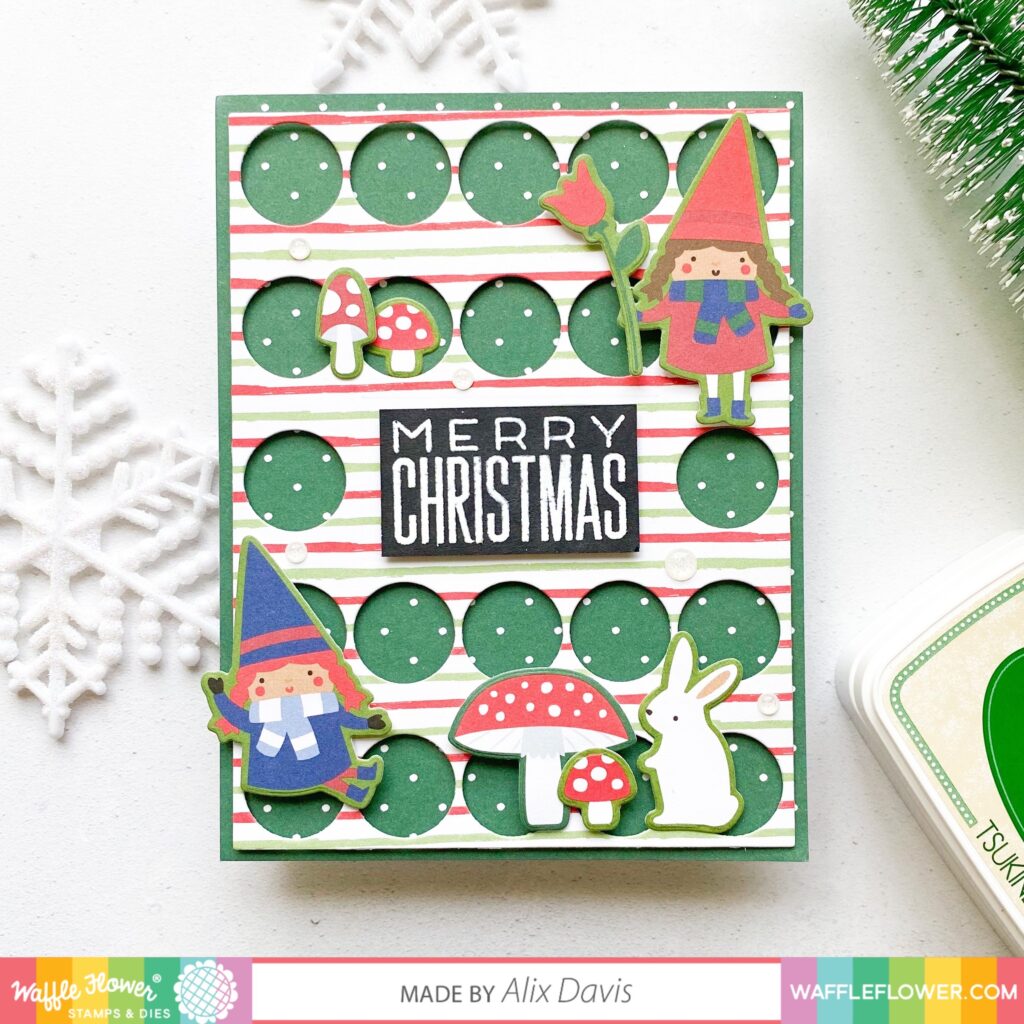
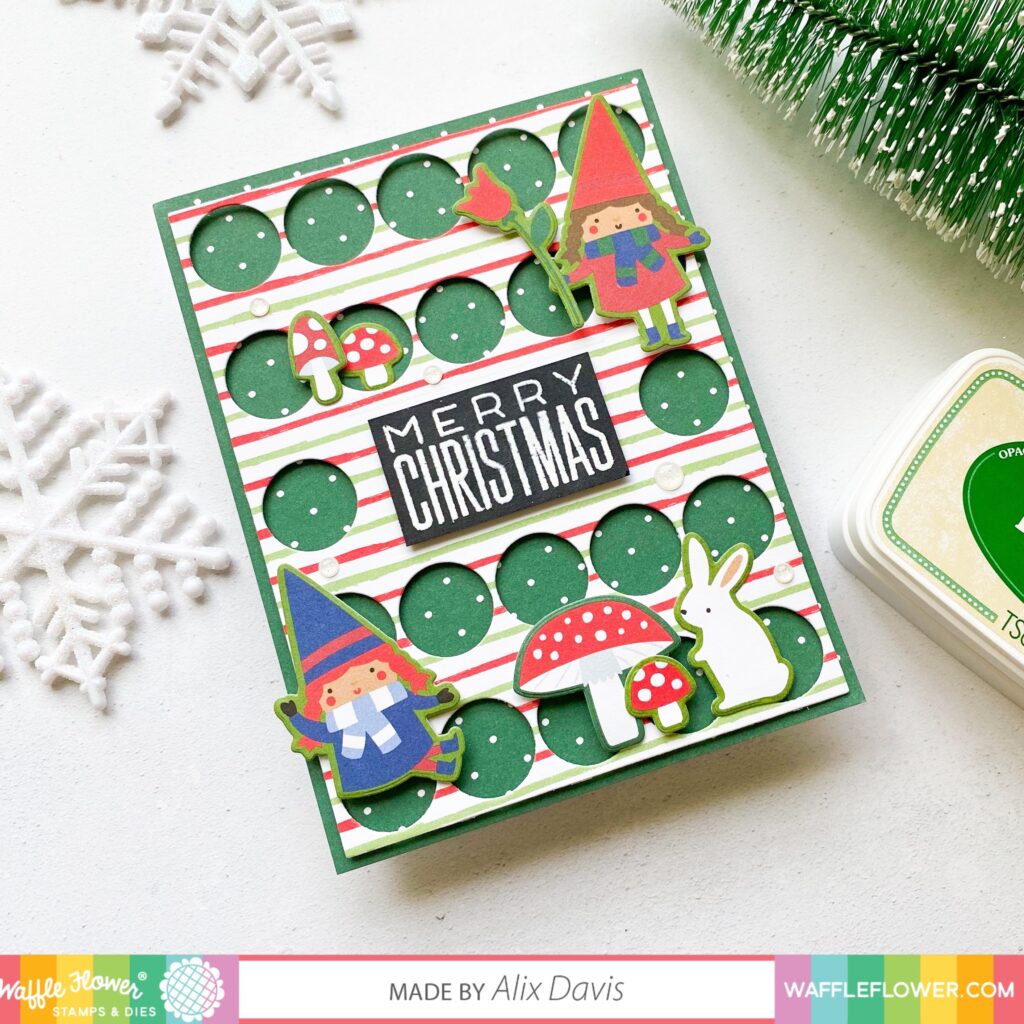
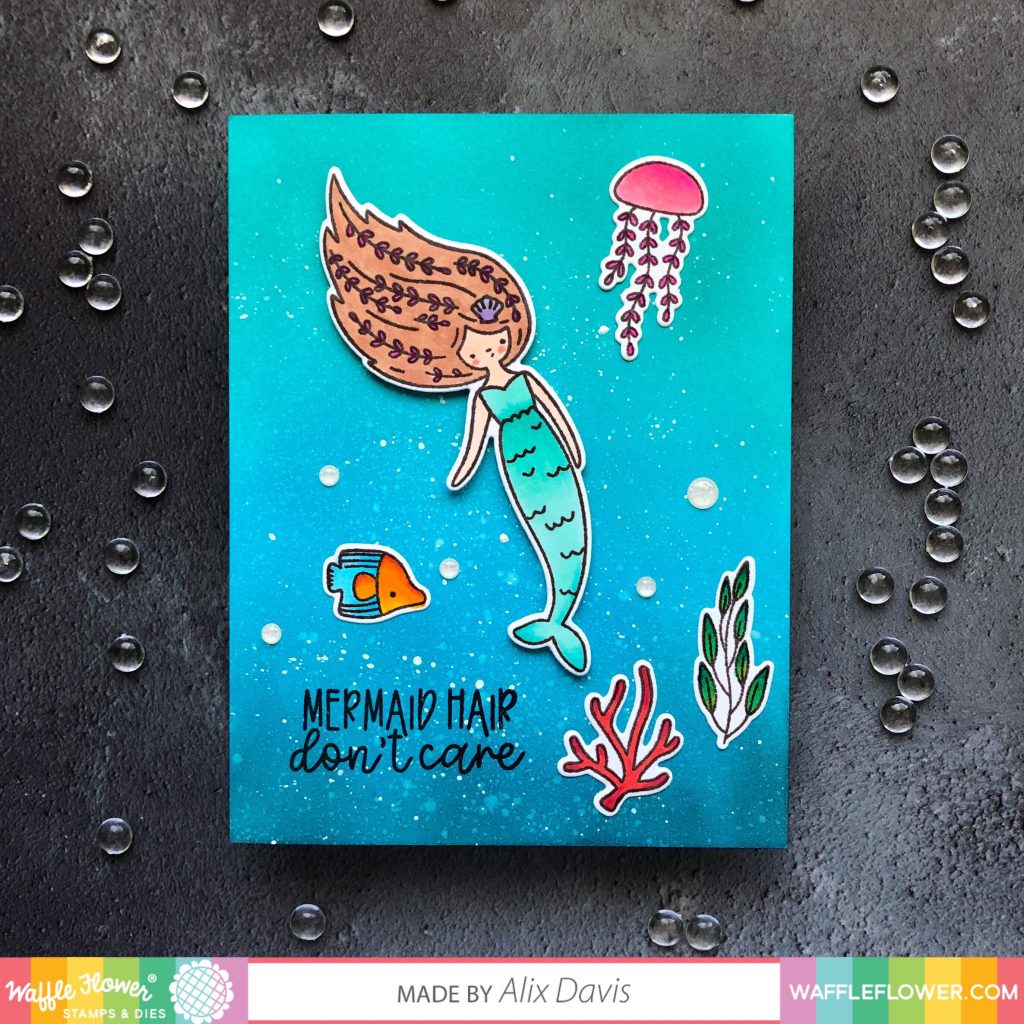
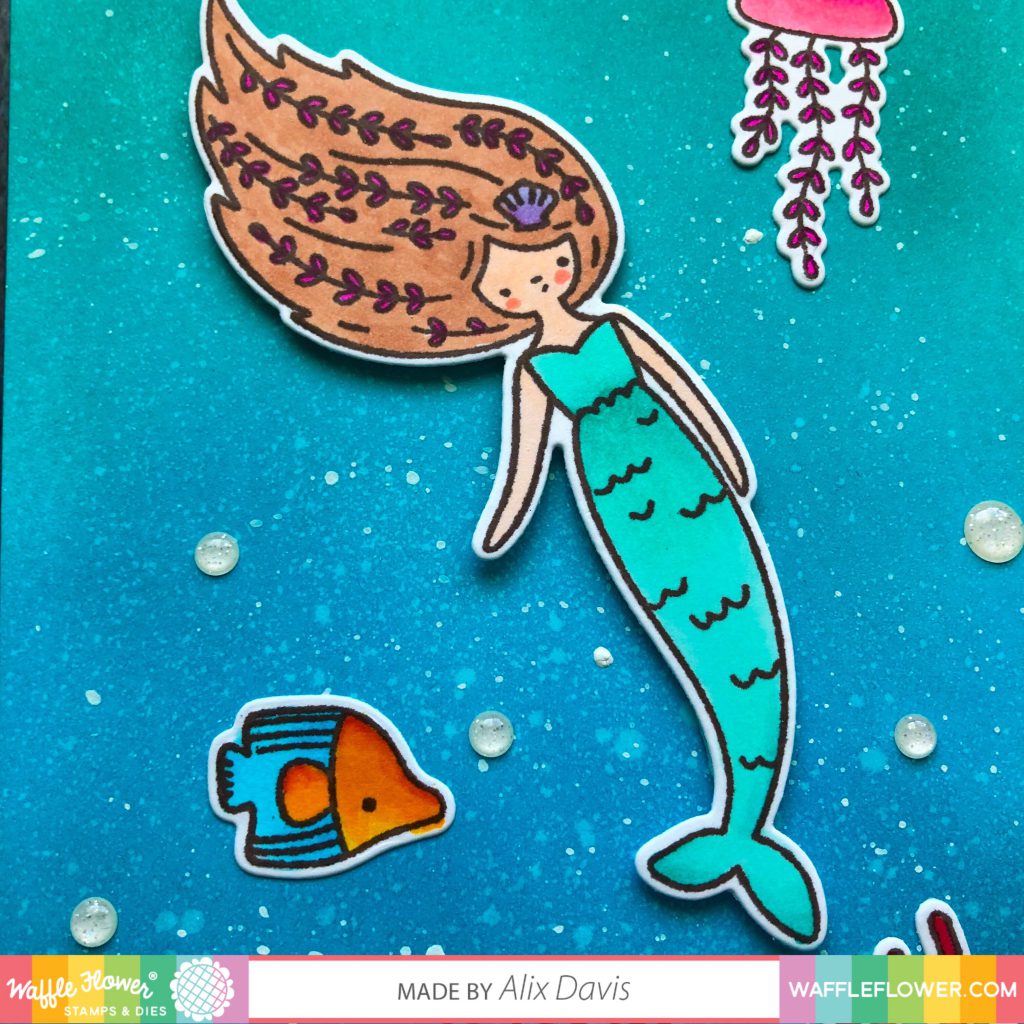
<Card 3>

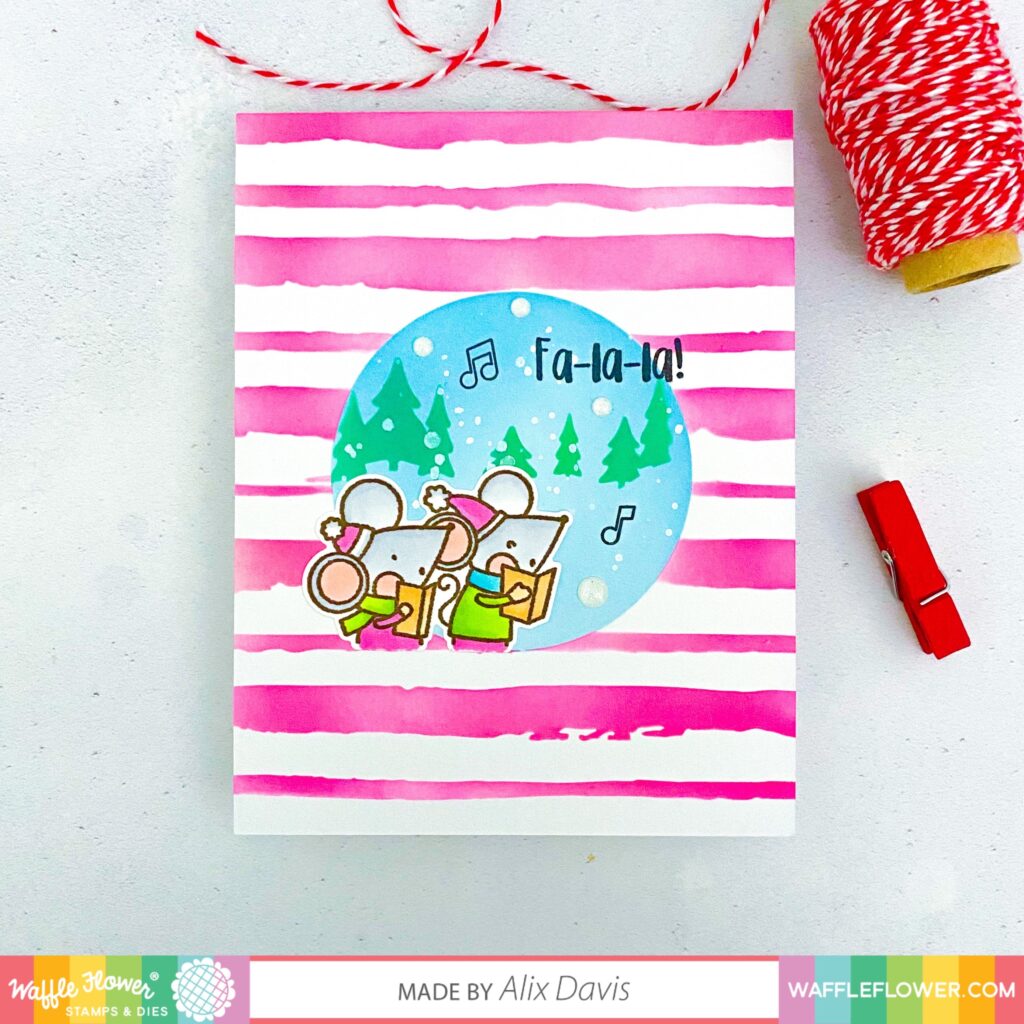
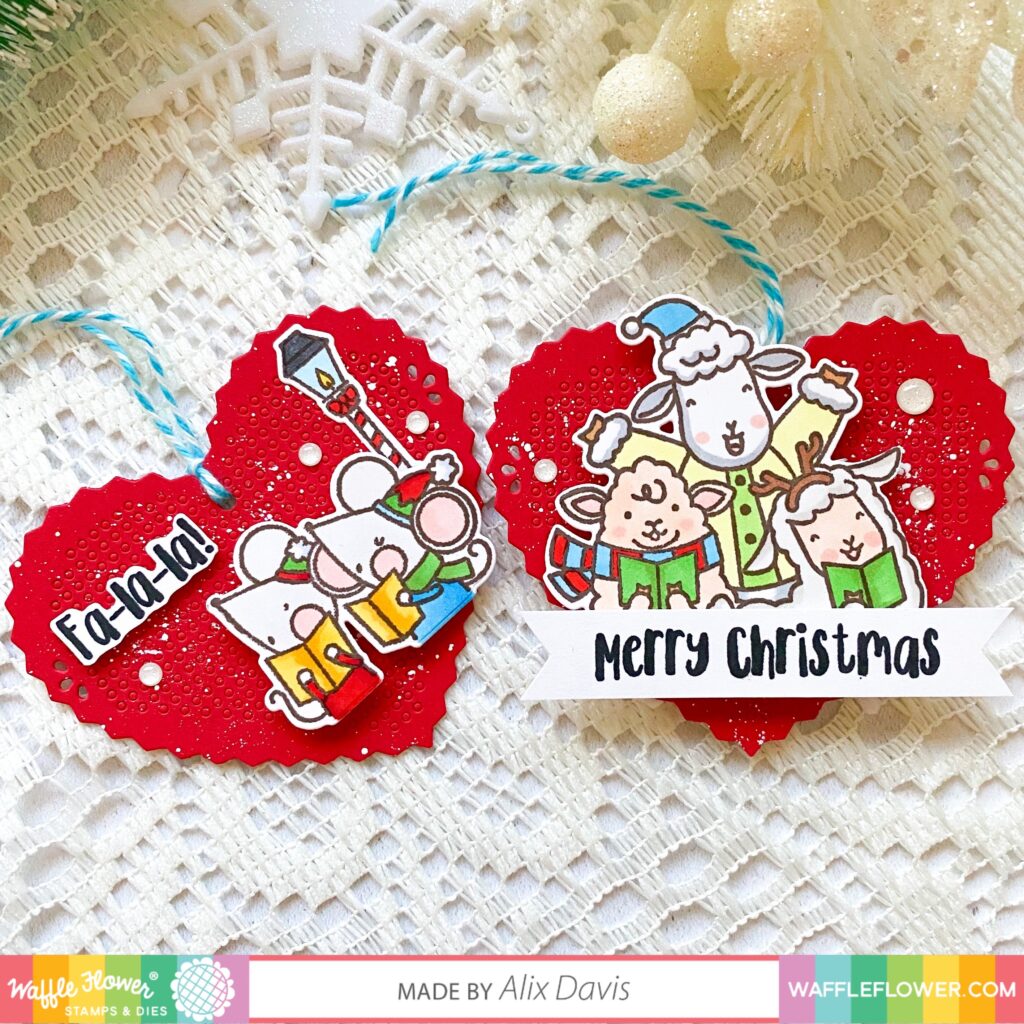
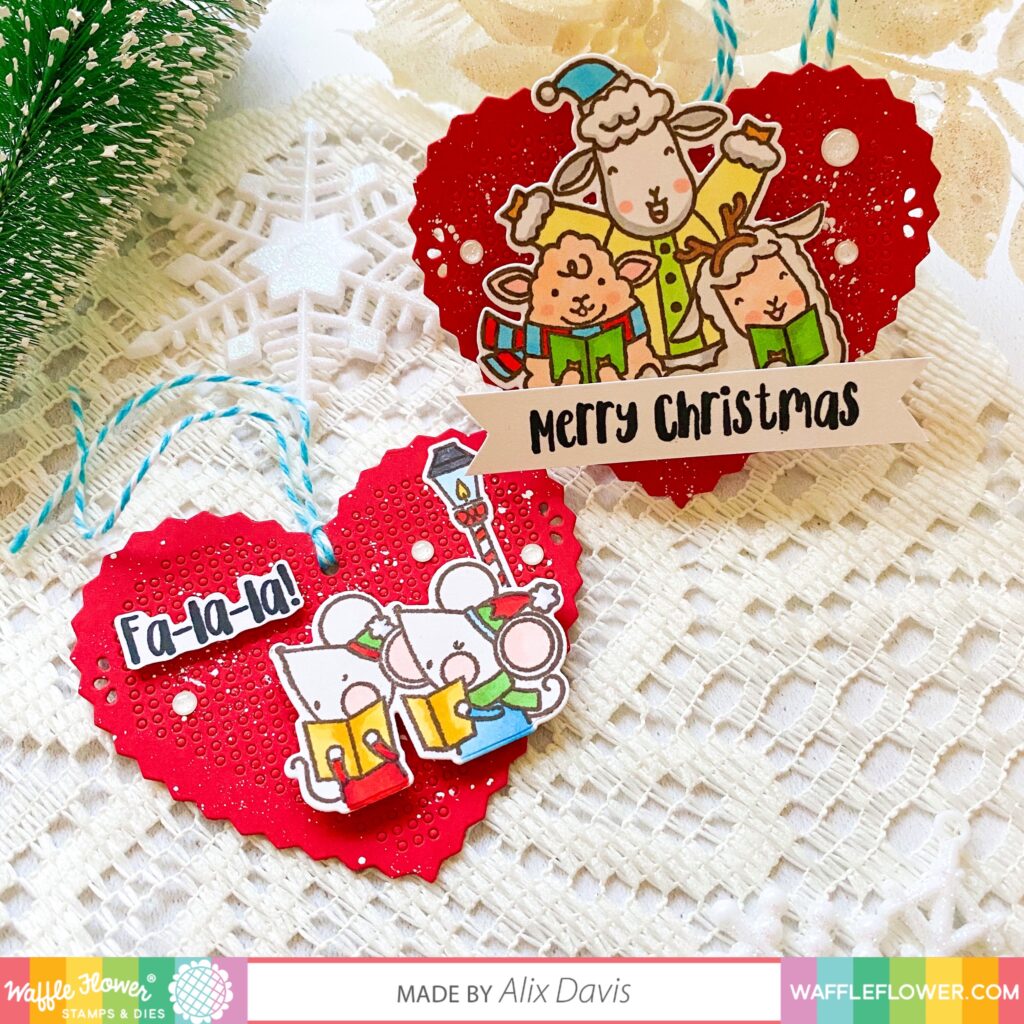
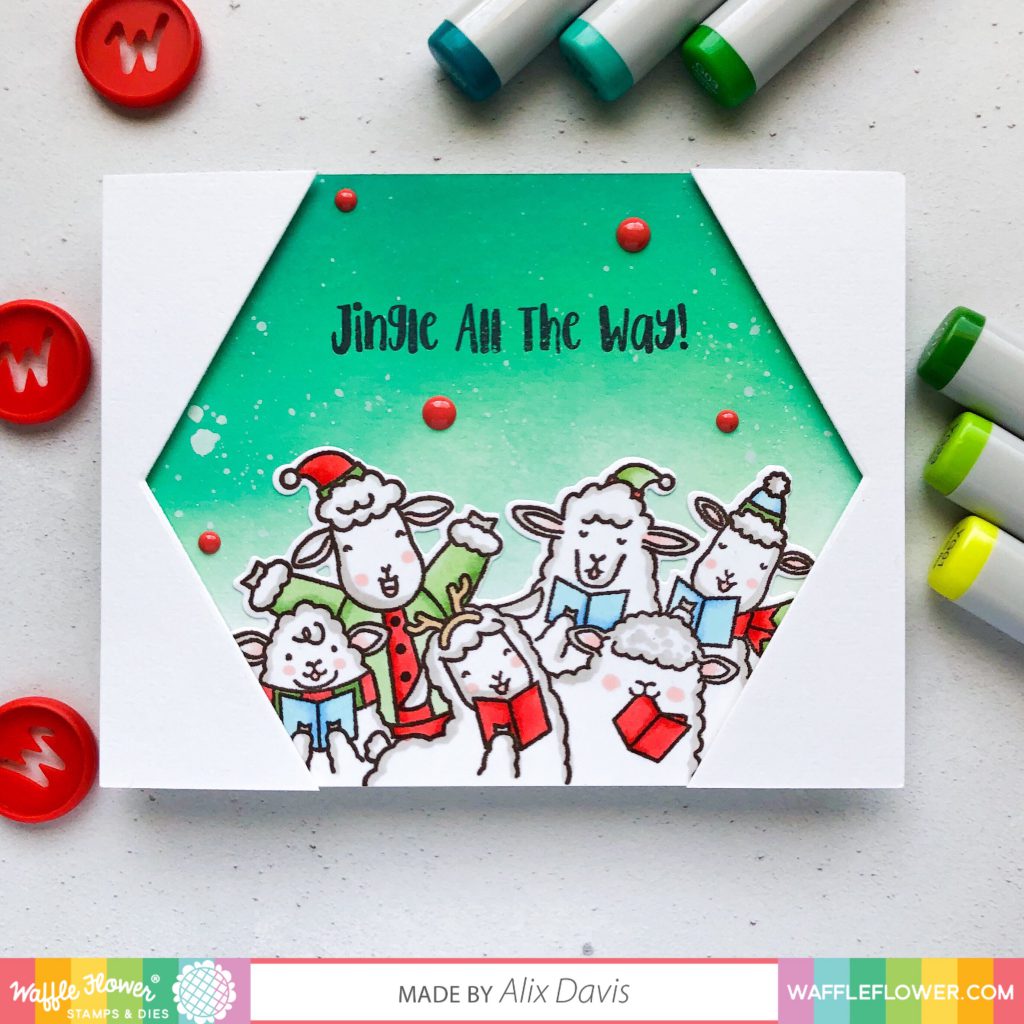
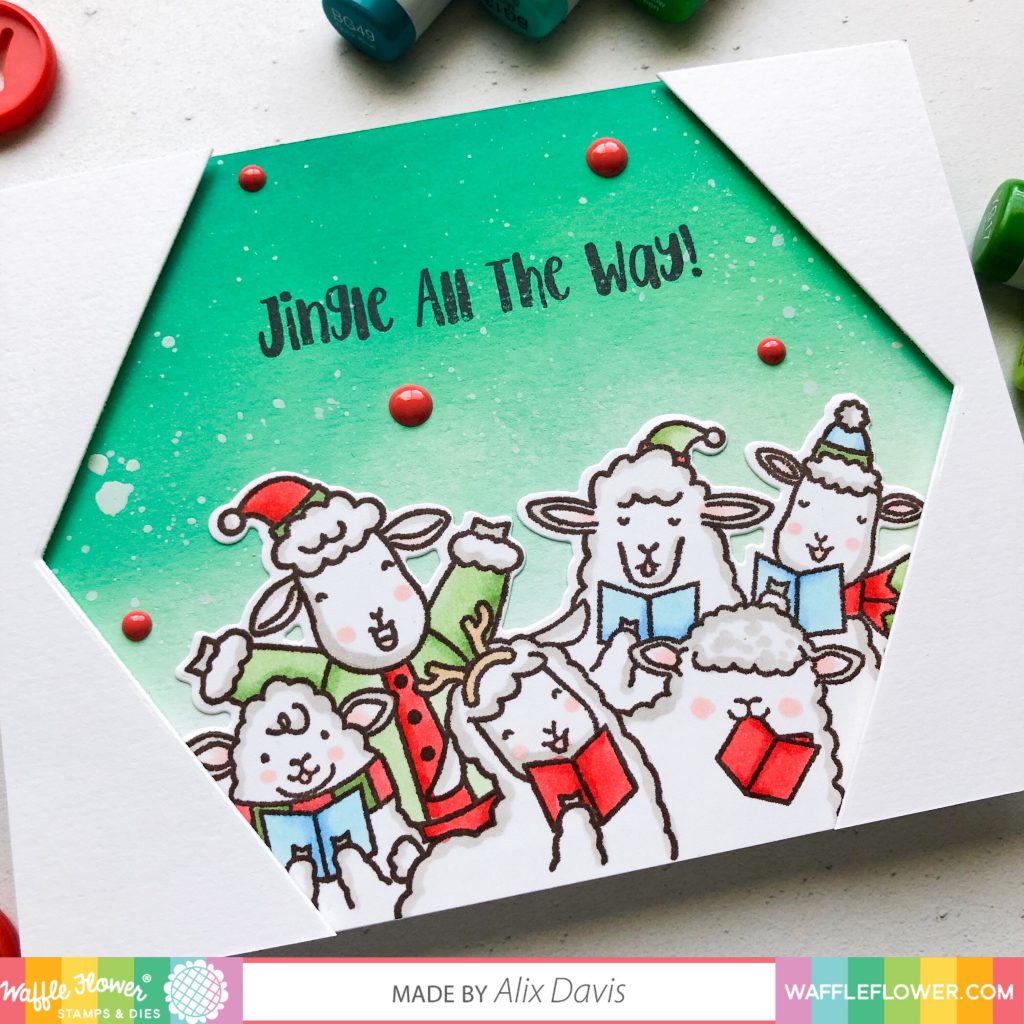
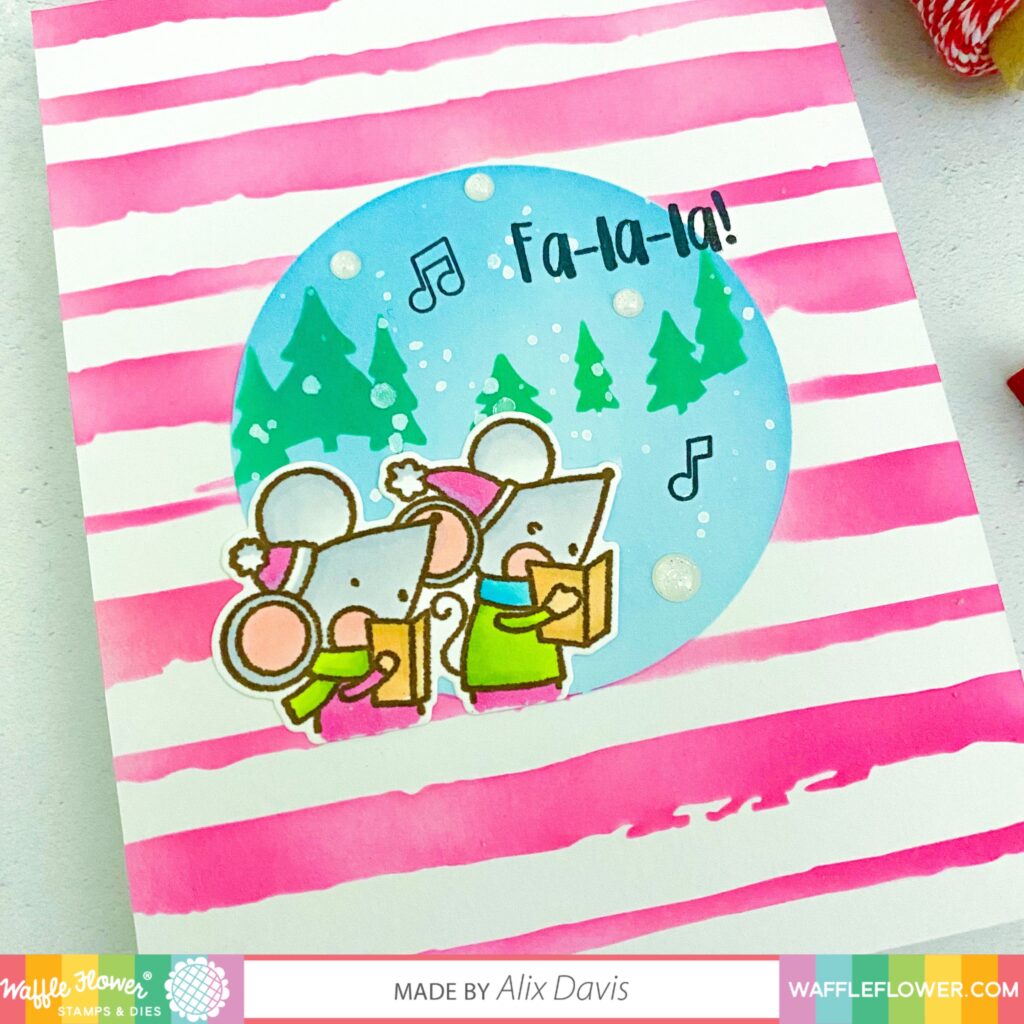
The holiday spirit just continues! For making this card, I combined multiple stencils we are releasing in this month. I created the circle using Spotlight Circle Stencil with Tumbled Glass distress oxide ink, then I added trees using Keeway’s Mountain Scene Stencil with Lucky Clover distress oxide ink.  I splattered white paints to create a snowy day and added pink stripes onto the background using Inky Stripes Stencil with Picked Raspberry distress oxide ink.

To add the characters, I stamped the mice from Fa-La-La Stamp set and die cut with the Matching Dies. I added sentiment “Fa-la-la!” to the scene and end with Stardust enamel dots.
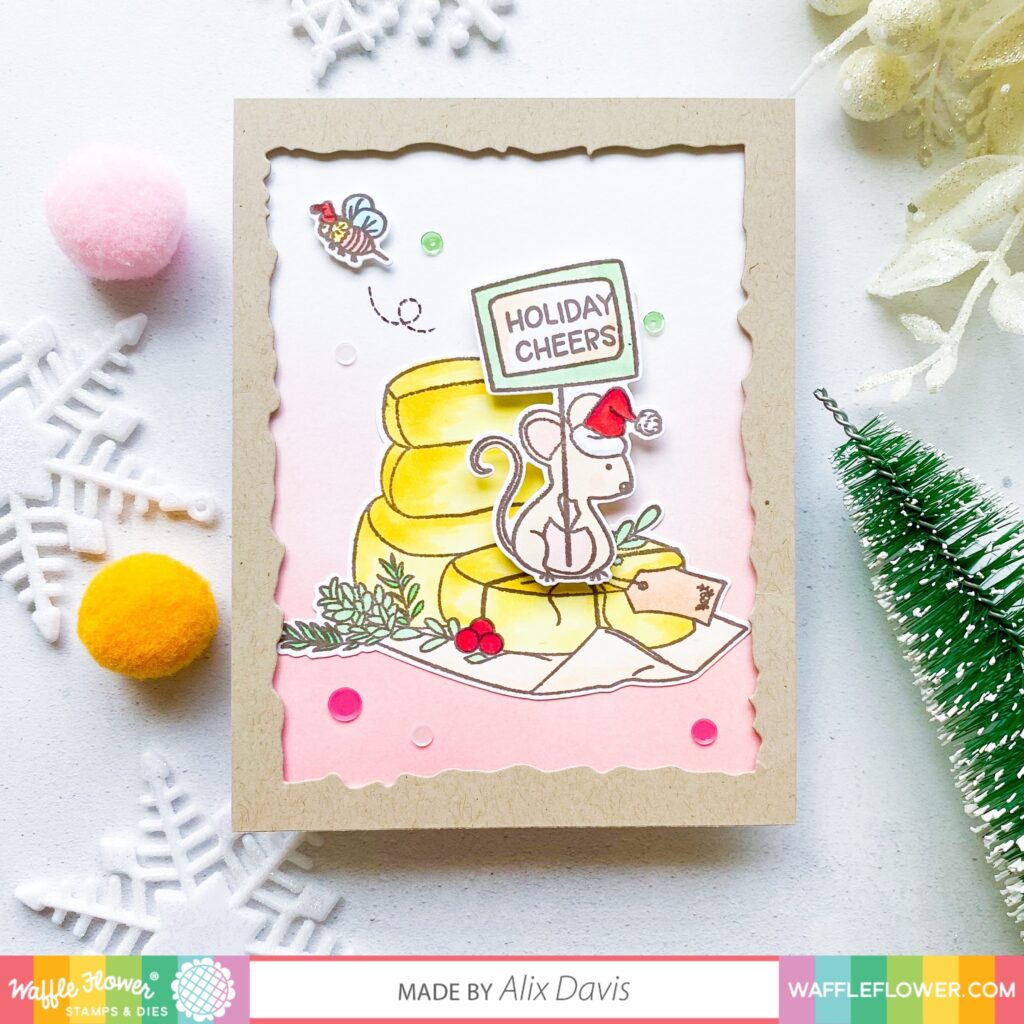
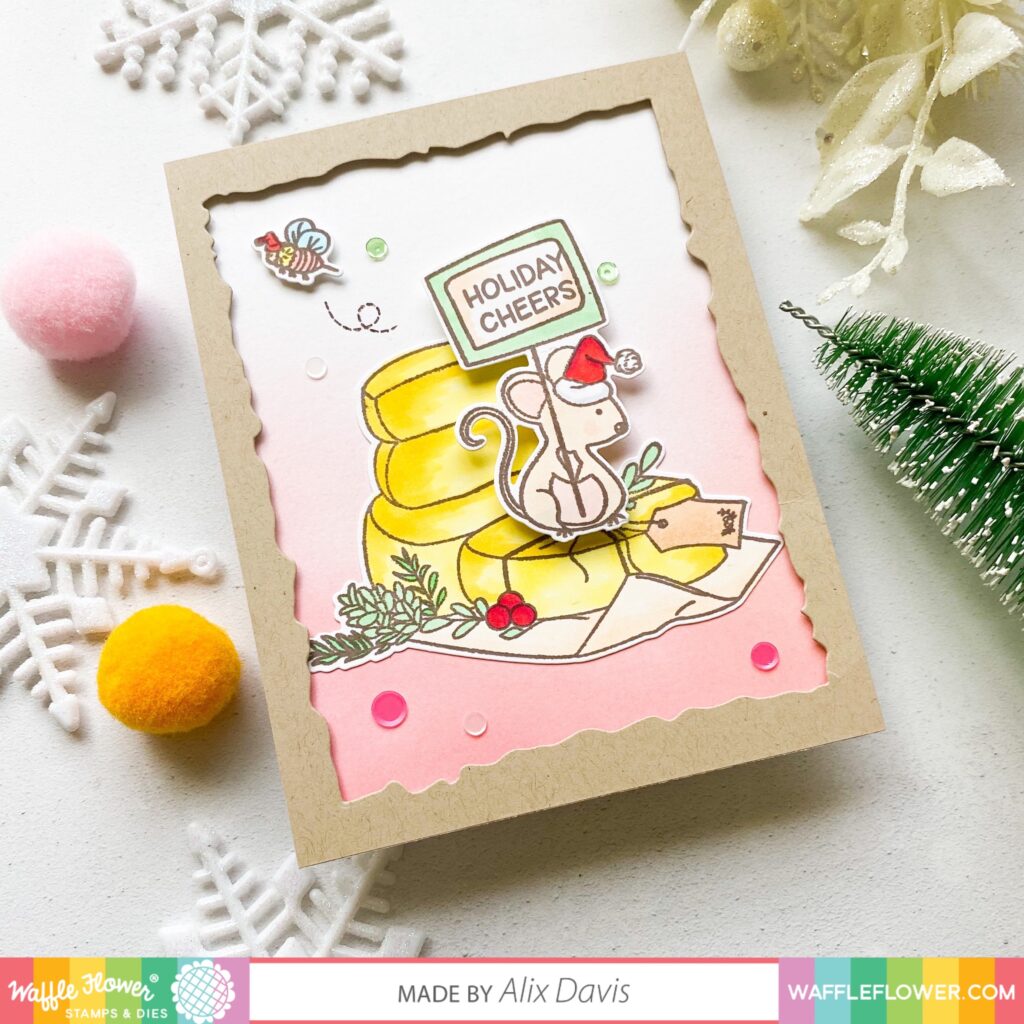
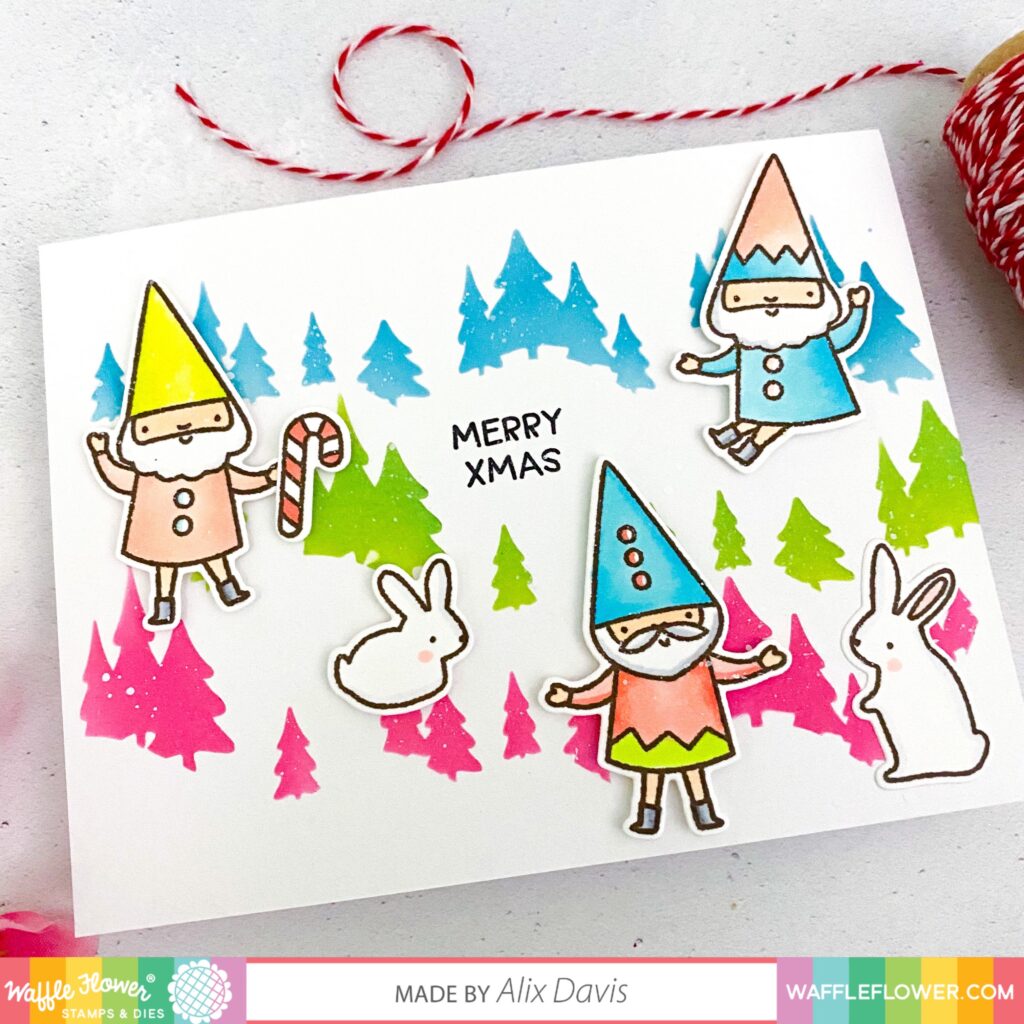
<Card 4>

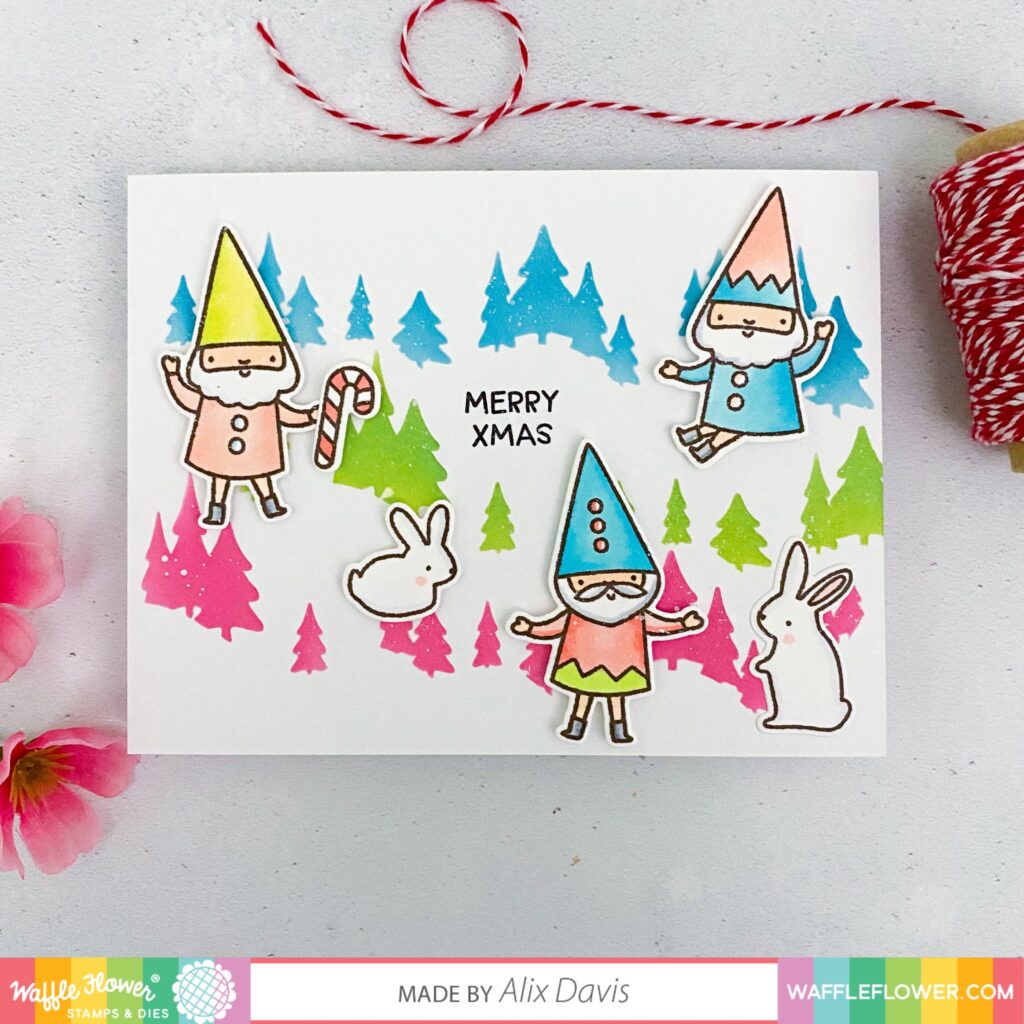
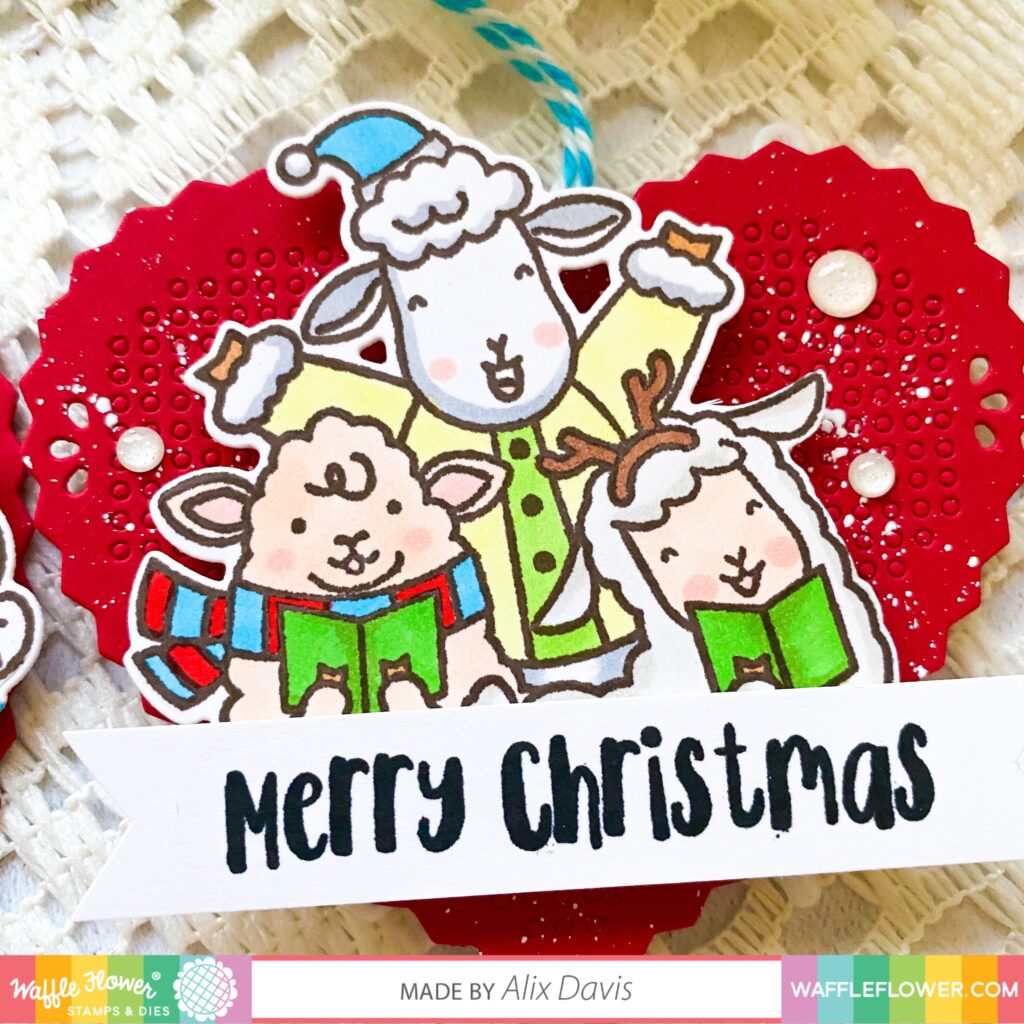
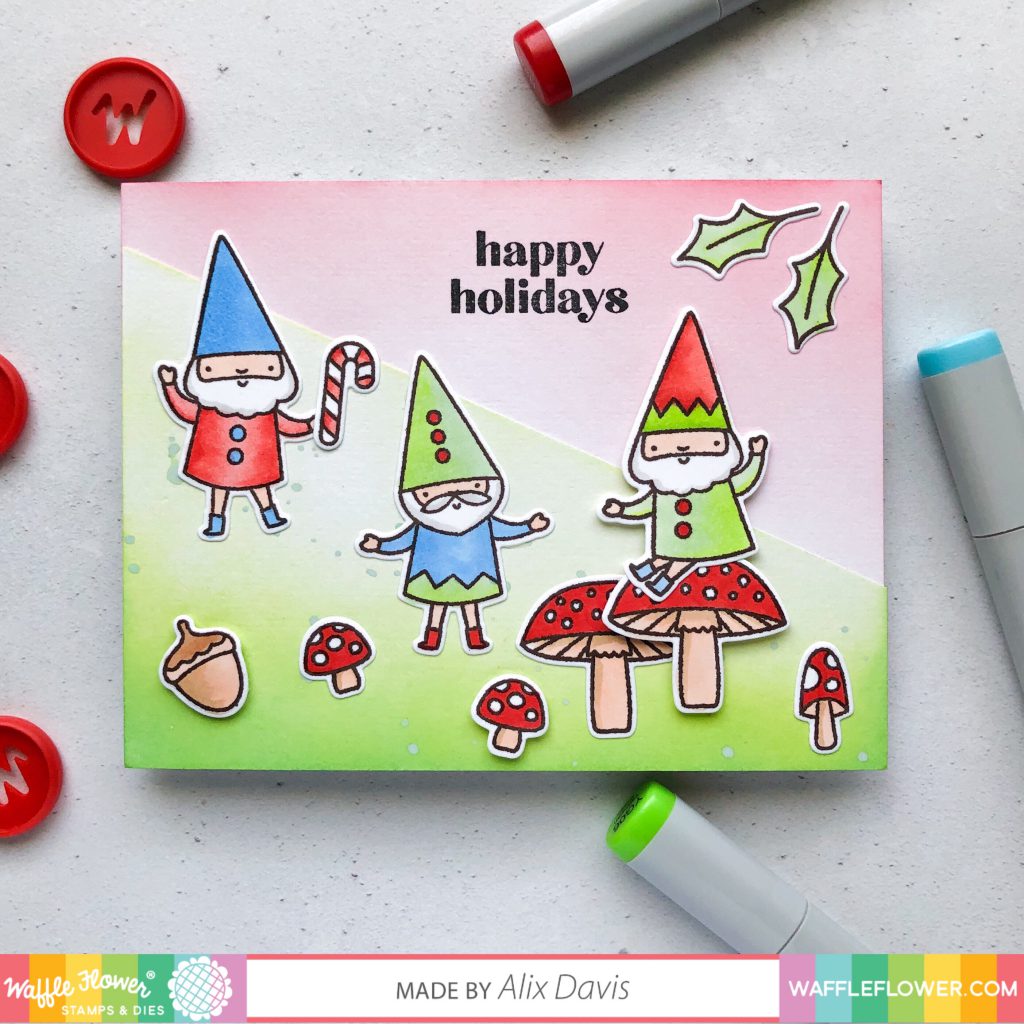
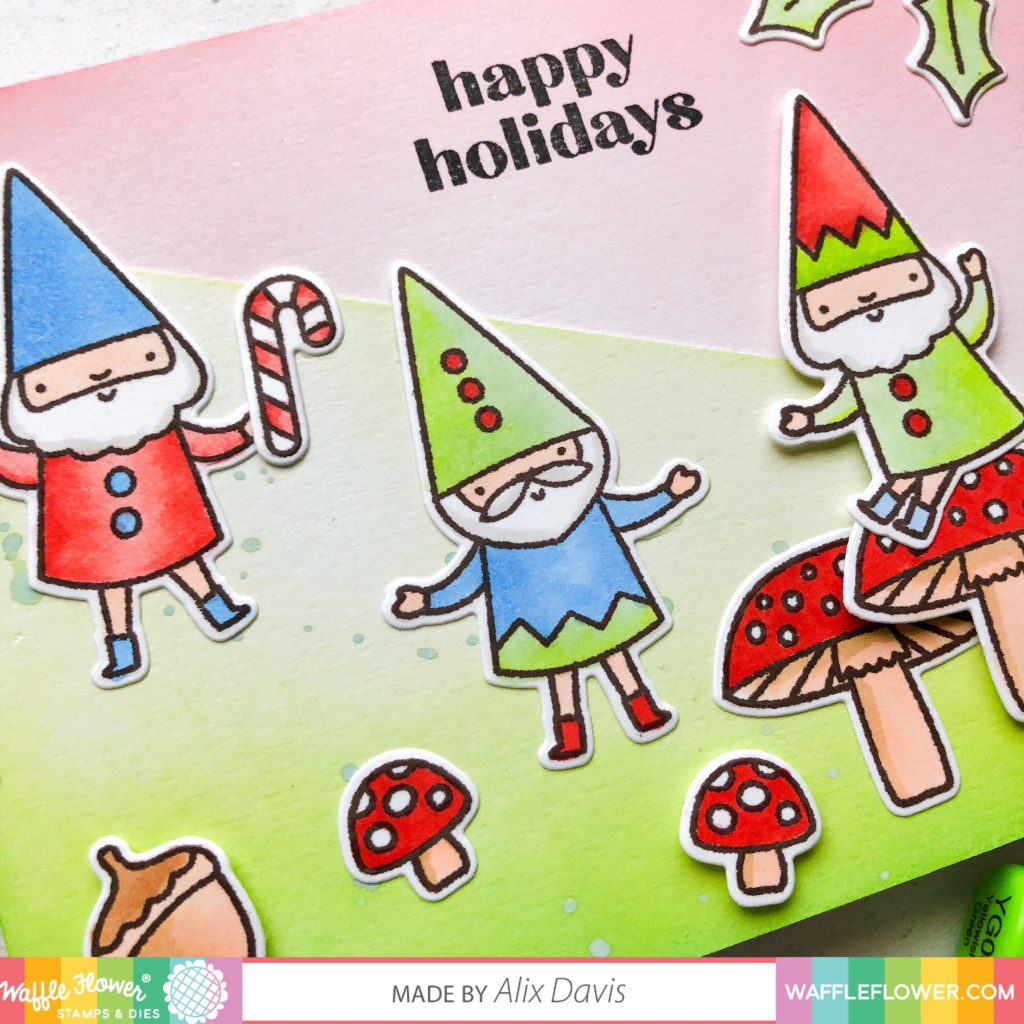
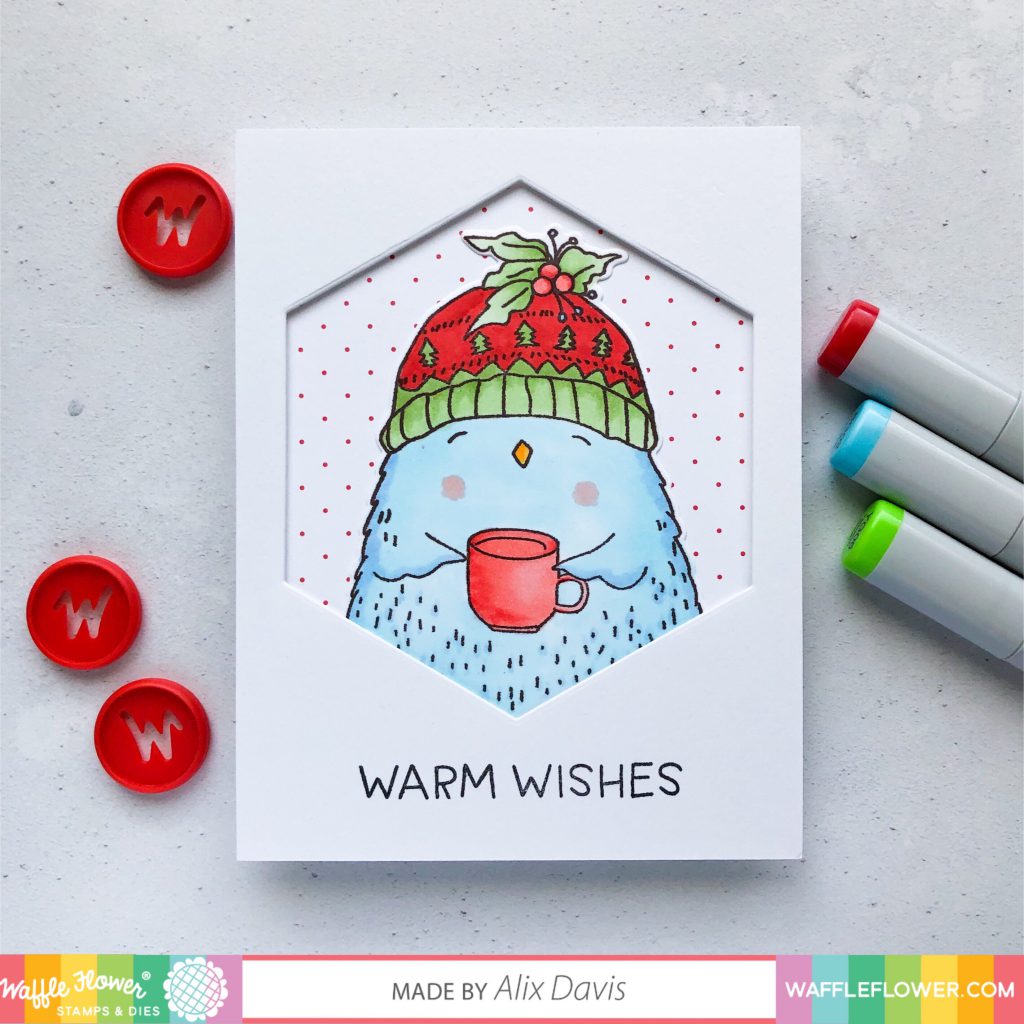
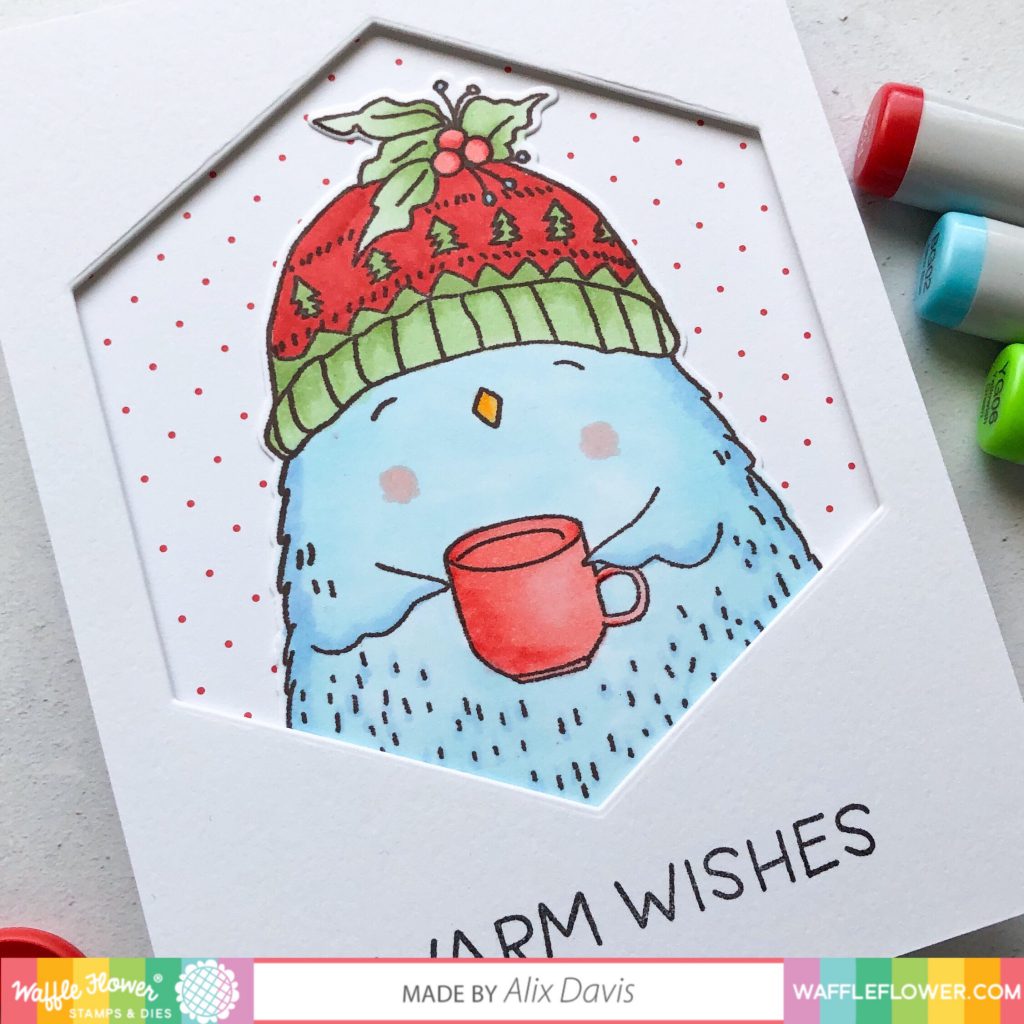
Here comes the last one. What a joyful scene. I picked out 3 fun holiday colors: Pink, Green and Blue and blended them over Keeway’s Mountain Scene Stencil to create my background patterns. Then I  stamped images from Happy Gnomes Stamp set and die cut with the Matching dies. I copic colored them and arranged them onto the background. I want my sentiment to be simple over this crowded scene, I stamped “Merry xmas” from Holiday Cheese Stamp set and it worked out perfectly!


We hope you’re ready to see some of these goodies in action! There’s a full lineup of guest designers and team members in today’s Blog Hop! We hope you find some ideas that spark your creativity!

HOP WITH ME!

Giveaways:
For today’s hop, Waffle Flower is giving away $25 gift certificate to THREE lucky winners. You can leave a comment on this blog and along the hop by 11:59pm EDT on November 8th, 2020 for your chances to win. Winners will be chosen at random from the comments left on any of the posts in this blog hop and will be announced on the Waffle Flower Blog on 11/11/2020.

There are more giveaways to enter on our Instagram! Follow us at @waffleflowercrafts so you don’t miss out!

Specials:
From now till November 8th, 2020, all orders over $50 placed at waffleflower.com will receive a FREE set of Merry Bow Stencil (No code required; Limited 1 per customer; While supplies last).

A kind reminder from Waffle Flower:”We appreciate every order we receive but we also recommend at this time of uncertainties, reserve your resources and use what you have first! Stay positive and healthy!”

For those of you who are new to Waffle Flower, they have a Last Chance section on their website that lists many goodies for 25% off until they are gone! This would be a great place to start your collection! Also they will host an annual Grab Bag event with great savings from November 15th to November 30th.

Waffle Flower 2020 October Release Blog Hop

Welcome to Waffle Flower’s October 2020 Release day! All of the products from this month’s release are waiting for you on the website here!October is the best of both worlds where we’re enjoying the beauty of fall while the excitement of the coming holidays is building! To celebrate this magical time of year, Waffle Flower is so excited to be releasing 6 new stamp sets, 8 standalone dies, and a new paper release! I am here showing you four cards I made so far.

<Card 1>


When we get into October, holiday is in following every single month. Let us talk about Christmas here.To make this card, I stamp and copic colored the images from Holiday Cheese Stamp set and die cut with the Matching Dies. I created my background by ink blending with Tim holtz distress oxide ink in Worn Lipstick, then I added my images on top. To make my scene more focus, I added a frame by using Deckled Frame Die cut out of an A2 sized cardstock paper in Kraft color. In the end, I embellished the scene with some sequins.


<Card 2>

Now let us move to another great holiday of the year—Thanksgiving. We will do our pumpkin picking towards the end of October but it’s never too early to make the card! I wanted the create a rich and autumn color for this card. I picked the pattern paper from Half-Half Dots-Caprice Paper Pad I added a piece of vellum paper to naturalize the super bright tone.

I then color the images from Pumpkin House Stamp set and cut out with the Matching Dies. I arranged them on to my background and added enamel dots in enchanted.


<Card 3>

Can you imagine to make a card without any coloring? For whoever prefer this way, this is your time!  I created my background by using Big Dots Die to cut out of the pattern papers from Pattern Paper – Happy Gnomes. I also cut out some images from the same paper pad to create my scene. At last, I white embossed the sentiment “Merry Christmas” from Big Dots Holiday Stamp Set and placed it to the center of my card.


<Card 4>

I love to create the pattern with my color combo because I could create thousands of different cards out of one die. First of all, I used Winter Floral Panel Die to cut ouf of an A2 sized white cardstock paper as my background pattern. I layered it over another A2 sized white paper that was covered with adhesive tapes. Then I chose four colors out of Half-Half Dots-Christmas Paper Pad and cut desired shapes with Winter Floral Panel Die. The best part now is to assemble them onto my prepped background. It was such a relaxing and soothing moment that you need! I embossed the sentiment “Merry & Bright” from Merry Christmas Sentiments to finish my last card.

HOP WITH US!

Giveaways:
For today’s hop, Waffle Flower is giving away $25 gift certificate to THREE lucky winners. You can leave a comment on this blog and along the hop by 11:59pm EDT on October 11th, 2020 for your chances to win. Winners will be chosen at random from the comments left on any of the posts in this blog hop and will be announced on the Waffle Flower Blog on 9/14/2020.
 
There are more giveaways to enter on our Instagram! Follow us at @waffleflowercrafts so you don’t miss out! 
Specials:
  • From now till October 11th, 2020, all orders over $50 placed at waffleflower.com will receive a set of Thankful Mouse Stamp Set (Limited 1 per customer; While supplies last).
  • A kind reminder from Waffle Flower:“We appreciate every order we receive but we also recommend at this time of uncertainties, reserve your resources and use what you have first! Stay positive and healthy!”
  • For those of you who are new to Waffle Flower, they have a Last Chance section on their website that lists many goodies for 25% off until they are gone! This would be a great place to start your collection!


Waffle Flower 2020 September Release Blog Hop


Today is Waffle Flower’s September 2020 Release day! All of the products from this month’s release are waiting for you on the website here!
This month Waffle Flower is celebrating the coming of fall with 8 new stamp sets and 6 new die sets! It’s back to school with the Learn at Home stamp set, Back to School stamp set, Monitor die, and Safe at Home sentiments. This fall, Waffle Flower is also taking time to celebrate all the everyday heroes in our communities! The Frontline series features 4 stamp sets (Frontline Heroes 1, Frontline Heroes 2, Frontline Heroes 3, and Frontline Helpers) to cover all your community heroes from nurses and doctors to grocery workers and delivery folks! For the nature lovers, there’s the Home Sweet Home stamp set and Fall Leaves dies. And just for fun, we’ve got the cute House Outline dies, versatile Nesting Diamonds dies, and the Skinny Stripes die set (similar to our popular Horizontal Stripe and Vertical Stripes dies)!
The Waffle Flower design team has been having lots of fun with this release and we’re excited to share our cards with you today! I have four cards here to share with you!

<Card 1>

As my backyard vegetable dying back, I smelled a little bit fall. It was great to play with this stamp because I have no resistance to anything cute and whimsical! To make this card, I messy watercolor my background using Tim Holtz Distress oxide ink in Mustard Seed over a piece of A2 watercolor paper.

Then I stamped my selected images from Home Sweet Home stamp set using memento tuxedo black ink over 80lbs Neenah Solar white cardstock paper and die cut with the Matching die. I colored all images with copic markers which took me about 15 minutes. Yes it’s fun and quick. I adhered my images using liquid glue and foam tapes. I stamped my sentiment “Safe at Home” from Safe at Home sentiment Stamp set and added enamel dots from Enamel Dots-Enchanted to finish my first card.

<Card 2>

I continued to my fall scene. I used washi tapes to mask the edge of my A2 sized background. Then I ink blended the uncovered background using Tim Holtz Distress ink in Fossilized Amber and Spiced Marmalade. I randomly splattered the water over the background to create some effect.

I die cut my leaf backgrounds and outlines using Fall leaves Die. I kept the outline white but ink blended the leaf background using several fall colors from Tim Holtz distress oxide ink in Crushed Olive, Candied Apple, Aged Mahogany and Carved Pumpkin. I glue them together and placed them onto my prepped background using foam tapes. I stamped my sentiment “Thank you SWEET FRIEND” from Stitched Sentiment Stamp set and added enamel dots from Enamel Dots-Enchanted as embellishments.

<Card 3>

Raise your hand and foot if you are one of parents who are hanging there with distancing learning? I hope you had “great time” so far! LOL As a mom of a 14 years old, we had experienced multiple zoom malfunction and still are trying to figure how to make things work. Why not sending a card like this to cheer each other?!

I ink blended my background using Twisted Citron distress oxide ink onto an A2 sized card stock paper. Then I die cut the computer die cut from Monitor Die. I lightly blended the die cut to create some dimension then adhered it onto my background.

I stamped and copic colored my images from Pencil In Stamp set and die cut with the Matching dies. Then I arranged them over the background with liquid glue and foam tapes. At last, I stamped the sentiment “Sending Virtual Hugs”from Safe at Home sentiment Stamp set to the upper right corner to end this card.

<Card 4>

For my last card today, I die cut the house using House Outline die and inked with Worn Lipstick distress oxide ink. I decided to choose the pattern paper from Half-Half Dots – Unicorn Paper Pad as my background to make it more fun. I stamped and copic colored those adorable kitty cats from Learning From Home Stamp set and die cut with the Matching dies. After I assembled everything onto the background, I finished the card by stamping my sentiment from Safe at Home sentiment Stamp set 

HOP WITH US!

Giveaways:

For today’s hop, Waffle Flower is giving away $25 gift certificate to THREE lucky winners. You can leave a comment on this blog and along the hop by 11:59pm EDT on September 7th, 2020 for your chances to win. Winners will be chosen at random from the comments left on any of the posts in this blog hop and will be announced on the Waffle Flower Blog on 9/9/2020.

Specials:

  • From now till September 7th, 2020, all orders over $50 placed at waffleflower.com will receive a set of Clean & Clear Enamel Dots.
  • A kind reminder from Waffle Flower:“We appreciate every order we receive but we also recommend at this time of uncertainties, reserve your resources and use what you have first! Stay positive and healthy!”
  • For those of you who are new to Waffle Flower, they have a Last Chance section on their website that lists many goodies for 25% off until they are gone! This would be a great place to start your collection!


Waffle Flower 2020 July Release Blog Hop

Waffle Flower’s Christmas in July Release is available today! Please note: Waffle Flower didn’t anticipate the popularity of this release and more stamps will be restocked around July 9th and dies around July 21st. Today I got four cards to show you.
In case you missed them, here are the links to the introjduction posts:
<Card 1>


Making Christmas card in July is such a delightful thing! To begin with,  I colored images from Poinsettia Stamp Set with copic markers and die cut with the Matching Dies. Then I prepared my background over a piece of A2 watercolor paper by smudge and splatter pink paint. At last, I attached my colored images with foam tapes and die cut the sentiment “merry” from the same set to place on the lower corner of this card to finish.


<Card 2>

Let’s shift to a cheerful holiday mood! I prepared my background by cutting my A2 background diagonally, then I ink blended the background using Tim Holtz Distress oxide ink in Worn Lipstick, Twisted Citron and Cracked Pistachio. I colored my images from  Happy Gnomes Stamp Set and die cut with the Matching Dies. I stamped the sentiment “happy holidays” from Classic Holiday Sentiments Stamp set and added my images.


<Card 3>

Red and Green are our traditional Christmas colors, so I decided to simply combine them for this card. I started to ink blend my background using Tim Holtz Distress oxide ink in Cracked Pistachio and Peacock Feather. Then I splattered white paints to create some interests.

I colored images from Fa-la-la Stamp set and die cut with the matching dies. I stamped the sentiment “Jingle All The Way” and attached the image with liquid glue. I die cut another A2 card stock with Nesting Hexagon Dies and only save the negative cut out to create my front card window. In the end, I added Enamel dots to embellish my card.


<Card 4>

For my last card, it is pretty simple but cute. I cut my front window using Nesting Hexagon Dies and I attached it over a piece of pattern paper from Half-Half Dots-Enchanted Paper Pad

I colored this big bird from Holly Bird Stamp set and die cut with the Matching Dies. I stamped the sentiment “warm wishes” to finalize the card.

HOP WITH US!!!

Giveaways:
For today’s hop, Waffle Flower is giving away $25 gift certificate to THREE lucky winners. You can leave a comment on this blog and along the hop by 11:59pm EDT on July 12th, 2020 for your chances to win. Winners will be chosen at random from the comments left on any of the posts in this blog hop and will be announced on the Waffle Flower Blog on 7/15/2020.
 
There are more giveaways to enter on our Instagram! Follow us at @waffleflowercrafts so you don’t miss out! 
 
Specials:
A kind reminder from Waffle Flower:“We appreciate every order we receive but we also recommend at this time of uncertainties, reserve your resources and use what you have first! Stay positive and healthy!”
Waffle Flower didn’t anticipate the popularity of this release and more stamps will be restocked around July 9th and dies around July 21st.

Waffle Flower 2020 June Release Blog Hop

Welcome to Waffle Flower 2020 May Release Blog Hop! We are finally in Summer time. My garden had significantly growth and our pool in the backyard has been calling our names everyday. I had great time crafting with these new products in my backyard while enjoying the summer breeze. I just can’t wait to share them with you!

<Card 1>

It’s been about 3 months since the pandemic started, I’ve been sending encouragements to friends and family to support them going through this tough time. I found this oversized die is especially useful! To make this card, I created my pattern with Nesting Stars Dies on an A2 card panel in white, then I attached it over a piece of pattern paper from Half and Half Dots-Enchanted Paper pad. I cut my card main focus- hugs using Oversized Hugs Die out of the pattern paper from JJ’s Rainbow Paper Pad. To build sturdy dimension, I also cut 3 more hugs die cuts and overlapped them on each other using liquid adhesive.

I white embossed the sentiment ” & KISSES” over black card stock paper and hand cut it to rectangle shape with a pair of scissors.. I attached the die cut and sentiment onto my background and added enamel dots from Up & Running Enamel dots to finish this card.


<Card 2>

I bet most of us love Mermaid because it’s beautiful and mestery. I created this card by starting to ink blending my background with Tim Holtz Distress oxide ink in Mermaid Lagoon, Salty Ocean and Black soot. Then I splattered water and white paint to create water effect. I selected a few images from Mermaid Mail Stamp set and die cut with the Matching dies. I copic colored them and attached them onto my background using foam tapes and glue. At last, I stamped the sentiment “Mermaid Hair Don’t Care” onto the lower left corner using versafine oynx black ink. I embellished my card with some Startdust Enamel dots.


<Card 3>

Just keep swimming! It reminds me of the movie – Finding Nemo. I really love this saying because I apply it to my real life very often. To start with, I created a random square watercolor block onto an A2 sized watercolor paper. I splattered some white paint to create bubble effect. I colored the images from Sea Birthday Stamp set and cut with the Matching Dies. I copic colored them and added them onto the background using foam tapes and glue. I stamped the sentiment to the upper portion to end this card.


<Card 4>

My last card was a quick make and great for mass producing. I die cut my front panel and other small elements using Under the Sea Panel Die out of a piece of white card stock paper. I prepared my background by ink blending with Tim Holtz Distress Oxide ink in Salty Ocean and I splattered some water on it. I copic colored the small die cuts and attached them with the main panel over the background. In  the end, I added sentiment from Under the Sea Sentiments Stamp set and enamel dots in Stardust.

HOP WITH US!!!

Giveaway
  • For today’s hop, Waffle Flower is giving away $25 gift certificate to THREE lucky winners. You can leave a comment on this blog and along the hop by 11:59pm EDT on June 18th, 2020 for your chances to win. Winners will be chosen at random from the comments left on any of the posts in this blog hop and will be announced on the Waffle Flower Blog on 6/19/2020.
Specials
  • A kind reminder from Waffle Flower:“We appreciate every order we receive but we also recommend at this time of uncertainties, reserve your resources and use what you have first! Stay positive and healthy!”
  • From now till 11:59pm EDT on June 17th, all orders at $50 and over, placed at waffleflower.com will receive a mysterious gift! 
  • For those of you who are new to Waffle Flower, they have a Last Chance section on their website that lists many goodies for 25% off until they are gone! This would be a great place to start your collection!

Waffle Flower 2020 May Release Blog Hop

Welcome to Waffle Flower 2020 May Release Blog Hop! This month, we covered many special occasions along with a new set in the Bouquet Builder series! For today’s Blog Hop, I chose 6 cards to show you what I did with some of these products!

<Card 1>

I almost screamed when I saw this combo set because I can find myself using them so much. I am a dental hygienist who has been staying home away from work for almost 2 months now due to current pandemic. I would like to make some cards giving out to my patients and this is perfect!

To create this card. I die cut the large tooth shape out of Tooth Fairy Shapes Die. Then I added blue distress oxide ink around the edge before I attached it onto am A2 sized card base. I stamped and copic colored all images from Tooth Fairy Stamp set and die cut with the Matching dies. I arranged them onto my background with liquid adhesive and embellished it with different sizes of sparkling clear sequins.


<Card 2>

I know Mother’s day is less than a week away. As being a card maker, we always think ahead of holidays. I think it is time for us to prepare Father’s day card if you haven’t started. Masculine with a little bit cute critter could be great but not too serious.

I die cut our main character, Panda, for this card with Be a Panda Die. Then I also die cut a few chosen pieces from Be accessories Die to dress him up. I used copic color markers to color everything as I wanted. I attached them onto the background I created by using Papers from Half-Half Lines-Enchanted Paper pad. To add the sentiment, I simply used the “Happy Father’s Day” sentiment from Home Brew Stamp set.


<Card 3>

If your Dad like Beers or beverages, you got to have this combo set. I first created my simple background with papers from Half-Half Lines-Botanical Paper Pad. I die cut selected the pieces from Home Brew Die and pairing with Home Brew Stamp set. I inked my cut out pieces using Tim Holtz Distress oxide ink in Mustard Seed and Salty Ocean. The sentiment that comes with this stamp set became handy again.


<Card 4>

Here comes one of my favorite series. Waffle Flower has been introducing a few stamp sets related to different countries and cultures in the past. Now we get more! Today we are feeling “Russian”!

I love coloring like a child. So I colored all images from From Russia with Love Stamp set using my copic markers then I die cut them using the Matching Dies. I cut out two different shapes of window out of Classic Frame Die and raised them up using foam tape for dimensions. I adhered all images onto the background and embellished with my all time favorite–  Up & Running Enamel dots .


<Card 5>

Hola! We are not forgetting Mexican culture this time either!

I created my frame using Picture Frame Die. I inked the edge of the frame and background using Tim Holtz Distress oxide ink in Fossilized Amber and Worn Lipstick. I added foam tape to create dimension of the frame. I easily copic colored all images from Hola Mexico Stamp set and die cut with the Matching Dies. I stamped the sentiment and added all images to finish this card.

Waffle Flower also released a stamp featuring Germany Culture name Prost Germany. You could find it Here!


<Card 6>

My last card means a lot to me! My daughter is graduating from Middle school this year. Unfortunately, she became one of graduating students who were impacted by our current unique situation. I highly encourage you at least send out a card to them because they deserve it! I really hope they will somehow make up the graduation ceremony when time is right in the future.

To create this card. I cut out my front panel using Graduation Panel Die. Then I added foam stripes underneath and layer it on top of the rainbow color pattern paper from JJ’s Rainbow Paper Pad. I cut out two sizes of circles from Classic Frame Die and stamped the sentiment from Graduation Sentiments.To make my bottom circle outstanding, I simply added a slightly larger circle cut out using vellum paper.For my embellishments, I cut out a few matching graduation hats with Graduation Panel Die out of the same rainbow paper. Oh,  and a few clear drops to bring you more attention.

HOP WITH US!!!

Giveaway

  • For today’s hop, Waffle Flower is giving away $25 gift certificate to THREE lucky winners. You can leave a comment on this blog and along the hop by 11:59pm EDT on May 10th, 2020 for your chances to win. Winners will be chosen at random from the comments left on any of the posts in this blog hop and will be announced on the Waffle Flower Blog on 5/12/2020.
  • We are also hosting a Instagram hop today at 12:00 noon EDT. Follow me at alixsworld and Waffle Flower at @waffleflowercrafts so you don’t miss out!
Specials
  • A kind reminder from Waffle Flower:“We appreciate every order we receive but we also recommend at this time of uncertainties, reserve your resources and use what you have first! Stay positive and healthy!”
  • From now till 11:59pm EDT on May 10th, all orders at $50 and over, placed at waffleflower.com will receive a mysterious gift! 
  • For those of you who are new to Waffle Flower, they have a Last Chance section on their website that lists many goodies for 25% off until they are gone! This would be a great place to start your collection!

Waffle Flower 2020 Pattern Paper Release Blog Hop

Waffle Flower now offers pattern paper! These papers are designed by cardmakers, so expect to see some new and innovative approaches!
For example, Waffle Flower paper pads measure a generous 5.5 inches by 8.5 inches (half-page of US Letter size). They settled on this size to give cardmakers more paper and less waste! Simply fold each page in half to make a standard landscape A2 card. Or trim a page in half to make two A2-sized card fronts. This larger size can also be used for A7-sized cards (5″x7″). The beauty of our unique page sizing allows us to have half-half designs. For more details, visit their paper introduction page here.
For today’s Blog Hop, I have 6 cards using papers from 6 different paper pads from this release. Let us take a look.
<Card 1>

To begin with my first card, I created the background with frame using Ticket Frames Die out of a piece of paper from Half-Half Lines – Unicorn Paper Pad I attached the top frame onto the solid pink background using foam tape.

I stamped the images from Rejoice Rabbit stamp set and die cut with the Matching Dies. Then I colored it with copic markers. After I attached the image onto the background, I stamped the sentiment “Just for you” that comes from the same stamp set onto black cardstock and white embossed it. I hand cut it into a piece of skinny rectangle shaped paper and adhered it to the upper right corner of my card. At last, I added enamel dots from Stardust Enamel dots to finish the card.

<Card 2>

JJ’s Rainbows Paper Pad

Everyone loves rainbow.Right? I just cannot have enough with rainbow colors. I chose a piece of cardstock paper from JJ’s Rainbows Paper Pad Then I die cut all color stripes using Horizontal Stripes Die which makes the process goes very easily. I overlapped each stripes a little bit and attached onto an A2 sized card base. I chose Thank You Rainbow Die cut as my focal point of the card. To assemble the center piece, I used black, white and the rainbow stripes paper. And of course, I added my favorite color coordinating enamel dots from Up & Running Enamel dots.

<Card 3>

Modern – Neutrals Paper Pad

We are turning our focus onto a classic and elegant look now. I chose a piece of granite marble cardstock paper from Modern – Neutrals Paper Pad and cut it into rectangle shape that was slightly smaller than A2 sized card base. I created center inlay piece by using Nesting Squares Die. I cut out my focal sentiment using Oversized Thank You Die out of a piece of silver shimmer cardstock and also attached A2 sized silver card base to match the whole scene. It is just so simple and easy to mass produce piece for you to try.

<Card 4>

Half-Half Dots – Botanical Paper Pad

If you joined our last Waffle Flower Top 6 Favorite Blog Hop, you should know how much I love these froggies. I brought them into this blog hop as well LOL. To start with, I cut my upper frame using  Shutters Panel Die out of a piece of cardstock paper from Half-Half Dots – Botanical Paper Pad Then I hand cut the lines between the lines to modify the frame window as I desired. I attached the frame onto a background that I ink blended with Tim holtz distress oxide in Tumbled Glass and Salty Ocean.

I copic color all images from Toadally Stamp set and die cut with the Matching Dies. Then assembled them using liquid adhesive and foam tape onto my background. After I added the sentiment, I scattered some green enamel dots from Up & Running Enamel Dot.

<Card 5>

Half-Half Dots – Unicorn Paper Pad

A perfect wedding or anniversary card here for you! I die cut my frame using Cake Panel Die out of a piece of cardstock paper from Half-Half Dots – Unicorn Paper Pad and I attached it onto the solid dotted paper from the same paper pad. I copic colored my selected images from Love You Bunnies Stamp set and die cut with the Matching Dies.  I chose to die cut “always & forever” sentiment from Cake Panel Die and inked with copic markers in two shades of pink. I quickly assembled all the pieces to finish this card.

<Card 6>

Special Delivery Paper Pad

My last card only took me about 10 minutes from start to finish. I used Special Delivery Paper Pad to achieve this look. In my opinion, it is great paper pad for cardmaking starter, scrapbooker or someone who wants to create a dozen of cards in reasonable time frame. I cut out my top layer of card focal image with help of Nesting Postages Die. Then I layered it onto two more layers of rectangle shaped pattern paper. To create dimensions, I added foam tapes to each layer. In the end, I added some enamel dots from Stardust Enamel Dots to make this card a little more special.

HOP WITH US!!!

Giveaway

For today’s hop, Waffle Flower is giving away the entire Everyday Paper Bundle to THREE lucky winners. You can leave a comment on this blog and along the hop by 11:59pm EDT on April 12th, 2020 for your chances to win. Winners will be chosen at random from the comments left on any of the posts in this blog hop and will be announced on the Waffle Flower Blog on 4/15/2020.

Specials

  • A kind reminder from Waffle Flower:“We appreciate every order we receive but we also recommend at this time of uncertainties, reserve your resources and use what you have first! Stay positive and healthy!”
  • From now till 11:59pm EDT on April 12th, all orders at $50 and over, placed at waffleflower.com will receive a mysterious gift! 
  • For those of you who are new to Waffle Flower, they have a Last Chance section on their website that lists many goodies for 25% off until they are gone! This would be a great place to start your collection!

My Top 6 Favorite Waffle Flower Products Blog Hop

Waffle Flower turns 6 Today!!!

To celebrate, our design team and guest artists are here to share our Top 6 Picks of Waffle Flower! Let us check out what my picks now!


My Top 6 Favorite WFC products are:

Be Her Stamps and Dies

Toadally Stamps and Dies

Jungle B-Day Stamp and Dies

Tile Panel Die

Cloudscape Panel Die

Enamel Dots

*** Use code “LastChance” to receive 25% off when purchasing Toadally Stamps and Dies and Jungle B-Day Stamp and Dies***

<Card 1>

To create my first card, I first stamped the images from Toadally Stamp set using Memento Rich Cocoa ink over 80lbs neenah solar white card stock paper and die cut with the Matching dies. Then I copic colored them and  set aside for later use.

Then I die cut my background panel using Cloudscape Panel Die out of a piece white card stock paper and lightly inked them using Tim Holtz Distress oxide inks in Tumbled Glass and Worn Lipstick. I assembled my colored images using liquid adhesive and foam tapes. I stamped the sentiment that comes from this stamp set onto the background and added Stardust Enamel Dots to create the water droplets.

<Card 2>

For my second card, I stamped images from Jungle B-Day Stamp set using Memento Rich Cocoa ink over 80lbs neenah solar white card stock paper and die cut with the Matching dies. Then I copic colored them and  set aside for later use.

Then I die cut my background panel using Cloudscape Panel Die out of a piece craft color card stock paper. I removed the negative part of die cuts and layered the outer frame over a background that was created by ink blending using Tim Holtz Distress oxide ink in Twisted Citron and Cracked Pistachio. I assembled my colored images using liquid adhesive and foam tapes. I stamped the sentiment that comes from Flower Girl stamp set onto the background and added Up & Running Enamel Dots for decoration.

<Card 3>

For this card, I continued using the images from Jungle B-Day Stamp set that I used from last card, but I created a different background layout.

I first ink blended my background using Tim Holtz Distress ink in Tumbled Glass and Worn Lipstick to create sky and ground. Then I die cut a panel using Tile Panel Die out of white cardstock paper. I inked the panel die cut with Cracked Pistachio oxide ink and hand cut created 3 opening windows using scissors. I layered the panel using foam tape over prepared background to create dimension and added selected colored images. I stamped the sentiment from Flower Girl stamp set onto the center of panel and embellished my card with Up & Running Enamel Dots.

<Card 4>

For my last card, I am going to tease you all with a Soon-to-be-released product –> Lacy Layers 2 Dies.

To begin with this card, I set up my main color combo would be pink and blue. I die cut my two sized of panels using Lacy Layers 2 Dies and lightly inked them using Tim Holtz Distress oxide ink in Tumbled Glass and Worn Lipstick. Then I attached them onto an A2 sized card panel which I inked with Tumbled Glass oxide ink as well. I then stamped the unicorn image from Be Her Stamp set with Memento Tuxedo Black ink over 80lbs Neenah Solar white paper and die cut with the Matching dies. I color the unicorn with simple coordinating color combo. I stamped “Happy Birthday” from Flower Girl stamp set over white cardstock paper and hand fussy cut them out. I attached the unicorn image and sentiment over my background and added Up & Running Enamel Dots to finish the card.


HOP WITH US!

Promotions:
  • To celebrate its 6th Anniversary, Waffle Flower has been hosting lots of giveaways on its YouTubeInstagram and Facebook.
  • For today’s hop, Waffle Flower is giving away $100 gift certificates to THREE lucky winners. You can leave a comment on this blog and along the hop by 11:59pm EDT on April 8th, 2020 for your chances to win. Winners will be chosen at random from the comments left on any of the posts in this blog hop and will be announced on the Waffle Flower Blog on 4/10/2020.

  • We are also hosting an Instagram Hop among all team members that will go live at 12:00 noon EDT today! Don’t forget to join us there!
  • All of our giveaways open to worldwide participants age 16 and above!

Specials:

  • We do not want to encourage impulsive purchases so we are not hosting a sale. Use what you have or join our giveaways here on the blog and on our YouTubeInstagram and Facebook! Stay calm and healthy!
  • From now till 11:59pm EDT on April 8th, all orders placed at waffleflower.com will receive a mysterious gift! It’s a brand new product that will be released on April 10th! Sneak Peeks starts tomorrow!
  • For those of you who are new to Waffle Flower, they have a Last Chance section on their website that lists many goodies for 25% off until they are gone! This would be a great place to start your collection!